
Last week we created pages for days 1 through 10 for our Graphic 45 inspired December Daily Journal. Let's keep going today and create 10 more pages!

We have two more weeks (counting today) to make this one-of-a-kind mini album! Visit my blog each week for step-by-step directions, according to the following schedule.
If you missed week one, see the post for December 1st, gathering your supplies, binding techniques, instructions for creating the covers click HERE.
If you missed the post for week two, pages 1-10, click HERE.
Today: instructions for creating pages 11-21
December 22nd: instructions for creating pages 22-31
Each week, the Graphic 45 Blog will remind you to visit me to get the next set of directions for your project!
There are some unique pages to make this week, so let's get started!
Page 11
1. Cut chipboard to 5x8 inches.
2. Cover the front of the chipboard with Le Cirque Wizards of Wonder paper (5x8 inches). Sand all edges and distress with white pigment ink or white paint.

3. Cut an image from Christmas Past Victorian Greetings paper. Distress image and adhere to the right side of the page.
4. Attach sticker or cardstock word strips to the left edge of the image, as shown. Use foam tape to add dimension.
5. Attach the word "eleven" to the top left of the page. I cut my word from decorative paper (Teresa Collins). Attach with foam tape to add dimension.
6. Glue a metal Christmas tree embellishment to the right of the word.
Page 12
1. Flip page eleven over and decorate the back by covering the chipboard with Christmas Emporium Joyous Noel paper.

2. Sand all edges and distress with white pigment ink or white paint.
3. Use a library card or similar item as a journaling block. Ink edges with brown ink. Attach to left side of the page.
4. Decorate the bottom of the journaling block with an image cut from Christmas Emporium Special Delivery paper. (The tiny bingo card was cut from the packaging of a set of Jenni Bowlin bingo cards.)
5. Attach banner stickers and sticker numbers to the top right edge of the page. (Jenni Bowlin)
6. Punch binding holes.
Page 13
1. Cut chipboard to 5x8 inches.
2. Cover the front of the chipboard with An ABC Primer Bedtime Stories paper (5x8 inches). Sand all edges and distress with white pigment ink or white paint.

2. Cover the front of a Graphic 45 packaging tag with Christmas Emporium paper, making sure to use the portion of paper that has the Santa image. Trim.
3. Cover the back of the tag with the opposite side of Christmas Emporium paper. Trim. Sand all edges and distress with white pigment ink or white paint.
4. Place adhesive on three sides of the tag and attach to the page to form a pocket.
5. Glue glitter number "13" to the lower right of the tag. (American Crafts)
6. Tie red ribbon through the hole in the top of the tag.
7. Slide journaling tags into the pocket.
Page 14
1. Flip page thirteen over and cover with Christmas Emporium Toyland paper and trim. Sand all edges and distress with white pigment ink or white paint.

2. Cover a chipboard "14" with red Stickles glitter glue. Allow to dry, then attach to the upper left of the page.
3. Use a premade journaling block, and attach to the right side of the page. (Bo Bunny paper, edged with green ink)
4. Glue a Christmas Emporium chipboard shape to the bottom left edge of the journaling block.
5. Punch binding holes.
Page 15
1. Cut chipboard to 5x8 inches.
2. Cover the front of the chipboard with Christmas Emporium Toyland paper (5x8 inches). Sand all edges and distress with white pigment ink or white paint.

3. Adhere Graphic 45 number sticker staples to the lower right of the page. Decorate with a rub-on or stamped image. (Daisy D's rub-on)

4. Adhere a premade journaling block to the left side of the paper. Use a stamp, rub-on, or sticker letters to spell "wonder" across the bottom of the journaling block.
5. Use foam tape to attach a chipboard word strip to the upper right of the journaling block.
Page 16
1. Flip page fifteen over and decorate the back by covering the chipboard with An ABC Primer School Days paper.

2. Sand all edges and distress with white pigment ink or white paint.
3. Cut a postcard image cut from Christmas Emporium Believe! paper. Distress with brown ink and attach to the left side of the page.
4. Attach a premade journaling block to the right side of the page, as shown. (Bo Bunny paper)
5. Paint a chipboard number "16" with green paint. Allow to dry. Attach to the lower left corner of the page.
6. Punch binding holes.
Page 17
1. For page seventeen I used a page from a Graphic 45 Black Policy Envelope Album Staples. You can use any envelop that opens at the top, such as a coin envelope. I trimmed the envelope a bit, and re-glued the bottom to seal it.
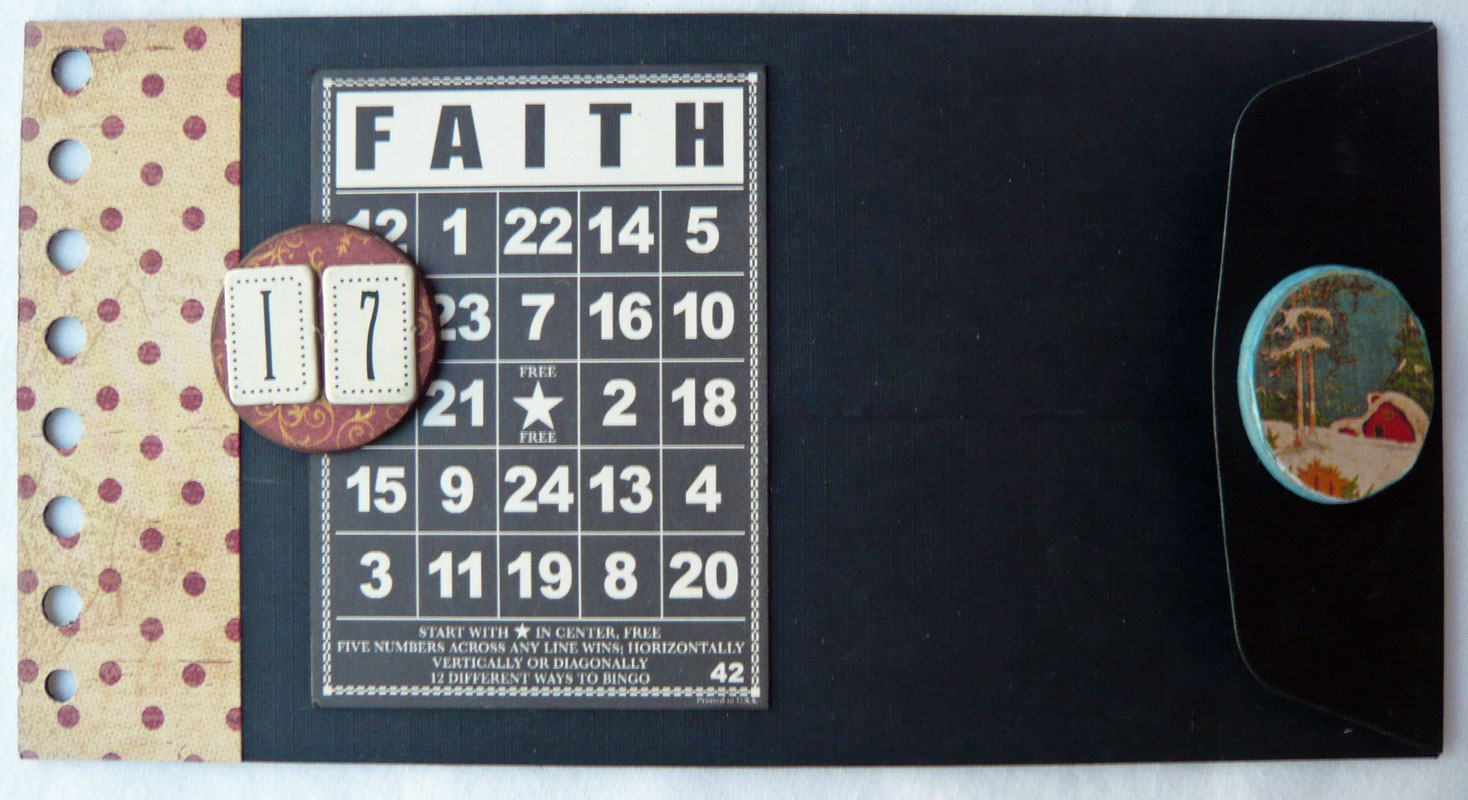
2. Distress with white pigment ink or white paint.
3. Cut a strip of Fashionista Vintage Cherries paper to 1 1/4 x 4 1/8 inches, distress with white ink, and attach to the left edge of the envelope.
4. Attach a bingo card (Jenni Bowlin) to the left side of the envelope.
5. Cover a chipboard circle with a scrap of paper, and attach the number "17" to the circle. I used some chipboard numbers that I found in my stash.
6. Embellish the envelope flap with another chipboard circle covered with paper.
Page 18
1. Flip page seventeen over and distress the envelope with white pigment ink or white paint.

2. Cut a strip of Fashionista Vintage Cherries paper to 1 1/4 x 4 1/8 inches, distress with white ink, and attach to the right edge of the envelope.
3. Trim a 2 1/4" circle from decorative paper and adhere to the top right of the envelope. Attach a sticker number "18" to the center of the circle.
4. Adhere sticker or rub-on snowflakes to the upper left of the number circle.
5. Use a larger snowflake rub-on to decorate the lower left corner of the envelope. (Little Yellow Bicycle).
6. Decorate the center of the large snowflake with a button and some twine. Add images cut from Christmas Past Letters to Santa.
7. Punch binding holes.
Page 19
1. Cut chipboard to 5x8 inches.
2. Cover the front of the chipboard with Christmas Emporium Happy Holidays paper (5x8 inches). Sand all edges and distress with white pigment ink or white paint.

3. Cut postcard image from Christmas Emporium Believe! paper and distress with brown ink. Attach to the right side of the page.
4. Adhere a bingo card (Jenni Bowlin) to the left side of the page.
5. Attach paper scraps to chipboard stars, and attach to the center of the bingo card as shown. Use foam dots for dimension.

6. Add a rub-on or sticker number "19" to the center of one of the stars.
Page 20
1. Flip page nineteen over and decorate the back by covering the chipboard with Fashionista Perfumeries paper. Sand all edges and distress with white pigment ink or white paint.

2. Cut a 2 1/4" circle out of paper or use a premade circle embellishment. Attach to the upper left of the page.
3. Cover a chipboard "20" with green acrylic paint. Allow to dry. Cover the numbers with a thin layer of glue and sprinkle with German glass glitter. Allow to dry, then attach to the circle.
4. Create a title for the page using rub-ons or stickers. (I used rub-ons from Marrah Johnson.)
5. Use a premade journaling block, and attach to the right side of the page. (Bo Bunny)
4. Glue an image cut from Christmas Emporium paper to a bottle cap and attach to the bottom left edge of the journaling block.

5. Punch binding holes.
Page 21
1. For page twenty-one I used a mini file folder (Pine Cone Press).

2. Cover the front and back of the folder with Fashionista Buttons a la Mode papers.

3. Cover the inside of the folder with Le Cirque Wizards of Wonder papers.

4. Distress edges with white pigment ink or white paint.
5. Attach Christmas Emporium chipboard tag to the front of the folder. Tie twine through the hole in the chipboard tag.
6. Cover a mini clothespin with scrap paper, distress with brown ink and use it to close the folder.
7. Attach a chipboard "21" to the bottom right of the folder.
8. Punch binding holes.
Come back December 22 for directions to Days 22-31!
Love this mini!
ReplyDeleteHugs from Brasil
This is great!!!
ReplyDeleteLove Love Love this book and thank you for all your hard work to make this tutorial for us
ReplyDeleteEnjoy
:)
TA
http://carbonescorner.blogspot.com
Oh my giddy aunt Gloria - you are amazing! I love this and all of those divine details - do you want to come and craft with me - what fun it would be - I would love a day inside your head - you are so creative!! Thank you for all the inspiration you bring us - I am loving it! {{{hugs}}}
ReplyDeletelove all the details Gloria!
ReplyDelete