


Graphic 45 will be choosing one random winner from this week's blog comments and announcing them on the blog on Monday, December 24th! So be sure to leave a blog comment for your chance to win!

Several years ago, I created a flip album for a workshop project that I was teaching. The original design came from a Close to My Heart demonstrator in approximately 2007. However, all good things come back into fashion, and I have always wanted to make another one of these minis with an updated flair. I have never had the time, until now! The Graphic 45 Place in Time collection inspired me to give it another go!
I used adhesives from Scrapbook Adhesives by 3L and Graphic 45 papers to create a Valentine's Day mini perfect for the sweetie my life!

The finished mini measures 6 x 6 x 3/4 inches. The basic construction directions are below. Once you have constructed the album, you are free to decorate it in any style you wish.
Basic Instructions
1. Cut (1) 6 x 12 piece of cardstock. Score at 2 1/4, 3, 9, and 9 3/4 inches.
2. Cut (4) 6 x 6 pieces of cardstock.
3. Attach 2 pieces of 6 x 6 cardstock to the 2 1/4 inch left flap at the 2 1/4 inch fold, sandwiching the flap between the cardstock. Repeat the process by attaching the other 2 pieces of 6 x 6 cardstock to the 2 1/4 inch right flap.
4. You will end up with a base page that is 6 inches tall and 19 1/2 inches wide. Score again at 6 and 6 3/4 inches from each end. This is your Album Base. Set this aside.

5. Cut (3) pieces of cardstock to 6 x 12 inches. Score each piece at 3 and 9 inches. Attach the three pieces of cardstock together by the 3 x 6 inch flaps to form a 6 x 24 inch section that has a center section with "doors."
6. Fold the two 3-inch center flaps towards the center.

7. Fold the 3-inch right flap in and fold the 6-inch right panel towards the center.
8. Fold the 3-inch left flap in and fold the 6-inch left panel towards the center. Now you have the Album Core. Once it is folded, it will measure 6 x 6 inches.
9. Attach the Album Core to the inside 6x6 center panel of your Album Base, by attaching adhesive to the back of the Album Core and placing it onto the center of the Album Base.
10. Fold the right panel to the center.
11. Fold the left cover panel to the center. (It may be helpful to label your “naked” panels and flaps prior to decorating.)
12. You may choose to ink all edges and folds.
13. Now you are ready to decorate!

If you find that your album is getting too "lumpy" you may have to increase your spines. Mine are 3/4 inches, but there is room to adjust them if necessary.

Decorate the cover with images, flowers, and other embellishments. If you plan to make your cover very ornate, you may want to decorate it last so that it does not get crushed while you are decorating the inside of the album.


Use approximately 30 inches of ribbon, sandwiched between the back cover and the front cover flap to tie your album closed.

This album is fun, with all its folds and flaps. There is a surprise at every flip!

Below are the photos of each page of the album.
I combined the NEW Place in Time Collection with lots of older Graphic 45 papers to create this red and pink extravaganza! I used the My Stik tape runner from Scrapbook Adhesives by 3L to glue everything down, and the 3D foam squares for added dimension.

The Place in Time Collection has a ton of images to choose from.

I used a hole punch to cut out this image, then glued it to a bottle cap.

There is lots of space for photos.

I created these glittery wings by inking chipboard wings with white pigment ink, then embossing with a glitter embossing powder. They are shimmery, but the glitter does not fall off!


I loved coordinating all the various papers and images. It was fun to just go crazy and create!

The Birdsong Harmony paper is the star of the show with the hot red and pale pinks!


This Saturday Evening Post image from the Place in Time January Cut-Aparts is my favorite image ever. I wish I had a pad of just that image!

I made sure to add journaling tags as well as photo mats throughout the album.

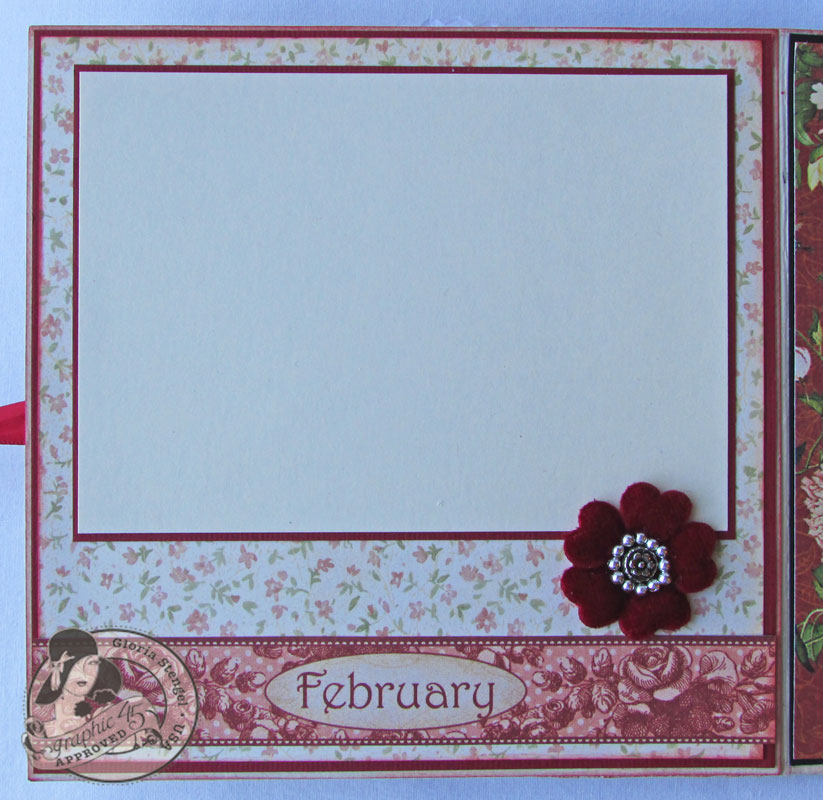
Postcards are my favorite vintage items. I love that all the newer Graphic 45 collections contain reproduction postcards. I used this one from the Place in Time February Cut-Aparts for my "door." I only glued it to half of the door, allowing the flaps to open.

Here is the left side open, which reveals the calendar image.

And the right side open.

With both "door flaps" open.

I trimmed down the February Foundation page from the 8x8 pad of Place in Time. I fussy cut the lower right corner and reattached it to form a photo corner.
I hope that you enjoyed my project. Continue on with the hop and see what the other designers have made, See the list below.
Graphic 45 Team
Dec 17: Sharon
Clare
Dec 18:
Gloria - YOU ARE HERE
Nicole
Arlene
Dec 19:
Jane
Susan
Maiko
Dec 20:
Laura
Betto
Tara
Dec 21:
Alberto
Kristin
Denise

Graphic 45 is a family owned and operated award-winning scrapbook and paper crafting company. We offer vintage inspired crafting products that capture the flamboyant style of the 1920's and 30's - with vibrant color, irresistible texture and imaginative design to create products with decades-old appeal that's both fresh and familiar. Let our products inspire your next scrapbook layout, card, album or home decor project.
Scrapbook Adhesives by 3L(r) has been delivering high quality adhesives to the craft industry for 10 years. We focus on a complete line of rigorously tested and approved adhesives that are safe for all of your crafts. Scrapbook Adhesives by 3L offers a range of products from high dimension 3D Foam to strong permanent and repositionable adhesive dispensers, tabs and sheets, along with photo corners and other memory keeping adhesive products. We provide value in easy to use products in a
>> variety of adhesives.Follow our blog at www.scrapbook-adhesives.com/blog, and find us on Facebook, YouTube and Pinterest too!

Graphic 45 papers:
Place in Time: January, February, June Cut-Aparts, February Foundation Page 8x8, Calendar Foundation Page, Stickers, Chipboard
Birdsong: Harmony
Baby 2 Bride: Unchained Melody, Endless Love
Domestic Goddess: Yours Truly, Simple as Pie
The Magic of Oz: Tenderhearted Tin Man
A Ladies' Diary: Chipboard, Stickers
Scrapbook Adhesives b 3L: My Stik Permanent tape runner, 3D Foam Squares
Cardstock: Bazzill Butter Cream; American Crafts Pomegranate, Black
Ink: Ranger Distress Fired Brick
Stamps: Stampers Anonymous Tim Holtz Collection Odds and Ends
Ribbon: Really Reasonable Ribbon
Brads: Creative Imaginations
Doily: Wilton
Flowers: Kaisercraft, The Paper Studio, Wild Orchid Crafts
Chipboard Clock: Teresa Collins
Chipboard wing: Maya Road
Glitter: Stampendous Kaleidoscope transparent glitter embossing powder
Sprays: Pro 31 Designs
Metal key: Tim Holtz Idea-ology
Punches: Martha Stewart heart border; Carl heart
Other: Scrabble tiles, bottle cap, mini lock, white glue
A gorgeous little album Gloria. This is one I definitely want to try. Thank you for sharing. ox Marg
ReplyDeleteBoth projects are wonderful...thank you for the instructions.
ReplyDeleteOh my gorgeous, Gloria! This design just makes my jaw drop! I love all the little flaps and flips....so much fun! How generous of you to share this magnificent design with us. You can bet I will be making one of these in the near future! Thank you!
ReplyDeleteI saw this album over on G45 before I got to your post in my Reader list... wow! Knocked my Christmas socks off! I pinned it immediately and am hoping to get back to it and try making one of these. It's gorgeous in both design and "papering/embellishing." Thanks for sharing it all including the directions.
ReplyDeleteWhat an amazing project to dazzle us. I have to try the flipbook, I love all the areas to decorate.
ReplyDeleteThanks for sharing.
OMWow, such a beautiful album! I sure want to give this type of album a try. Thank you for sharing your wonderful instructions with us.
ReplyDeleteThe album is beautiful. My mother loved the vintage look and she would have been thrilled if I could have made a book like this for her. Great job.
ReplyDeleteGloria this is amazing, unbelievable: I love it.
ReplyDeleteThanks so much for sharing all the pics and dimensions. I plan to try this ASAP.
ReplyDeleteThis is a fabulous little mini book! For the last month I have been interested in creating mini books and this one has jumped to the top of my "To Do" list!
ReplyDeleteGloria many thanks for posting the instructions for this album. It is fabulous. I will use your instruction to make one.
ReplyDeleteThis is gorgeous, Gloria! Thanks for sharing the process. I have to try to make one. Fabulous creation.
ReplyDeleteGloria, this is fabulous! Love how you folded these pages to make it so very interactive.
ReplyDeleteWhat a great idea, Gloria! I just love this project. I may have to pull the one I made out and give it another whirl, too:)
ReplyDeleteThis paper line is AWESOME! Thank you so much for the detailed instructions, too!
Love your album. Valentines is one of my favorites!
ReplyDeleteWOW! This is amazing! Beautiful creation~
ReplyDeleteFAB album Gloria - LOVE all the texture on the cover - just beautiful :)
ReplyDeleteWhat a great idea!I think I will try to make this.
ReplyDeleteThis turned out gorgeous Gloria! - great idea and wonderful with that new paper!!
ReplyDeleteYour album is so beautiful, Gloria! I really miss making minis, thanks for the boost of inspiration! xoxo, Arlene
ReplyDeleteLove this project! Can't wait to try it.
ReplyDeleteLove this project! Can't wait to try it.
ReplyDeleteLove the mini! Thanks for the instructions :)
ReplyDeleteI like your blog and your creations, this is an extraordinary project, thank you for sharing!
ReplyDeleteI have been a scrapper from few months and my blog seems to be an infant near a giant!
Merry Christmas from your new follower Laura from Milan
www.vive-lavi.blogspot.com
I loved this album so much, that I have now made three of them in the last four days, January, February and March. I've decided to make it a year long project. I will make all 12 months and use photos taken in those months to fill them. Thank you so much for the great idea, you've inspired me.
ReplyDeleteGloria, your album is just stunning. I have copied and pasted all your photos and instructions into a word document, so that I can make one, too. :) I love all the detail and all the love you put into it. xo
ReplyDeleteI truly love this album. What a great gift. Love Graphic 45 what great papers. I have never tried the adhesives but will have to try them sometime. If you like them they must be good. -Amy Kluchesky
ReplyDeleteGreat!!. Thanks for sharing!
ReplyDeleteabsolutely gorgeous!!!!!!!!!!! Thank you for the sharing !!!
ReplyDeleteWOW! This is just beautiful. I love what you have created and I LOVE G45! This is just marvelous....thanks for sharing such a great project and thanks for the great tips, too!!
ReplyDeleteI'd love to see a video tutorial on this...never thought to use just cardstock for the covers (always use covered chipboard).
ReplyDeleteI also LOVE the Norman Rockwellesque picture - would love to have that pic in individual sheets too! They should definitely make more in this style!!
How are you attaching the cardstock pieces to the base (like in step 3) without a hinge?
ReplyDeletethis is so cool and adaptable to any month.
ReplyDeleteWow Wow Wow Gloria. I really must have been sent to see this. I was browsing looking for inspiration and Oh what joy when I found this. I hope you don't mind if I have a go a making one of these ,solely for my own use. Its jaw dropping gorgeous. Thank you so much for sharing this with us. Hugs from Scotland. Rita xxxx
ReplyDeleteGloria, your mini album pattern is wonderful! I saw it, I made it, I love, love it. Did it as a grandmothers brag book and it was such fun and turned out super! I used a magnet for the clousure instead of ribbon. Of the 5 minis I've made, this is by far the best pattern, directions and result I've had. Definitely will be doing many more of these!
ReplyDeleteDo u have a tutorial
ReplyDeleteThe kit and tutorial for the beach version of this project is no longer available.
Delete