To see the IBS Challenge, please scroll down!
The Place in Time Collection contains wonderful images that are perfect for card making. I have decided to make one card for each month, using the monthly Cut-Aparts. I will present these in a five-part series.
Part I - January, February, March (Click HERE for the printable tutorial)
Part II - April, May, June (Click HERE for the printable tutorial)
Part III - July, August, September (Click HERE for the printable tutorial)
Part IV - October, November, December (Click HERE for the printable tutorial)
Part V - Storage box (Click HERE for the printable tutorial)
Each part will be available as a printable tutorial once they are released to the Graphic 45 Blog. Click the links above to print Part I, Part II, Part III, and Part IV.
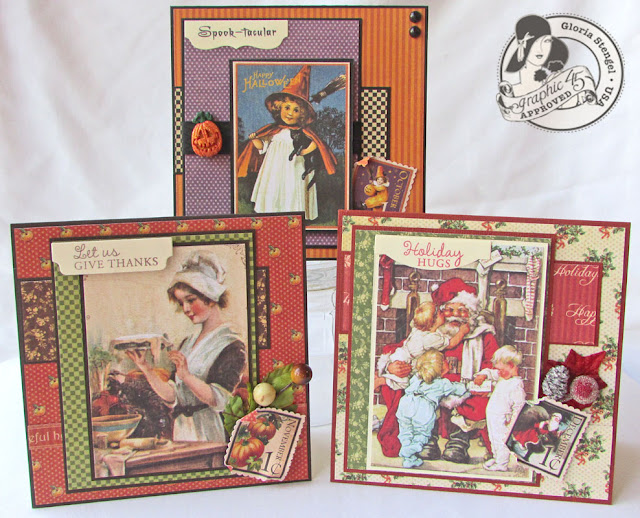
Each card will measure 5 x 5 inches and each set of the series will correspond to a card sketch. The cards for October, November, and December correspond to the sketch below. Each set of three cards will have a similar "feel" to them.
I used the same sketch for all three cards in Part IV of this series, but each card is unique. I used the papers and images from the monthly cut apart sheets and added a few embellishments and a sentiment to each card. Please notice that I did not use flowers for every card. I interpreted the sketch differently to fit the themes of the cards. I flipped the sketch and placed the flowers on the right in two of the cards.
Cut List: I do not provide you with a cut list for the cards because you are working from a sketch. If you wish to figure out the exact measurements of the layers, simply copy the image into a photo editing program or a text editor and print it at 5 x 5 inches. You can then measure each layer. The beauty of working from a sketch is that you can customize the card to meet your own specifications. (My measurements may not match the sketch exactly.)
Measurements: I try to keep to the standard of length x width for my measurements. Length means from the top of the card to the bottom. Width means from the left to the right.
Cardstock Mats: You will notice that all of my cardstock mats are 1/16 inches. To achieve this, cut your printed paper to size, and then increase the size of your cardstock by 1/8 inch. For example, if your printed paper measures 2 x 4 inches, then cut your cardstock mat to 2 1/8 x 4 1/8 inches. This will give you a 1/16 inch mat on all four sides. I work in 1/8, 1/4, and 1/2 inch increments for all of my projects. This makes measuring a snap!
Images: I trim my images from Graphic 45 paper, and then I use the Perfect Layers tool to achieve a 1/16 inch mat. You can use a paper trimmer, but I find it easier to use a craft knife and the Layers ruler.
October
The October card is a cute Halloween card. I adore vintage
images, and this little girl and her kitten is so precious.
Note: To achieve the 4 3/4 x 4 3/4 inch striped panel, I had
to combine two pieces of the printed paper. You will notice that the back of
each Cut-Aparts sheet has three printed designs. None of them is wide enough to
cut a 4 3/4 inch square. You have to get creative!
Cut one piece of the striped paper to 4 1/4 x 4 3/4 inches.
Cut a second piece to approximately 2 x 4 3/4 inches by inches. Make sure that
your stripes will line up properly before you cut your second piece of paper! Combine
the two pieces to form a 4 3/4 inch square. You may use a decorative paper
strip or some ribbon to cover the seam.
I attach some of my elements with dimensional tape to give
them "lift." When gluing ribbon to the cardstock, or when gluing
buttons to ribbon, I always use Beacon Fabri-tac. It "grabs" the
fabric qualities of the ribbon and seems to hold up to handling and mailing.
November
Here in the US ,
we celebrate Thanksgiving in November. I love this image of the little
"Pilgrim" girl making a pie.
Follow the same steps that you used for the striped paper
above to "stretch" the dotted paper for this card. The paper strip
will cover the seam.
December
This adorable image of Santa and the children is perfect for
December!
You will once again, piece the floral paper together to make
a 4 3/4 inch square panel. I chose not to cover the seam as it is not very
visible.
I hope you enjoyed Part IV of this card series. This is the
last set of cards. Part V will be a decorative box to hold all 12 cards in the
series.
If you have any questions, email me at stengelgloria@gmail.com.
Graphic 45 papers:
Place in Time: Cut-Aparts (October, November, December) - you
will need TWO (2) sheets for each month
Cardstock: Bazzill Cajun, Java; American Crafts Black;
Stampin' Up! Very Vanilla
Ink: Tsukineko Memento Tuxedo Black, Rich Cocoa, Rhubarb
Stalk
Stamps: Crafty Secrets (Halloween Fun); Waltzing Mouse (Basket
Additions)
Ribbon: Really Reasonable Ribbon
Leaves and floral: Michael's Crafts
Button: All Dressed Up
Pearls: Want2Scrap
Scrabble tiles: unknown
Die Cuts: My Favorite Things Die-namics Mini Tabs Quartet
Tools: Sizzix Big Shot; Fiskars postage edge scissors
Adhesive: Scotch 3M tape; Beacon Fabri-tac; Aleene's Tacky
Glue; Scrapbook Adhesives by 3L foam squares; Scor-tape


I have totally enjoyed your card series. Can't wait for the box. I think I will give the whole set to
ReplyDeletemy Mother for Mother's day. I'll be
sure to give you credit.
What a beautiful cards you make.
ReplyDeleteI can't wait for the box. And will sure look what there is more on your site.
Greatings from Holland.
This has been a wonderful card series, Gloria. You have such a fabulous eye for design and color. These are full of life, full of joy....Thanks for sharing!
ReplyDelete