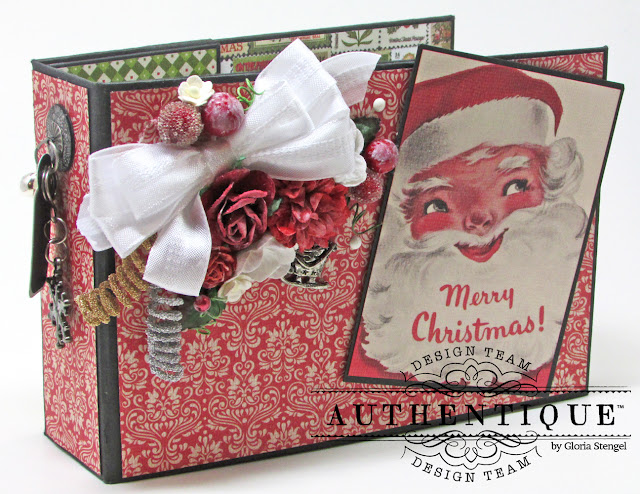
I was sent the Christmas/Winter Collections to work with, and for my first project I decided to create a mini album with the Vintage Christmas Collection. Which is right up my crafty alley!
This jam-packed mini album measures 4 1/2" tall by 6 1/2" wide, with a 1 3/4" spine. I created the album from chipboard and added three page sets to the inside. Each page set has multiple flips, folds, tags, and pockets!
The chipboard is wrapped with black cardstock to create a wonderful border for the beautiful paper. The red and green color scheme of Vintage Christmas has black accents and wonderful vintage imagery. I used the Vintage Christmas Collection Kit (with Stickers) and the Vintage Christmas Bundle (6x6 Paper Pad) for this project.
This fun and chunky book is filled with places for photos, journaling, and memorabilia.
The book measures more than twelve inches when opened. Since paper and cardstock only comes in 12" x 12", I wanted to share a tutorial for covering your book base.
Cut black cardstock to 6 1/2" x 12" and draw a line 1" from the right edge as shown. Cut a second piece of black cardstock to 6 1/2" x 6".
Place double-sided adhesive on the 1" section, as shown. Then, attach the smaller piece of cardstock to that one-inch tab, making a piece that is 6 1/2" tall by 17" wide.
Cut two pieces of heavy weight chipboard to 4 1/2" x 6 1/2" for the front and back covers. Cut another piece of chipboard to 4 1/2" x 1 3/4" for the spine.
Place the chipboard onto the center of the black cardstock. Make sure to leave 1/8" spaces between the spine and each cover. Add adhesive around the edges of the cardstock. Angle the corners.
Wrap the cardstock around the chipboard as shown. Make an accordion-fold page hinge. I created mine to be 4 1/4" tall with 1/2" page tabs and 3/4" gutters. I have three page tabs.
(Please note: the hinges are too tall! I had to cut mine at an angle to get my pages to fit! Make your hinges a 3 7/8" tall instead, for 4" tall pages!)
Place the hinge mechanism onto the spine. Add double-sided adhesive to both sides of each hinge tab.
I created my page sets from black cardstock. I folded the cardstock in various formats to create my pages. Each page measures 4" x 6", slightly smaller than the covers. The book is pretty packed, but it still closes nicely!
I did not create a tutorial for making the page sets. You can find many of these types of tutorials on YouTube or poke around here on the blog to see others that I have made. In all honestly, I totally forgot to take step-by-step photos! I just went to town making!
Once I had my book all assembled, I decorated the cover and the inside pages. I wanted to use one of the sweet ephemera cards for the front, and chose this kind, smiling Santa image!
I glued a cluster of ribbon, flowers, and charms to the book cover to give it a vintage Christmas feel.
I dangled some charms, along with one of the sticker tags, from the spine of the album. When working with sticker elements, I always attach them to cardstock for extra stability. Lucky for me, I had a die cut template to exactly match this tag sticker!
Check out all those pages, pockets, and tags! Christmas eye candy!
I also created a pocket for both the inside font cover and the inside back cover. The pockets are perfect for a large tag or extra photos.
Some of the pages have pockets and some are plain, for adding photos.
Other pages have flaps and hidden pockets!
The pages are decorated simply with enamel dots, stickers, and other small embellishments.
This mini has far too much to see for a photo spread. Editing umpteen million photos is so boring! So...
If you want to see every page, plus all the tags and pull-outs, please visit my YouTube video, linked above! Grab your hot cocoa and get ready for Christmas music!
Thank you so much for looking! I have projects scheduled on the Authentique Blog for November 29, December 15 and 29 also. After that...who knows?!
Paper and Stickers: Authentique Vintage Christmas Collection (Collection Kit with Stickers, Bundle 6x6 Paper Pad)
Cardstock: WorldWin Papers ColorMates Smooth Midnight
Acrylic paint: Plaid Folk Art Wicker White
Markers: Stampin' Up Basic Black, Ruby Red, Old Olive
Die cuts: My Favorite Things Stitch Mini Scallop Stax, Spellbinders Back to Basics Tags
Punches: Fiskars scallop border, Stampin' Up various circles, Creative Memories corner rounder
Ribbon: Really Reasonable Ribbon White Satin with Stitched Center
Flowers: Wild Orchid Crafts, Petaloo
Berries: Floral supply
Spiral stamens: Wild Orchid Crafts
Enamel dots: Your Next Stamp Gumdrops White Sugar and Sparkle, Simple Stories DIY Chirstmas
Sequins: Craft Medley
Charms: Tim Holtz, Funkie Junkie, Treasured Memories
Heavy weight chipboard: WorldWin Papers
Tags: Graphic 45 Large - black
Vintage Santa ornament: my stash
Adhesive: hot glue, Scor-tape, ATG tape, foam, multi medium


Fabulous album with those gorgeos papers, - love it!!
ReplyDeleteBeautiful and fantastic!!
ReplyDeleteAWESOME. Yep that’s what it is.
ReplyDeleteFabulous Vintage Christmas album...love all the pages and layers! Congrats on the Guest Spot with Authentique!
ReplyDeleteThank you for the continued inspiration. I love all that you do and Authentique is some of my favorite card Stock . Can't wait to see what you create next.
ReplyDeleteThis is such a fun album - and the paper collection brings back so many memories of my childhood (am I dating myself? LOL). Love the way you've created so many elements on each of the signatures, or book pages. Lots of real estate for photos and journaling!
ReplyDeleteAs always, an inspiration. Thanks for sharing.
This is adorable. Thank you so much for sharing the tutorial. I'm off to the rubber room!!
ReplyDeleteI very seldom comment, but feel I must: what a beautiful album! You used appropriate items to embellish. I can't believe the number of people who over-do their albums with lace, things sticking out, and poor, poor Craftsmanship!!!! You are different . Your presentation, and album, are professional, NEAT, AND USE EXCELLENT CRAFTSMANSHIP. BRAVO!
ReplyDelete