I sorted through my Heartfelt Creations papers to find papers with the same color tone as the wild orchid spray, and created this dimensional card. The purple poppies literally pop off the page!
Start by creating a 5" x 6" card by
trimming black cardstock to 5" x 12" and scoring at 6" on the
long side to make a 5" x 6" top-fold card. Trim border paper from the
Cut Mat Create Paper Collection to 4 7/8" x 5 7/8" and wrap a length
of white satin ribbon around the paper on the lower section of the pattern.
Attach the ribbon at the back of the paper, and adhere the paper to the card
front.
Trim floral paper from the Cut Mat Create Paper Collection to 3 7/8"
x 4 7/8" and mat with black cardstock cut to 4" x 5". Attach
panel to the top of the card front at an angle. Trim purple text paper from the
Butterfly Medley Paper Collection to 2 7/8" x 3
7/8" and mat with black cardstock cut to 3" x 4". Attach the panel
to the right side of the card at an angle. Trim purple and green print paper
from the Cascading Fuchsia Paper Collection to 1 7/8" x 2 7/8" and
mat with black cardstock cut to 2" x 3". Attach panel to the left
side of the card at an angle.
Stamp the Blazing Poppy Petals Cling Stamp Set twice onto white cardstock with gray ink. Color the flowers by spraying the paper with the Art Anthology Wild Orchid Colorations Spray and allow paper to dry. Use the Blazing Poppy Die to cut out the flowers. Shape the flowers and assemble one large and one small flower by gluing the layers together. Stamp the leaves from the Delightful Daisies Cling Stamp Set several times onto white cardstock with black ink. Color the leaves with distress ink and use the Delightful Daisy Die to cut out the leaves. Assemble the large dimensional flower and the leaves on the lower center of the card. Add a white satin bow to the left edge of the flower.
Stamp the sentiment from the Heartfelt Sentiments Cling Stamp Set onto white cardstock with black ink. Use the large tag die from the Luggage and Tags Die to trim out the sentiment. Sponge the edges of the tag with Thistle pigment ink and attach the tag to the right top of the card with foam adhesive. Cut the small vine from the Cut Mat Create 1B Die out of a scrap of green paper. Attach the vine and the small dimensional flower to the tag as shown.
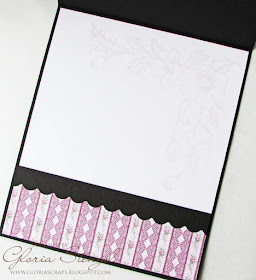
Decorate the inside of the card by cutting white cardstock to 4 7/8" x 5 7/8" and stamping the corner image from the Poppy Corner and Border Cling Stamp Set with Thistle pigment ink onto the upper right corner. Trim Cut Mat Create paper to 4 7/8" x 1 3/4" and attach to the bottom of the white panel. Use a border punch to create a decorative border from black cardstock. Trim the border to 4 7/8" wide and attach it to the top of the printed paper. Attach the panel to the inside of the card.
Thanks for stopping by! Visit the Heartfelt Creations Blog for more inspiration!
Products Used:
Other products used:
Cardstock: WorldWin Papers Black, Stampin'
Up Whisper White
Ink: VersaFine Onyx Black Instant Dry Pigment, Stampin'
Up Going Gray Dye, Clearsnap Colorbox Thistle Pigment, Ranger Shabby
Shutters Distress, Art Anthology Wild Orchid Colorations Spray
Ribbon: Really
Reasonable 1/4" white satin ribbon
Tools: Sizzix Big Shot, My Sweet Petunia MISTI,
Fiskars border punch, hot glue gun
Adhesive: Scotch ATG tape, Scrapbook Adhesives
by 3L 3D Foam Squares, hot glue sticks


Wow! What a gorgeous card, Gloria. I love those beautiful poppies. They are stunning. All of the purple papers are so pretty. Amazing design!
ReplyDeleteSo beautiful! It would bring a smile to anyone that saw it...such lovely, happy colors and layout. Great flower, too!
ReplyDeleteBeautiful card!!! love the color!!!
ReplyDeleteWOW!!! This is stunning! Love the colors and such a gorgeous design! Thank you for the inspiration Gloria :) I always look forward to your new projects, always so beautiful, elegant and inspiring! Have a wonderful day!
ReplyDeleteStunning, love the layers and the flower is just breathtaking!!!
ReplyDeleteI absolutely love the color of your poppies this week! The decorated inside of the card is such a nice surprise too!
ReplyDeleteThis is absolutely gorgeous!!!!!
ReplyDeleteStunning card. Love the design. Nicola x
ReplyDeleteWhat a beautiful color for the poppies Gloria! Love the design of the card!
ReplyDeleteYou are the Queen of Layers! I love those staggered panels of designer paper. It just makes the whole card feel alive. Then you top it with those amazing flowers and I'm completely gobsmacked. This is so feminine and soft and lovely....and your poppies are gorgeous!
ReplyDeleteHi Gloria, Great color for the flowers! Such a pretty card. Hugs
ReplyDeleteGloria, I love the yummy purple color scheme of this card. Your purple poppies are just stunning!
ReplyDeleteHugs,
Tracey