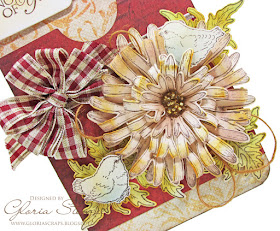
I cannot create enough tags, especially if I have a chance to use the Graphic 45 Tag Staples! The regular size tags are perfect for creating altered gift card holders. I created this beautiful tag with a pocket to hold a gift card, some cash, or a love note! {giggle}
By this time of the year, I am sick of hot weather and dream of cool, crisp days. I may as well keep dreaming, because that is NOT happening any time soon here in Southern California! I do what I can by creating with fall colors and decorating my house for fall.
Create a 5 3/4" x 3 7/8" pocket tag by covering a Graphic 45 Regular Kraft Tag with paper from the Farmers Market Paper Collection. Trim around the tag and use a 5/8" circle punch to punch a hole for the grommet. Sponge the edges of the paper with Rich Cocoa ink.
Trim Blazing Poppy paper to 4" x 3 7/8". Use a 1 1/4" circle punch to cut a notch out of the top of the Blazing Poppy panel. Sponge the edges of the paper with Rich Cocoa ink. Attach double-sided tape to both sides and the bottom of the notched panel and adhere it to the tag, 1/2" from the bottom edge, creating a pocket.
Wrap a length of plaid ribbon around the tag, 3 1/4" from the bottom edge. Secure the ribbon at the back of the tag. Cover the back of the tag with a 4" x 3 7/8" piece of Farmers Market paper, thus hiding the ribbon ends.
Stamp the Enchanted Mum Cling Stamp Set two times onto ivory cardstock with Rich Cocoa ink. Color the flowers with various brown and tan chalk inks, then "dust" the edges of the petals with Spiced Marmalade Distress ink. Use the Enchanted Mum Die to cut the flowers.
Shape two large, one medium, and one small flower into one mum, as shown. (Watch THIS Video to learn how to shape the Enchanted Mums.) Use Glossy Accents to add gold micro beads to the flower center. Glue the large mum to the lower right side of the tag.
Stamp the large leaves from the Delightful Daisies Cling Stamp Set twice and the small leaf once onto ivory cardstock with Rich Cocoa ink. Color the leaves with green chalk inks, and then sponge a bit of Spiced Marmalade Distress ink onto the edges. Use the Delightful Daisy Die to cut out the leaves, and then shape them. Tuck the three leaves around the edges of the large mum as shown.
Stamp the birds from the Birds and Blooms Cling Stamp Set onto ivory cardstock with Rich Cocoa ink. Color two birds with chalk inks and use the Birds and Blooms Die to cut them out. Use foam adhesive to attach two birds to the flower embellishment. Tuck a few loops of antique gold burlap string under the upper left and lower right edges of the flower and glue in place. Tie a bow with plaid ribbon and attach it to the upper left edge of the tag.
Stamp the sentiment from the Heartfelt Sentiments Cling Stamp Set onto ivory cardstock with Rich Cocoa ink. Use the Spellbinders Back to Basics Tags die to cut out the sentiment. Sponge the sentiment with Spiced Marmalade Distress ink before removing it from the die. Then, sponge the sentiment edges with Rich Cocoa ink. Use foam adhesive to attach the sentiment to the top left of the tag, lining up the hole in the sentiment tag with the grommet of the large tag. Place a decorative brad into the hole and secure. Place a gift card into the pocket.
Thanks for stopping by! Visit the Heartfelt Creations Blog for more inspiration!
Heartfelt Creations Products Used:
Other Products Used:
Spellbinders dies: Back to Basics Tags
Cardstock: WorldWin Papers Smooth Natural
Ink: Clearsnap ColorBox Fluid Chalk Ink (French Blue, Dark Moss, Chestnut Roan), Clearsnap ColorBox Pigment Ink (Cocoa, Raw Silk), Ranger Spiced Marmalade Distress Ink,
Trims: Really Reasonable Ribbon plaid ribbon, antique gold burlap string
Tag: Graphic 45 Regular Kraft Tag Staples Album (one tag)
Brad: Stampin' Up
Gold micro beads: craft supply
Tools: Sizzix Big Shot, MISTI stamp positioner, Stampin' Up 5/8" and 1 1/4" circle punches
Adhesive: Scotch 3M ATG tape, Scrapbook Adhesives by 3L 3D Foam Squares, Aleene's Fast Grab Tacky Glue, Scor-tape, Ranger Glossy Accents
Brad: Stampin' Up
Gold micro beads: craft supply
Tools: Sizzix Big Shot, MISTI stamp positioner, Stampin' Up 5/8" and 1 1/4" circle punches
Adhesive: Scotch 3M ATG tape, Scrapbook Adhesives by 3L 3D Foam Squares, Aleene's Fast Grab Tacky Glue, Scor-tape, Ranger Glossy Accents


love the vintage feel you created with this card, beautiful mum and like how you brought in the birds from the birds and bloom collection fabulous.
ReplyDeleteJust beautiful.
ReplyDeleteGreat looking tag Gloria, I just love the chrysanthemum flower it looks beautiful.
ReplyDeleteLove ~ Lady Anne xx
Anne's Paper Dream's Blog
Lady Anne Milnes-Howard of Glencairn, Caithness Scotland.
Beautiful tag Gloria! For some reason tags just intimidate me...but today you've inspired me to perhaps give it another try! Love the color palette you've chosen... and your mum is stunning!
ReplyDeleteHugs,
Tracey
Hi Gloria, Love this little tag..so cute with the birds and the mum flower is great...what about that bow..love it! Hugs
ReplyDeleteThis is such a sweet tag...and adding the birds in with the mums was such a clever design choice. Love it!
ReplyDeleteWonderful style, love the plaid gingham ribbon - the perfect touch to this sweet tag!
ReplyDelete