I don't have school-age kids any longer (and that is so hard to believe), but I still love school supplies and back-to-school sales! My youngest is in his second year of college, and informed me he did not need my help in buying school supplies or clothes! Whatever! {insert pout face}
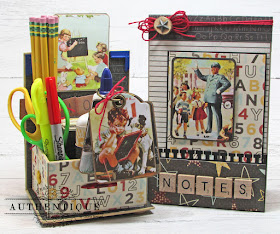
To make myself feel better, I made this super cute tool caddy and a matching altered notebook. There is no law that says I cannot have fun school stuff on MY desk, right?! I adore the vintage images in the Authentique Studious Collection. (This is an older collection, which can still be found online. I linked you to one online store that still has it.) I added a few bits of Authentique Accolade as well.
My little caddy can hold four sticky note pads, a bundle of pencils, a large bottle of glue, scissors, and pens! It's perfect for the teacher's desk, a student's desk, or even mom's desk at home!
Let's make one!
I started out with a little papier-mâché box (Graphic 45 ATC Book Box). The box is small, only about 4 3/4" x 3 1/2" x 2 1/2".
The style of box that I chose has an attached lid, that is really covered chipboard, scored to "hinge" open. You can use any style of box you desire.
I started out by cutting a thin piece of chipboard to 6" x 4 3/4" and attaching it to the back of the lid, too keep the lid from closing or bending.
I then glued the lid to the back of the box so that it would stay open permanently. I did attach my decorative paper to the lid BEFORE attaching it to the box. For the area around the "base" of my caddy, I cut small strips of the same paper and glued them in place. I found tweezers to be very helpful with this part!
I continued to add decorative paper to all the box surfaces. I found some fun school embellishments in my stash to add to the box as well. The Studious Collection has some wonderful ephemera cards that make wonderful decorations.
Here is the back of the box. I covered that extra piece of chipboard with paper and added an accent with the punched paper strip.
I wanted my box to have "feet" and I tried a few different variations before I settled on these wood buttons. They are about 7/8" wide, about the size of an American quarter.
I decided to cover a few sticky-note pads and add those to my box, along with some pencils.
The note covers are easy to make. Just cut kraft cardstock to 6 5/8" x 3 1/8" and score at 3 1/8" and 3 1/2". Fold and burnish the score lines. Attach one note pad inside each folder with some double-sided tape.
Decorate the covers as desired. Wrap a piece of the decorative paper around the bundle of pencils and secure with tape. Tie a bit of twine around them as well.
I also wanted to "jazz up" my glue bottle. Plus, the box I used contained three ATC-sized tags and a binding ring. Not one to let them got to waste (or go into the "where all supplies go to die bin"), I decided to die-cut some of the ephemera cards to fit the tags! Now I have a little bundle of tags, which look super cute hanging from my glue bottle!
The tags are perfect for book marks or gift tags. To cover the glue bottle, I just cut a few strips of the paper and wrapped them around the bottle, securing them with tape at the back.
Here is my caddy, all stuffed with goodies! It holds the four note pads, the bottle of glue with tags, the bundle of pencils, plus two pairs of scissors, and two pens. Perfect for teacher's desk...or for mine! {grin}
But, we all need a pretty notebook, too! Right?! The notebook is a standard 8" x 5" notebook, but cover it with pretty paper and it becomes a something fun and personalized.
I just trimmed kraft cardstock to 10" x 5 1/8" and wrapped it over the top of the notebook. I secured it to the back of the notebook with tape. I used more of the paper and ephemera cards to decorate the front of the notebook.
I also had lots of extra letter tiles in my stash, so I used those to spell out "notes" for my cover.
I found the fun "to do" notepads at the Dollar Store, but they are the same size as the regular "yellow" notepads you can find in any office supply department.
Thanks for dropping by! I wish all of you a happy First Day of School. As I said, only one of my children is still in school and he's in his 2nd year of college! Time flies....it does indeed!
Authentique Supplies Used:
Authentique Studious 12x12 Paper Pad
Authentique Accolade 12x12 Paper - Accolade One
Other Supplies Used:
Papier-mâché box: Graphic 45 ATC Book Box - Kraft
School-theme embellishments: various
Chipboard: Grafix
Wooden buttons: craft supply
Cardstock: WorldWin Black, Neenah Desert Sand
Note pads: office supply
Twine: red baker's twine (source unknown)
Letter tiles: wood Scrabble tiles
Wood tile: Maya Road
Metal star: Tim Holtz
ATC tags: Graphic 45
Corner rounder: Kadomaru Pro
Border punch: Fiskars
Adhesives: Scor-tape, ATG tape, glue


Gloria, this is such a practical project. It can be adapted so well for a variety of events and occasions. tfs
ReplyDeleteThanks sooo much for another really great tutorial here, it´s just fabulous and I´m sure my grandkids are going to love it.
ReplyDelete