Pages
▼
Friday, November 22, 2019
Magical Christmas Box - Graphic 45 Tutorial
Good morning G45 Fans! Raise your hand if you still have to do your Christmas shopping and/or wrap gifts! {My hand is WAY up!} I have made a sweet box to store Christmas tags plus all the things you need to label your gifts!
This sweet box is 8 1/4" x 5 1/2" x 2". It is perfect for holding all sorts of things, from a small gift to home baked goodies. It is easy to decorate it in any theme or style you wish!
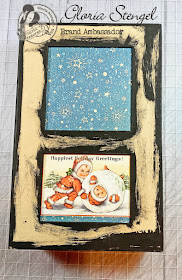
The box closes with a very strong magnet, but I added a handle to mine to make it easy to open. The Graphic 45 Shabby Chic Door Pull is perfect for this project. The box is a discontinued G45 product (Kraftboard Altered Art Box), but HERE is a similar box. I created shaker boxes for the two "widows" in the box!
The box is decorated with a combination of Christmas Magic and St. Nicholas paper collections. Both are retired, but you can use any paper you have in your stash. (You can still find Christmas Magic online.)
My box has a gift list (on the right panel) and a stash of gift tag supplies! I added some simple tags, some twine, adhesive, scissors, and a pen to my box. This would be a great gift for an older person or someone home bound. In fact, it's perfect for anyone who is always looking for their wrapping supplies!
Here is a little tutorial.
Paint all the edges of the box with your choice of color. I used black acrylic paint. Make sure you open the box and allow all the edges to dry.
Trim a piece of decorative paper a bit larger than each window and glue to the back of the front flap. I used an ephemera card for the bottom window.
Place your shaker items into each window. I used sequins and coarse glitter for my shaker elements. Use foam tape and clear plastic to create shaker boxes out of the windows. I used a transparency sheet for my clear plastic. You could also use a pre-made shaker if you can find one that fits the holes/windows.
I also added foam all around the top of the box so that everything would be level.
Add strips of black cardstock to cover the unsightly foam and adhesive.
Add your decorative paper over the black cardstock. Decorate around each window as desired. I used some sticker strips and fussy cut elements for the top window.
For the bottom window I used some die cut shapes and other holiday embellishments. I also added a handle to make it easy to open the box.
The shaker elements are so much fun! It is perfect with the Kewpie doll kids from the Christmas Magic Collection!
Add decorative paper to all the other surfaces of the box. I trim each piece slightly smaller than each panel to allow some of the black paint to show around the edges.
The focal image from the G45 Signature sheet works great for the inside panel! I added a die cut snow bank to the bottom of the panel.
Create a little list pad from a few stacked ephemera cards or a notepad. Attach the notepad to the right panel so that when the box is closed it sits over the opening and does not catch on the box edges.
Fill the box as desired. I trimmed out some gift tags and added some of the small ephemera cards to use as gift bag tags and gift labels. I also placed some adhesive, string, a pair of scissors, and a pen into my box.
Thanks for stopping by today! I will see you back here tomorrow for another project in the Power Poppy Christmas Remix Hop!
Graphic 45 Supplies Used:
Shabby Chic Door Pull
Kraftboard Altered Art Box(retired, similar HERE)
Christmas Magic Collection
St. Nicholas Collection (retired)
Other Supplies Used:
Cardstock: WorldWin Papers (black)
Snowflake buttons: Buttons Galore
Enamel dots: Eyelet Outlet
Sequins: Craft Medley, Pretty Pink Posh
Glitter: Martha Stewart
Acrylic paint: craft supply
Clear transparency: office supply
Dies: Sizzix photo corner), My Favorite Things (stitched snow drifts, stitched scallop frame), Elizabeth Craft (frames)
Vintage snowy tree: Tim Holtz
Adhesive: ATG tape, Scor-tape, hot glue, white glue, foam tape


No comments:
Post a Comment
Due to high levels of SPAM, your comment will be moderated and approved as soon as possible. Thank you for taking the time to visit and comment.