A few months ago, I used a "drawer" from a Graphic 45 8x8 Altered Art Matchbook Box for a shadowbox, but I had kept the "box" portion. I did not want to toss it out. (Let's face it; I hoard!) I was wondering what to do with it and decided it would make a super cool cover for a mini album. Well, I got stuck on how to make the spine. (I had done this once before, but never wrote it down!). And then Sharon and Susan from the 2012 G45 team both helped me out! Sharon made a very nice altered book HERE and Susan shared how to create a spine HERE. And I was "unstuck" and ready to roll again!

I am so happy I kept the box. I turned the box portion into a mini album. I used 12x12 French Country papers and embellishments to make a cute 8x8 mini. (Please note that you may need 3-4 sheets of some of the prints to create this mini album. Feel free to substitute other papers.)
To create this album, follow the directions below.
1. Cut the box apart so that you have a front cover and a back cover, each measuring slightly larger than 8x8 inches.
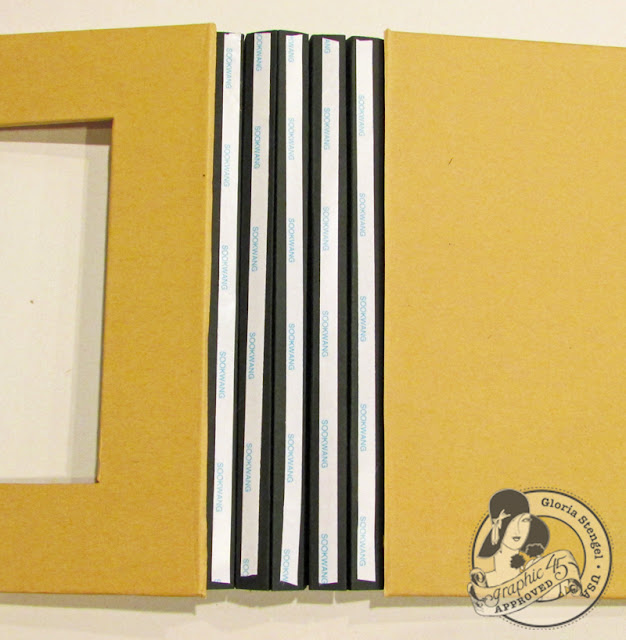
2. Place strong adhesive on the two interior edges as shown.
3. Create a cardstock spine. Cut black cardstock to 8 1/4 x 12 inches. Score the long edge at: 1", 1 1/2" 2 1/4", 3", 3 1/2", 4 1/4", 5", 5 1/2", 6 1/4", 7", 7 1/2", 8 1/4", 9",9 1/2", 10 1/4", 11". Fold the cardstock in a fan-fold method. Glue the 3/4" sections together to form "tabs." Glue the spine to the covers as indicated.
4. Flip the book over and place strong adhesive on the spine.
5. Trim cardstock to 8 1/2 x 2 5/8 inches and attach to the cardstock spine. Make sure there is a gap between the covers and the spine to allow the album to close.
6. Trim Graphic 45 French Country Sunflower paper to 8 1/2 x 4 inches and cover the spine.
7. Cover the font of the album with Promenade paper, cut to 8 1/2 x 8 inches. Trim out the center. Decorate the cover as desired, using French Country Cardstock Banners, Chipboard Tags, Cardstock Flowers, and various image cut from the papers.
8. Cover the back with Promenade paper cut to 8 1/2 x 8 1/4 inches. Decorate the back and spine as desired.
9. To see a tutorial for creating the paper flower click HERE.
10. Using the spine "tabs," you may attach up to 5 pages to your album (10 sides).
11. Decorate the inside front cover with Promenade paper. Cut out the center. Add a ticket sticker to the top center.
12. To make the pages studier, attach each right-hand page to a piece of kraft cardstock. For page one, cut Montage paper to 8x8 inches and attach to the spine tab. Add stamped images and other French Country embellishments. Place a black, 5x5 inch photo mat in the center of the page.
13. Attach 8x8 inch reverse Sunflower paper to the back of page one to form page two. Add a strip of Sunflower 8x1 inch Sunflower paper to the left edge. Glue the page to the spine tab. Attach the sunflower list image from the A La Carte paper and other embellishments to the page.
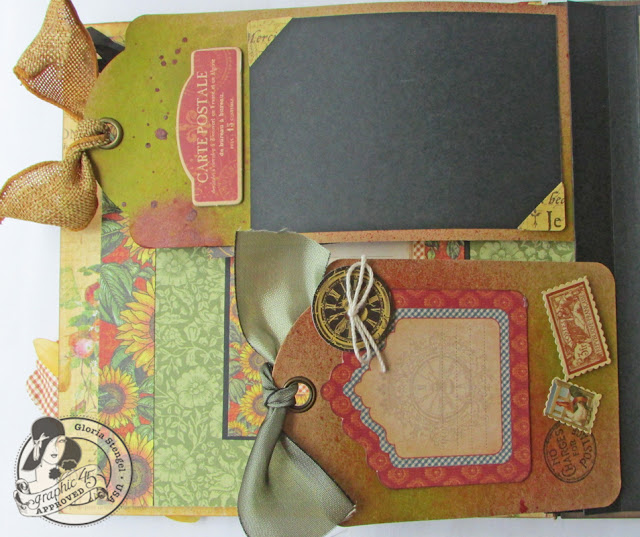
14. For pages 3 and 4 use one Regular and one Large Tag Album Staples. Spray both tags with a selection of glimmer mist. Used paper scraps to create a pocket on the large tag. Assembled one of the French Country Cardstock Tags and Pockets and attached it to the small tag. Tie ribbon through the holes in the tags. Adhere the tags to the spine tabs. Glue the large tag to the front of the tab and the smaller tag to the back, creating page 4.
15. Spray and decorated the back of the tags. Add a 3 1/2 x 5 inch photo mat to the larger tag.
16. Each tag has a place for journaling or a spot for a photograph.
17. For page 5, cut Sunflower paper to 8x8 inches and attach to the tab. Add a landscape 7 x 5 inch photo mat. To create dimension for the Cardstock Stickers, attach them to a scrap of chipboard, then glue them in place.
18. Use the reverse of the French Country paper, cut to 8x8 inches, for page 6. Add a 6x6 inch photo mat to the center. Decorate with chipboard elements.
19. Cut Bonjour paper to 8x8 inches and attach to the tab for page 7. Trim out the Good Luck image from A La Carte paper. Stamp images and add a ticket sticker to the center of the journaling block. (The rooster stamp is from My Favorite Things.)
20. Create a pocket for page 8. Attach Bon Appetit paper, cut to 8x8 inches to the back of page 7. Cut Sunflower paper (I used a sheet from an 8x8 pad as I ran out of the 12x12) to 3 x 8 inches. Attach on three edges to make a pocket.
21. Tuck images cut from the various papers into the pocket. You can also use tags from the Cardstock Tags and Pockets sheet. I also decorated another Regular Tag Album Staples tag.
22. For page 9, cut Rendezvous paper to 8x8 inches and attach to the spine tab. Add a 6 x 4 inch photo mat and decorate as desired.
23. To create page 10, trim the reverse of Sunflower paper to 4 x 8 and attach to the bottom of page 9. Trim Promenade paper to 3 x 8 inches and attach to the top of the page. Trim a strip of Sunflower paper 1 1/2 x 8 inches and attach to the center. Add a 7 x 5 inch photo mat. Decorate as desired.
If you have any questions, please email me. For a printable version of this tutorial, please click HERE. Thanks for looking!
Graphic 45 paper (12x12 and 8x8):
French Country: French Country, Sunflower, Promenade, Rendezvous, Bon Appetit, Bonjour, A La Carte, Montage
Graphic 45 French Country Chipboard Tags, Stamps, Cardstock Stickers, Cardstock Banners, Cardstock Flowers, Cardstock Tags and Pockets
Graphic 45 A Ladies' Diary stamps
Graphic 45 Staples: Altered Art Matchbook Box Staples (8x8), Tag Album (Regular and Large)
Cardstock: WorldWin Papers ColorMates Heritage Black, Light Totally Tan, Kraft
Other Stamps: Stampin' Up! (library card); My Favorite Things Life's Direction (rooster)
Stencil: My Favorite Things Mix-ables Mini Chicken wire
Ink: Clearsnap Colorbox Fluid Chalk Chestnut Roan, Creamy Brown, Butterscotch, Bisque; Tsukineko Memento Rich Cocoa, Tuxedo Black
Mist: Ranger Dylusions Fresh Lime; Ranger Color Wash Sunset Orange
Brads: unknown
Silk flower: unknown
Trims: May Arts
Postage edge scissors: Provo
Adhesive: Scrapbook Adhesives by 3L foam squares; Scotch 3M ATG tape; Aleene's Tacky Glue


Gorgeous mini Gloria. Love it!! ox Marg
ReplyDeleteSuper clever and beautifully decorated. Going to have to copy this one!
ReplyDeleteWoooow! That is just so stunning! Lovely mini album. :) ♥
ReplyDeleteHugs
Gorgeous mini, going to make one I think sometime in the future, unless you just need to mail me this one. Hint, hint, hint....
ReplyDeleteso many details to look at, gorgeous work Gloria as always, love your book :)
ReplyDeletebeautiful album gloria, love how you make things from scratch and build to perfection
ReplyDeleteI'm definitely going to try the binding technique you've used. Really like it.
ReplyDeleteThanks for sharing this beautiful mini album with us!
Beautiful!
ReplyDeleteWise decision on G45's part!! Each & every project of yours is amazing and each tiny detail is perfection! Especially love the Gratitude journal... There is much gratitude in your life and it shows in your artwork!
ReplyDelete