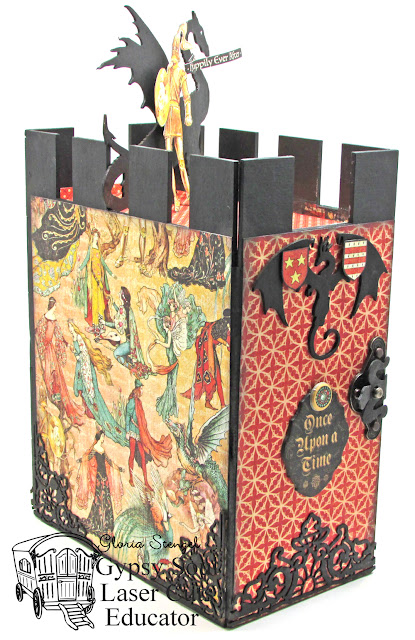
Gypsy Soul Laser Cuts sent me a "prototype" Castle Box and Mini Album to try (this product is coming SOON to the GSL Store). When I found out that Graphic 45 was coming out with the Enchanted Forest Collection, I knew that I had a winning combination!
Today, I am sharing the Castle Box project. In two weeks, I will share the matching album, which fits inside the box!
I created a tower, complete with knight and dragon! The Castle Box is 7 3/4" x 6 1/2" x 6 1/4" and has a piece that can be used as a door for the front of the box. The album that fits inside is approximately 5 1/2" x 6".
Start by prepping all the castle panels by wiping them with a damp cloth to remove any dust from the laser-cutting process. Paint all the edges with black acrylic paint. Make sure to paint all the battlements black as they will not be covered with paper.
Place the left side of the box face down on the work surface. Place the castle door piece face down to the left of the side piece, leaving a 1/16" gap between the pieces. Cut two pieces of tyvek to 6" x 4". Using one piece of tyvek, attach the castle pieces together. The tyvek forms a sturdy hinge. (I used some left over mailing envelopes made from tyvek for my hinge.) Flip the box pieces over and add a second piece of tyvek to the front side to make a stronger hinge. Score lightly on the 1/16" gap and gently fold the door piece inward.
Cover the inside areas of the box pieces with decorative paper. Trim the paper slightly smaller than the box surface if you wish to have a black border around the edges.
Cover both sides of each piece. Use a matte gel medium to attach the paper to the box surface.
Assemble the box, using a strong, quick-drying glue to adhere the pieces together. Sponge paper edges with black ink, if desired. Make sure to sponge any visible tyvek with black ink as well. Note that the hidden door hinge is on the left side of the box, when facing the box front.
To make a closure for the door, I used a piece of metal latch that I found in my stash, and a long hinge from the Hinge Straps Shape Set, painted black. Use a hole punch to make holes in the hing strap, as shown. Use long mini brads to attach the pieces to the box.
Use a hole punch such as a Crop-a-Dile to make holes in the box for placement of the hinge strap and the hinge plate. Fit the top of the hinge strap over the knob of the hinge plate to secure the door.
Use black acrylic paint to paint the Art Deco Border and Corners and the pieces from the Art Deco Corner Set. Also, paint two dragons from the Dragons Shape Set. Use metallic inks to color a plate from the Keys and Plates Shape Set.
Wrap a bit of paper border around the large dragon's neck and use a white pen to draw an eye on the dragon shape. Use strong glue to attach the dragon to the top of the box. Fussy cut a knight image from the decorative paper and attach him to the dragon with foam adhesive so that it looks like he is standing next to the dragon.
Trim the Art Deco border into sections and glue one piece to the door of the box. Glue Art Deco corners to the bottom left side of the box.
Glue the small dragon to the top of the door as shown. Fussy cut two shield images from the decorative paper and attach them to the dragon with foam adhesive. Glue Graphic 45 Enchanted Forest decorative chipboard to the door, if desired.
Glue two Art Deco corners to the right side of the box. Glue another section of the Art Deco Border to the back section of the box. Place tiny brads into the holes of the key plate and attach it to the top of the back panel with strong glue.
To cover the holes where the front latch is attached to the door, glue some decorations from the paper collection to that area of the door.
The box is now ready for the album! Here is a sneaky peek!
Tune in on March 22nd to see the matching mini album!
Thanks for joining me today! Visit the Gypsy Soul Laser Cuts Blog HERE!
Gypsy Soul Laser Cuts Products:
Castle Box with Mini Album (coming soon)
Hinge Straps Shape Set
Art Deco Border and Corners
Art Deco Corner Set.
Dragons Shape Set
Keys and Plates Shape Set
Other Products:
Paper and decorative chipboard: Graphic 45 Enchanted Forest
Ink: Colorbox Pigment (Burnt Copper, Gold Brocade, Copper, Bronze); Memento Tuxedo Black
Paint: Martha Stewart Sating Acrylic Beetle Black
Brads: Tim Holtz long fasteners
Metal clasp: SkyBluePink
Tyvek: recycled envelopes
Adhesive: Ranger Glossy Accents, Liquitex Matte Gel Medium, Scrapbook Adhesives by 3L 3D Foam Squares


All I can say is WOW!
ReplyDeleteSuperb work !
ReplyDeletefantastic! I'm going to adapt this to make an album for pictures
ReplyDeleteYou are amazing - this I've always known about you but this well I'm totally blown away by your creativity. Bless your heart for sharing this gem with all of us. be well, Robin
ReplyDeleteThanks, Robin! I appreciate your kind words!!
Delete