

Each month, on the third Sunday of the month, I will release the tutorials for TWO (2) folios! Today, it is time for the March Folios!

The March Folios are a beautiful duo of green and purple! I have used several different ribbons this time, all to celebrate THE GREEN.
I am continuing to use the Graphic 45 collections Place in Time (both the original collection and the new Deluxe Collector's Edition), Time to Flourish, and Children's Hour. I am using the 12x12, 8x8, and 6x6 pads, plus some of the other items from each collection. See the full supply list below.

The March folios consist of one calendar folio (8 1/4" x 8 1/4") and one scrapbook folio (8" x 8"). These folios hold AT LEAST twelve (12) photos. You can customize them for fewer or more photos, or for journaling, or to use as a planner. (This folio set is the same construction as the January and February Folios.)
Before getting started, I recommend cutting up ONE EACH of the Cut Apart and Collective sheets from the various paper collections. That way you will have all the images needed, as we will also use the prints on the reverse sides of most papers. (Note: I have used more than 2 sheets of some of the paper, but if you cannot do that, substitute something from your stash that coordinates.) I also recommend the Ephemera card packs, if you can find them.
March Calendar Folio

The March Folio is side-fold folio, measuring 8 1/4" x 8 1/4" when closed. I have added flowers and ribbons in tones of green and purple, to celebrate spring, St. Patrick's Day, or March birthdays.

The folio opens with areas for photos and journaling. I love all the vintage images in the Graphic 45 calendar collections!

Cut one sheet of black cardstock to 8 1/4" x 8 1/4". Cut a second sheet of black cardstock to 8 1/4" x 8 3/4". Score the long side at 1/2" to make a second 8 1/4" x 8 1/4" panel. Fold and burnish the score line. Add strong adhesive to the 1/2" tab.

Attach the two sheets together to create a folio that is 8 1/4" tall and 16 1/2" wide. Make sure the fold is on the left-hand side of the folio, so that the folio opens like a book.

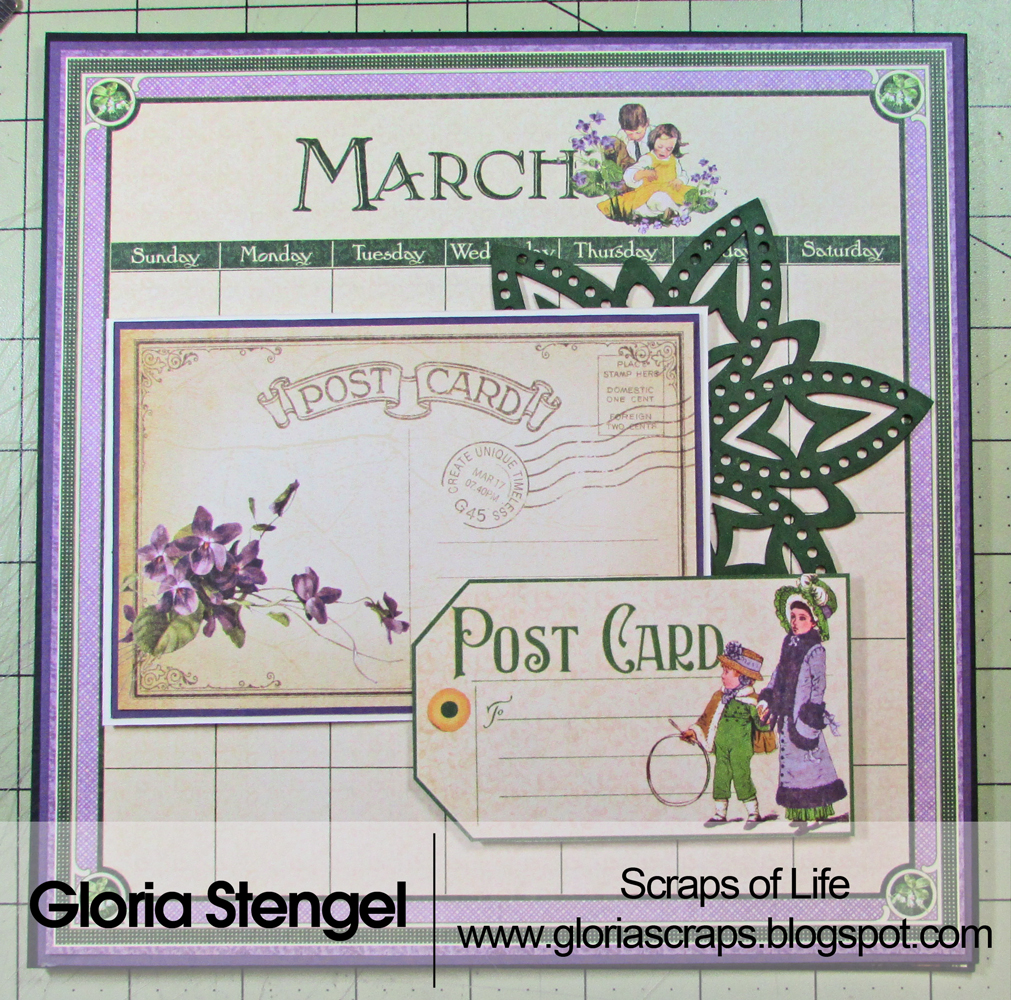
Paint or ink a chipboard medallion (found HERE) with dark green paint or ink (I used a Copic Marker, G09). Attach the medallion to the right side of the calendar page, as shown.
Trim the post card image from Place in Time March Cut Apart paper and mat with purple and ivory cardstock, cut slightly larger. I have 1/16" borders on my piece. Attach the image to the folio, approximately 2 1/2" from the top edge and 5/8" from the left edge.
Trim the post card tag from Children's Hour March Collective paper and use foam tape to attach it to the lower right corner of the calendar.

Use foam tape to attach a postage stamp image, cut from Place in Time March Cut Apart paper, to the upper right corner of the main image. Tie a loopy bow from green gingham ribbon and glue it to the chipboard medallion, as shown. Glue a decorative chipboard button (Place in Time DCE) to the top of the bow. Tie a loopy bow from green and ivory twine and attach the bow to the button.

Glue a chipboard tag (Place in Time original collection) to the bottom of the folio, as shown. Add a green pearl to the tag. Trim the "Hello Spring" sentiment from Children's Hour March Collective paper and use foam adhesive to attach the sentiment to the left side of the page, as shown.

Glue purple and green flowers to the page, as shown. Add a few purple and green pearls, scattered about the page.

Use the flowers on the postcard image as a guide to placement of your 3D paper flowers.

Open the folio and work on the left-hand page. Cut Children's Hour March Collective paper (reverse, green print) to 8 1/8" x 8 1/8" and attach the panel to the left side of the folio. Create a photo mat by cutting black cardstock to 6 1/8" x 6 1/8". Attach a sheet of 6" x 6" green solid paper from Children's Hour 6x6 Patterns and Solids Pad to the black cardstock. Attach the photo mat panel to the center of the page.
Attach a tag cut from Place in Time March Cut Apart paper to the lower left corner of the photo mat. Place adhesive onto the bottom and left edges of the tag to create a pocket. Glue a circle shamrock image (Time To Flourish Banners) to the top of the tag. Use foam tape to attach a postage stamp image, cut from Children's Hour March Collective paper, to the pocket. Tuck photos or ephemera into the pocket.

Next, work on the right-hand page. Cut Children's Hour March Montage paper to 8 1/8" x 8 1/8" and attach the panel to the right side of the Calendar Folio. Trim the Children's Hour March Collective border strip to 8 1/8" long and attach it to the top of the panel.
Cut black cardstock to 6 1/8" x 4 1/8" and round all four corners. Mat Children's Hour March Ephemera card with the black cardstock. Attach the card to the right side of the page. Use foam adhesive to attach a postage image from the Time to Flourish March Cut Apart paper to the upper right corner of the ephemera card.
Cut two circles from Children's Hour March Montage (reverse, purple print) paper. Cut one circle 2 1/2" in diameter and cut the second circle to 2". Mat both circles with black cardstock, cut slightly larger. Attach the circles to the left side of the page, as shown.
Cut the "Good Luck" tag from the Place in Time March Cut Apart paper. Glue a chipboard tag (Time to Flourish) to the "Good Luck" tag. Glue a flower image (Time to Flourish Banners) to the top of the chipboard tag, as shown. Attach the tag to the bottom left corner of the page.

Close the folio. Cut Time to Flourish March Flourish paper to 8 1/8" x 8 1/8" and attach to the back panel of the folio.
The calendar folio is finished! Add photos and journaling, as desired.
March Scrapbook Folio

This project originally appeared here on the blog last spring. This is what I have based the January and February folios upon! In fact, this particular project was the inspiration behind this whole Calendar Folio Series!
This matching March Scrapbook Folio measures 8" x 8" and is a top-folding folio, decorated inside and out. It is perfect for journaling, ephemera, and photos. Like the calendar folio, this project can be displayed on your desk or shelf during the month of March. (Please note, this project does not use Place in Time March papers. You may need extra sheets of the Time to Flourish and Children's Hour papers, or substitute as needed.)

The inside of the folio contains two flaps and a pocket. Everything is decorated in a spring and St. Patrick's Day theme.
We will construct the base for the folio first, and then decorate it.
We will construct the base for the folio first, and then decorate it.

Cut one piece of black cardstock to 8" x 8". Cut a second piece of black cardstock to 8 1/2" x 8" and score 1/2" from the top edge. Fold and burnish on the score line. Add double-sided tape to the tab.


Cut Time to Flourish March Flourish (reverse) paper to 7 7/8" x 7 7/8". (This is from the 12" x 12" paper pad.) Attach the paper to the front of the folio.
Cut Time to Flourish March Flourish paper to 7 7/8" x 4 1/8". Mat with black cardstock cut to 8" x 4 1/4". Attach this panel to the left side of the folio, approximately 1/2" from the left edge.
Cut Children's Hour March Collective border strip to 7 7/8" long. (We used this same border for the Calendar Folio. If you do not have another border, choose a coordinating border from one of the other papers.) Place the border at the top edge of the panel.
Select the March ephemera card from the Children's Hour ephemera pack (there are two of these in the ephemera pack, one for each project, or trim the image from Children's Hour March Collective paper to 5 7/8" x 3 7/8"). Matt the image with forest green and purple cardstock, cut to 6" x 4" and 6 1/8" x 4 1/8" respectively. Attach the image to the right side of the folio, approximately 1 1/2" from the top edge and 1" from the right edge.

Create a loopy bow from Apple Green Swiss Mini Dots Satin ribbon. Glue the bow to the left edge of the image, as shown. Make another bow with Mixed Green Vertical Striped Satin ribbon. Tie chipboard charms to the striped bow with Iridescent White Metallic String. Glue the second bow on top of the first.
Use foam adhesive to attach the "Best of Luck" sentiment, cut from the Children's Hour March Collective paper, to the left side of the folio, under the bow.

The cover is finished! Open the folio. We will work on the inside panels next. (I did not take photos of each step, just of the finished folio. Sorry about that!)

We will decorate the top, inside panel and the two flaps next.

Open both flaps so you can work on the top panel. Cut Time to Flourish March Cut Apart (reverse, purple flowers print) paper to 7 7/8" x 7 7/8" and attach the paper to the top panel. (This paper is from the 8x8 pad.)
Trim the March border from the 12x12 Time to Flourish March Cut Apart paper and attach to the top center of the panel.
Trim the post card tag image from Children's Hour March Collective paper and attach it to the lower right edge of the panel. Make sure to only add adhesive to the right and bottom edges, to form a little pocket. Use a 3/4" circle punch to punch a small image from one of the paper collections. Add the little decoration to the tag as shown. (Note: We have already used this tag for the Calendar Folio. If you do not have a second image, choose one of the other images from your paper collections.)

Let's decorate the left-hand flap. Trim forest green cardstock to 6 1/8" x 4 1/8" and attach it to the panel. Trim Children's Hour March Collective (reverse) paper to 6" x 4" and attach the panel to the flap. Trim out a postage image from the Children's Hour March Collective paper and use foam tape to attach it to the top left corner of the flap. Trim the "March" border from 12x12 March Collective paper. Attach the border to the bottom center of the flap.
Trim the weekly calendar image from Children's Hour March Collective paper and mat with forest green cardstock, cut to 4 1/8" x 6 1/8". Attach the image to the right-hand flap.
Trim the weekly calendar image from Children's Hour March Collective paper and mat with forest green cardstock, cut to 4 1/8" x 6 1/8". Attach the image to the right-hand flap.

Close the right-hand flap. Mat the Time to Flourish March Ephemera card with purple cardstock cut to 4 1/8" x 6 1/8". Attach the image to the flap. (You may also cut this image from Time to Flourish March Cut Apart paper.)

Close the left-hand flap. Trim the March image from the Time to Flourish March Cut Apart paper to 6" x 4". Mat the image with purple cardstock cut to 6 1/8" x 4 1/8". Wrap a piece of the Apple Green Swiss Mini Dots Satin ribbon around the panel to act as a "belly band," which will hold some tags.
Glue a chipboard horseshoe embellishment to the center of the ribbon. Attach the image to the flap. Trim tag from Time to Flourish March Cut Apart paper, and a tag and calendar from Children's Hour March Collective paper. Tuck the tags into the pocket.
Now, let's work on the bottom panel.

Trim Time to Flourish March Flourish paper to 4 1/2" x 7 7/8" and attach it to the top portion of the panel, tucking the bottom edge into the pocket. Trim Children's Hour March Montage (reverse) paper to 4 1/8" x 7 7/8" and attach it to the pocket.
Trim the March title from the Children's Hour 12x12 Calendar Pad to approximately 1 7/8" x 6 7/8" and mat with purple cardstock cut slightly larger. Attach the title to the center of the pocket. Add postage stamp images cut from Time to Flourish March Cut Apart and Children's Hour March Collective papers, as shown.
Trim the March title from the Children's Hour 12x12 Calendar Pad to approximately 1 7/8" x 6 7/8" and mat with purple cardstock cut slightly larger. Attach the title to the center of the pocket. Add postage stamp images cut from Time to Flourish March Cut Apart and Children's Hour March Collective papers, as shown.

Cut a piece of black cardstock to 6" x 7 7/8". Trim Children's Hour March Montage paper to 5 7/8" x 7 3/4". Attach the paper to the card.

Flip the card over. Cut Children's Hour March Collective (reverse) paper 5 7/8" x 7 3/4" and attach the paper to the card. Tuck the card into the pocket. You may use the card for extra photos or journaling. You may also tuck ephemera or photos into the pocket.

Close the folio and flip it over so that back is facing up with the fold at the top.
Trim Children's Hour 12x12 March Calendar (reverse) paper to 7 7/8" x 7 7/8" and attach to the back panel. Trim Children's Hour March Collective pansy border to 7 7/8" long and attach it to the top of the panel.
Trim Children's Hour 12x12 March Calendar (reverse) paper to 7 7/8" x 7 7/8" and attach to the back panel. Trim Children's Hour March Collective pansy border to 7 7/8" long and attach it to the top of the panel.

And, you are FINISHED!

If you missed the January Folios Tutorial, click HERE.

For the February Folios Tutorial, click HERE.

If you wish to make the 9" x 9" x 9" storage box to hold all your monthly folios, click HERE to see that tutorial.
Keep in mind, that during this tutorial series I will be using some product that is retired or hard to find. If you cannot find the product I am using, try to find something similar, or just substitute something from your own hoard of supplies. You may be able to find some of the retired items on Amazon or Ebay, but be prepared to pay a premium. You will also need a stack of 12x12 black and ivory (natural) cardstock.

Ribbon: Really Reasonable Ribbon Emerald Plaid, Ivory Burlap String, Green Solid Baker's Twine
Cardstock: WorldWin Papers Deep Lovely Lilac, Natural, Black
Cardstock: WorldWin Papers Deep Lovely Lilac, Natural, Black
Designer paper: Graphic 45 Children's Hour (March Collective, March Montage, 8x8 Calendar Pad, 6x6 Patterns and Solids Pad), Time to Flourish (March Flourish), Place in Time (March Cut Apart)
Chipboard: Gypsy Soul Laser Cuts Star Medallion; Graphic 45 Place in Time (original and DCE), Time to Flourish Journaling
Cardstock circle mbellishments: Graphic 45 Place in Time Banners
Flowers: Wild Orchid Crafts, Petaloo
Pearls: Want to Scrap
Copic markers: black, G09
Tools: hot glue gun, scoring board and bone folder
Adhesive: Scotch 3M ATG tape runner, Scrapbook Adhesives by 3L 3D foam squares, hot glue
Ribbon: Really Reasonable Ribbon Apple Green Swiss Mini Dots Satin, Mixed Green Vertical Striped Satin, Iridescent White Metallic String (out of stock)
Cardstock: WorldWin Papers Black, Forest Green, Deep Lovely Lilac
Designer paper: Graphic 45 Children's Hour (March Collective, March Montage, 12x12 Calendar Pad), Time to Flourish (12x12 March Cut Apart, March Flourish; 8x8 March Flourish) Cardstock: WorldWin Papers Black, Forest Green, Deep Lovely Lilac
Ephemera cards: Graphic 45 Time to Flourish, Children's Hour
Chipboard: Gypsy Soul Laser Cuts Feeling Lucky Charm Set, Feeling Lucky Shape Set
Ink: Colorbox Pigment Black, Moss Green, Turtle
Tools: hot glue gun, scoring board and bone folder
Adhesive: Scotch 3M ATG tape runner, Scrapbook Adhesives by 3L 3D foam squares, hot glue
again a stunning creation! I still have to get to work on the month of March. Thanks for the idea, my front page is always like yours hihihi LOTS OF LOVE Mieke
ReplyDelete