
Good morning, Blogger Buddies! Today I have a project from "the vault." A while back, I taught this mini album as a class, with an AMAZING class kit. {Oh, yeah, I do amazing kits! hee hee} I don't think the album was ever shown on the Graphic 45 Blog, and they needed mini albums for....mini album week. They also wanted to showcase the Le' Romantique collection, so...I dragged this baby out and gave them my class directions to turn into a tutorial, voila!

The base of the album is a Kaisercraft mini album, called Antique Tags. It is an older album, but you can still find it at some of the online discount places. For the paper, you need one 8x8 pad of Le' Romantique and one of the tag sheets. I used the 8x8 pad because it was cheaper to make up the kits with the pads than to use 2 sheets of each of the 12x12 papers. And a pad is easier to kit!
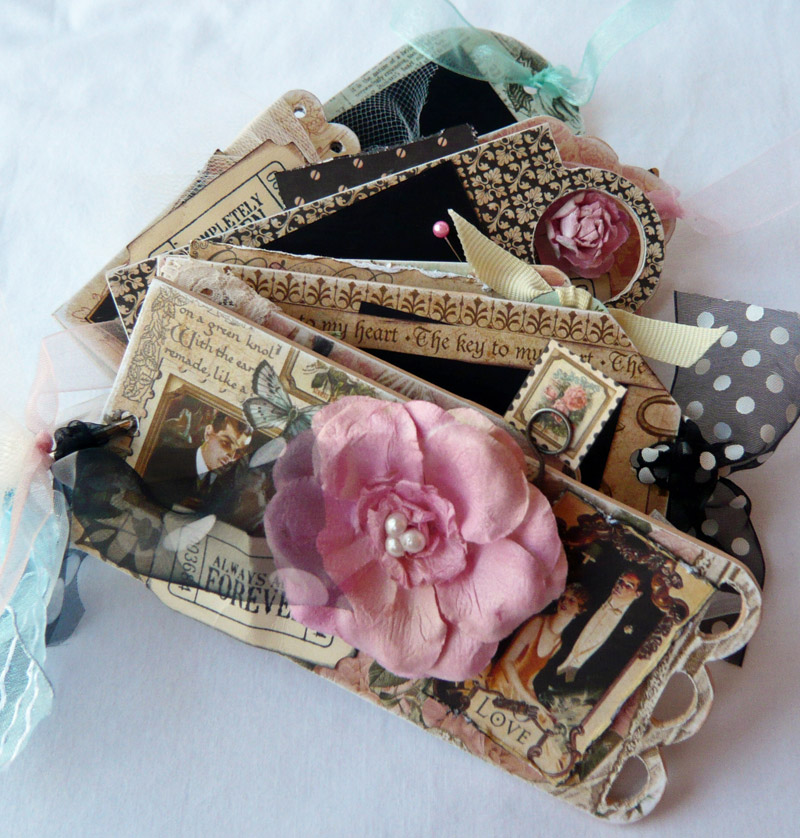
There is a memo pin sticking up on the front page, right behind the large flower. Cut two of the rose stamp images from the paper and glue them back to back before attaching to the memo pin. That way you have a pretty image from the front and back views.

Each page is shaped, making it a bear to trim out, but once you finish...it looks awesome. You have to break the Antique Tag mini album apart and sand all edges before you begin. I also painted my edges with peach paint.
Cover each mini album page with Graphic 45 paper, trim to fit. Sand all paper edges, and ink to distress. Sanding and inking covers up any imperfections in your cutting technique! I used a strong glue to attach the paper to the album pages.

The large flower comes in a creamy white, so I sprayed it with Glimmer Mist and attached pearls to the center. When attaching the embellishments to each page, I used glue dots or a strong, quick-drying wet glue. (I find that glue dots stop holding the paper flowers after a bit of time. I tend to use glue for those.) To create added dimension, I attached some embellishments with foam tape or pop-dots.

I used the Autumn Leaves ticket stamp set to stamp all of my tickets. This is another older set that you can find at some discount stores. I really like to dig into my stash when I make mini albums. Just because something is older does not make it less valuable! {wink}

When using images cut from Graphic 45 paper, ink the edges with black or brown ink for added interest and dimension. All paper embellishments can be inked and slightly crumpled to add texture.

Mini albums are a great way to use up small bits of ribbon, left over papers, and odd bits of this and that.

You could copy this basic design for any tag shaped album and any paper line.


I confess that I buy a lot of my do-dads for classes through places like Oriental Trading Company! And I lurk in the fabric store, craft store, and hardware store, just to see what cool junk I can buy in bulk!

A little fussy cutting always makes a statement! I cut out the hat and the rose stamp for this element. Notice that I placed the rose just perfectly to peek through the hole in the top tag?!


For the edge of this page I pleated the butterfly paper to look like ribbon.


I loved this netting as it reminds me of weddings.


And that's the end! Bind the album the provided D-ring. After binding, tie a few bits of ribbon to the ring.


Here is a view from the top. I did paint all of my edges before I started, but that is personal choice.
I hope you enjoyed this "project from the vault!"
Supply List
Graphic45 Le’ Romantique 8x8 paper padGraphic45 Le’ Romantique Tags
Kaisercraft antique tag mini album
Making Memories paint (peach, pale pink, cream, pale teal)
Tattered Angels Glimmer Mist (pink taffy, bronze)
Dye ink (brown, black)
Distress ink (old paper, vintage photo)
Autumn Leaves ticket stamp set (and cream cardstock to create tickets)
Embellishments: Prima Flowers, Tim Holtz memo pins, White pearls, Tickets, Ribbon and trims, Pins, Key
Edge distressing tool
Martha Stewart butterfly punches
Crop-a-Dile or Anywhere hole punch
Sanding block
Foam brush
Craft knife and mat
Micro tip scissors
Glue stick or other strong, fast drying glue
Strong wet glue or metal glue
Glue dots
Foam tape
I saw it on the G45 blog ! It is absolutely charming ! Congrats !
ReplyDeleteThat is soooooo pretty! I love it!
ReplyDeleteGorgeous! I'm so wanting to sit at my table and work now!!! Loving the inspiration!
ReplyDeleteThis mini is SO beautiful, and SO my style! I'm like you in that I like to use embellishments no matter how "old" they are...they still work one way or another!
ReplyDeleteWow, I love it! My daughter just got engaged yesterday, and I may have to scraplift this idea!
ReplyDelete