Wednesday, July 31, 2013

Halloween in July!

Last week, I gave you Christmas in July. Well, today is July 31st and we are going to celebrate Halloween in July! I have another WorldWin Papers project to share today. I created this for the WorldWin Summer CHA booth, for display last last week in Las Vegas. 


Is this the cutest little boo banner ever?! (It was really hard to photograph! My ghosts are sort of....ghostlike!) Each little banner is about 4 inches long. This is just a little home decor piece that you could hang on a door. 


I created the "Os" out of paper rosettes, rather than letters. They were so fun to make! Let's take a closer peeky at each banner.


I created the base of the banner from ColorMates Royal Purple and Petallics Black Ore cardstock, using a banner die template. I added a banner of printed paper and also covered the chipboard "B" with paper (Graphic 45). The rosette is made from the Royal Purple cardstock. 


The ghosts are cut from Translucent Vellum (White Plaid) using a very old Sizzix die. I have had that ghost die in my stash for over 10 years! Still works and cut the vellum like butter! 


For the "O" I created a large paper rosette from Petallics Black Ore cardstock, then attached a chipboard clock to the top. I cut the clock hands from Black Ore as well.


I love the dimension, and the shimmer of the Black Ore cardstock is perfect for this project! The Petallics cardstock is cover weight and so great to work with!


For the second "O" I created a double rosette out of Black Ore and Royal Purple cardstock. I added another vellum ghostie!


One of my DT pals asked me how I got my rosettes to stay flat. Well, I just glue a circle of paper over the front and back center, and ta da. I use a fast drying glue. One of the other gals uses hot glue. But hot glue and I don't get along well, so I used white glue! I do NOT recommend glue dots as they tend to lift off and the rosettes pop up! 

It was pretty interesting creating Halloween projects in July, especially since I had just finished creating some Christmas cards! I had AC cranked and was a happy camper, crafting away! Thanks for looking!

I hope you have a chance to check out all that WorldWin Papers has to offer!

WorldWin Cardstock:
ColorMates: Royal Purple
Petallics: Black Ore
Translucent Vellum: White Plaid

Designer paper: Graphic 45 Steampunk Spells, Happy Haunting
Halloween chipboard: Graphic 45
Die cutting templates: My Favorite Things Fishtail Flag Jumbo Banners; Sizzix Tim Holtz Alterations Paper Rosettes, Mini Paper Rosettes; Sizzix Ghosts, Clock Hands
Cord: unknown
Chipboard alpha: Basic Grey
Adhesive: Scotch 3M ATG tape runner; Aleene's Tacky Glue, Scrapbook Adhesives by 3L foam squares; Tombow vellum adhesive

Tuesday, July 23, 2013

Christmas in July

I have two WorldWin Papers projects to share today. I created two Christmas cards for the WorldWin Summer CHA booth. CHA is this week in Las Vegas, so if you are unable to go to the show, you can get a sneaky peek of the cards today! {I am NOT at the show either, so don't feel too bad!}

Before we get to the cards, I just want to tell you that this company is so generous with the Design Team! You would not believe the boxes of paper that arrive on my doorstep! It is like getting a rainbow in a box! (If you want to purchase some of this fantastic cardstock, please visit The Paper Mill

Now, on to the first Christmas card!


It was sort of funny creating Christmas cards in July, with the AC cranked, but that is what happens in a designer's life! We are always creating 4-6 months ahead of actual seasons and holidays!

I embossed the ColorMates Original Medium Berry Red cardstock with the Couture Creations Exotic embossing folder. I lightly rubbed the embossed areas with white chalk ink to make the embossing pop. As you can tell by the name, this folder is not really a Christmas-themed folder. However, the pattern seemed very "festive" to me, so I used it!


I embossed the ColorMates Heritage White cardstock with a second embossing folder (Cuttlebug Christmas Countdown). I used Pearlescent Swirl cardstock to create the snowflake, using Spellbinders Create-a-Flake Three dies. 

I added just a bit of patterned paper to create a gift card holder on the front of the card.

This next card was fun to make, plus I used some products that I have had in my stash for ages and have never used before!


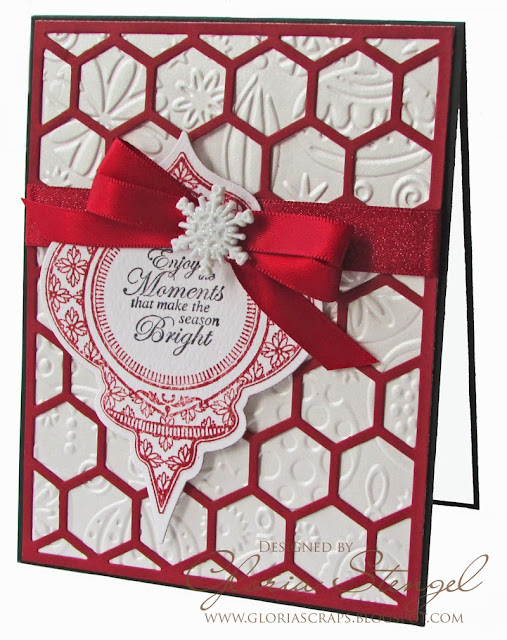
I embossed Petallics Beargrass cardstock with an embossing folder (Cuttlebug Ornaments) and trimmed it to size. Petallics papers are shimmery and heavy weight, so they "take" the embossing very well. I cut the hexagon pattern from ColorMates Originals Deep Berry Red cardstock. This is the first time I have used that die cutting template (from Papertrey Ink)!


I stamped the Christmas ornament image onto ColorMates Heritage White cardstock and cut it out with the Spellbinders 2010 Heirloom Ornament die. 

And there you have it! Christmas in July! Thanks for looking!

I hope you have a chance to check out all that WorldWin Papers has to offer!

WorldWin Cardstock: 
ColorMates Original: Medium Berry Red, Deep Berry Red
ColorMates Heritage Black, Heritage White
ColorMates Textured Cascata: White
Pearlescent: Swirl
Petallics: Beargrass

Designer paper: Carta Bella Winter Fun; Graphic 45 
Stamps: Hampton Art/Graphic 45 Christmas Emporium; Just Rite Christmas Mini Sentiments, Merry and Bright
Ink: Tsukineko Memento Tuxedo Black; Clearsnap Colorbox Chalk Alabaster; Close to My Heart Cranberry
Embossing Folders: Couture Creations Exotic; Cuttlebug Christmas Countdown, Ornaments
Die cutting templates: My Favorite Things Fishtail Flag Stax, Layers, Gift Card Pockets Horizontal; Spellbinders Create-a-Flake Three, 2010 Heirloom Ornament; Papertrey Ink hexagon plate
Ribbon: Really Reasonable Ribbon
Button: craft store
Adhesive: Scotch 3M ATG tape runner; Aleene's Tacky Glue, Scrapbook Adhesives by 3L foam squares; Glue Dots adhesive dots

Monday, July 22, 2013

Just a Few Publications

I have had a few cards published in the past couple of months, but have not had time to share! I have been so busy with designing for the summer trade shows, and for the summer and fall workshop events that I barely have had time to eat! I had a few seconds today, between jobs, so I decided to pop these up on the blog for you.


I have one card in the Spring 2013 issue of Just Cards! On page 31. I sent this in a long time ago, so it was a nice surprise to see it in print.

I originally created this card for CropStop, but Just Cards! does not care if things have been seen before, so I sent it in.


I have a card on page 35 of the September 2013 issue of Scrap and Stamp Arts. This is an older card as well. They used it as part of the Simple Stampin' feature. (Who knew I was a simple stamper?!)


This is another one that I had done for CropStop a while back. (And yes, that dress form is stamped onto canvas!)


I have one card in the 30-minute card section of the Fall 2013 issue of Crafts 'n things (page 43).


I sent this poor card to several magazines before Crafts 'n things finally took it. It is also an older card, but it's still a good one. {grin}

If you want more details about these cards, you will have to buy the magazines. {smirk}

Have a great day! And thanks for stopping by!

Sunday, July 21, 2013

Remembering...

Todd Dale Getgen
September 9, 1967 ~ July 21, 2010


It has been three years since we lost my brother. I still miss him deeply. I pray for my family today, that we all have the strength we need and that the memories will become sweet and not be so painful. Todd was much loved. Much admired. And much missed.

Saturday, July 20, 2013

Graphic 45 July Place in Time Project Sheets

It is time to share the Graphic 45 July Place in Time Project Sheets! To get these delivered to your email, sign up for the Graphic 45 Newsletter.

Here are the three July project sheets. I created three summer-themed cards, with some fun details.

Have a Party Project Sheet


Graphic 45 paper always contains the most adorable vintage images. I love these bathing beauties! You can modify this card for any summertime occasion. 

Celebrations! Project Sheet

I think the paper and button rosette, and the crumpled edges, make this card my favorite of the set! I love the relaxed, beachy feel of it.

Happy Day Project Sheet
This card is a little "criss cross" pocket card. And once again, I have added some paper buttons for some fun interest. 


The "inside" of the card pulls out to reveal a place to put a note, gift card, or invitation. 

Make sure to check the Project Sheets tab at the top of the blog for all the Graphic 45 project sheets that I create. This card series will continue through December. 

If you are attending Summer CHA in Las Vegas next week (the trade show is called Create and Connect), or Scrapfest in Minnesota in September, you will have a chance to make the workshops or make-n-take projects that I have designed with the NEWEST Graphic 45 Collections: Bohemian Bazaar, Steampunk Spells, and The Twelve Days of Christmas. If you have a chance to make one of the projects, please come back here and let me know what you thought of them! (Or post a note to me on Facebook!)

I also made 12 cards for the Graphic 45 CHA booth this year, celebrating the 12 Days of Christmas. The whole card series will be shared on the Graphic 45 Blog in December. But, here is a little peeky...


Friday, July 19, 2013

Going My Way?

When my kids were little we used to read a book called "Simple Pictures are Best." I sometimes think that simple cards are best as well. I make a lot of cards, many of them are complicated, filled with layers, and contain all the bells and whistles. But, sometimes a simple card is just as nice!


Ok, so I still have a lot of layers...  I cannot stop myself and this paper is just too sweet not to use!

I stamped the bicycle from the Jillibean Soup Irish Farm House Soup set using black ink. I sponged a bit of pale blue ink around the bike, then cut it out with a rectangle die template. (I have a thing for bike stamps!)

I stamped the sentiment and trimmed it out with a banner die template. I sponged it with a bit of pale yellow ink. I love that Hampton Art now has such a large number of companies under their banner! For the full list, click HERE. (I hope that the new Hampton Art Christmas catalog comes out soon so that I can share my very own stamps with you! It won't be long now!)

I also stamped on the inside of the card. It was a struggle to think of a good sentiment to match the front of the card! But, I think I pulled it off. (Sorry for the wonky photo.)


Hampton Art Stamps:
Jillibean Soup Irish Farmhouse Soup
Ki Memories Celebrate Life

Ink: Clearsnap Colorbox Archival Dye Wicked archival, Ice Blue, Peach Pastel chalk
Cardstock: WorldWin Papers Heritage Black, Stampin' Up Whisper White
Designer paper: Jillibean Soup Pasta Fagioli Romano Cheese, Fresh Vegetable Soup Chicken Base
Trims: Really Reasonable Ribbon
Button: unknown
Die templates: My Favorite Things Fishtail Flag, Couture Creations Scallop Rectangle, Rectangle Nesting Dies
Adhesive: Scotch 3M ATG tape runner, Glue Dots adhesive dots, Scrapbook Adhesives by 3L 3D foam squares

Thursday, July 18, 2013

CHA Peeky

I love steampunk images. When Graphic 45 came out with Steampunk Debutante paper a few years ago, I was so happy. They have just came out with a NEW release of steampunk themed papers, called Steampunk Spells that has coordinating stamps from Hampton Art!


The collection is really a Halloween collection, but I used the steampunk hat image to create a birthday card. I stamped the image and colored it with alcohol markers. The birthday sentiment is from the Hampton Art/Ki Memories Celebrate Life set. The typewriter font was perfect for this card.

I sponged the image with some Graphic 45 Decades antiquing ink and some chalk ink to grunge it up a bit. I had stamped onto white paper and felt it was a bit too bright.


I added some gears and flowers to give the card extra dimension.

Thanks for looking! Stop by the Hampton Art Blog to see what is happening in the world of stamps! 


Hampton Art Stamps:
Graphic 45 Steampunk Spells 2
Ki Memories Celebrate Life

Ink: Clearsnap Colorbox Archival Dye Wicked archival, Gray Whale chalk; Graphic 45 Decades Vintage Lace antiquing
Cardstock: WorldWin Papers Heritage Black, Copic Xpress It White
Designer paper: Graphic 45 Steampunk Spells 6x6
Markers: Copic
Gears: 7 Gypsies
Flowers: Wild Orchid Crafts
Die templates: My Favorite Things Fishtail Flag, Spellbinders Labels Twenty-eight
Adhesive: Scotch 3M ATG tape runner, Glue Dots adhesive dots, Scrapbook Adhesives by 3L 3D Foam Squares

Monday, July 15, 2013

Really Reasonable Ribbon Challenge #76

It is time again for a Really Reasonable Ribbon Challenge! The NEW Challenge is called Sizzlin' Summer Colors. Make a project with HOT summer colors , plus ribbon!

I am not sure what is going on, but I have had to do a lot of work with colors that are so far outside my "norm" that I think I may have to redefine normal!


I created a very sizzlin' project! Graphic 45 sent me a bunch of Bohemain Bazaar paper so that I could work on a make-n-take project for CHA and Scrapfest, and I have some left over. Ok, I have a lot left over! I am trying to use it while it is still new and interesting. {wink}

I created a gift card pocket on the front of the card. Oddly enough, the itunes gift card matched the colors perfectly!


Here is a view with the gift card taken out. I wrapped a bit of Hot Pink Diamond Satin around the top of the blue panel, and then I added a button tied with Blue Solid Baker's Twine.  The solid baker's twine is a bit like embroidery floss, but thicker. I love it! 


I used some Scor-tape along the bottom of the gift card pocket to attach some Turquoise Faux Canvas Ribbon to it. The pleating technique is such a simple, but lovely ribbon technique. The hot pink flower adds just the right touch!


I had to decorate the inside also! I wrapped more of the Hot Pink Diamond Satin around the inside, and added a small button and more twine.

Thanks for looking! Visit the RRR Blog to see the other entries...and to enter your own project!


Cardstock: WorldWin Papers Heritage Black; Stampin' Up Whisper White
Designer paper: Graphic 45 Bohemian Bazaar
Stamps: My Favorite Things Gift Card Greetings II; Papertrey Ink Fillable Frames #9
Ink: Tsukineko Memento Tuxedo Black
Ribbon and twine: Really Reasonable Ribbon
Buttons: Buttons Galore and More
Flower: Wild Orchid Crafts
Die cuts: My Favorite Things Gift Card Pocket Horizontal; Sweet and Sassy Stamps Mini Tags
Adhesive: Scotch 3M ATG; Score-tape; Scrapbook Adhesives by 3L foam squares; Glue Dots adhesive dots

Saturday, July 13, 2013

Really Reasonable Ribbon July Blog Hop


Welcome! The July Really Reasonable Ribbon Blog Hop starts at the RRR Blog!

You should be coming to my blog from Ginny's Blog. (For the complete blog list, scroll to the bottom of the post.)

Here is a peeky at the RRR July Ribbon Club. It's another hot, summer-time color combo! This one is called "Citrus Assortment"! 


These colors are way outside my comfort zone. They are bright, hot, and saturated. I am more of a muted, neutrals, red, and tan sort of girl. But, I am up for the challenge!


I had the new Graphic 45 Bohemian Bazaar papers on my desk, and realized they matched the hot colors of the ribbon! Happy day! I also had a been playing with banners for another project, and well....this is what happened!  


I used the yellow and green ribbon from the July Ribbon Club to make my bows. Plus, I used a few bits of the orange dot grosgrain on the banners. 

I had just purchased the green and yellow solid baker's twine last month from RRR, so I used some of that, too. The buttons are from Buttons Galore and they are in the RRR store, HERE. I think I used buttons from Key Lime Pie and Lemon Tart. (Great color names!) 

Enjoy the hop! Make sure to leave a comment! I love your comments!

Hop over to Cherry's Blog next!

Here is the RRR Blog Hop Order in case you get lost!

Judy
Heidi
Jenn

Misty
Ginny
Gloria - YOU ARE HERE!
Cherry
Heather
Tammy
Jeanne
Tracey
Cheryl
RRR Blog
Cardstock: WorldWin Papers Heritage Black; Stampin' Up! Whisper White
Designer paper: Graphic 45 Bohemian Bazaar
Ribbon: Really Reasonable Ribbon July Ribbon Club, Green Solid Baker's Twine, Yellow Solid Baker's Twine
Die cuts: My Favorite Things Fishtail Flag Stax and Layers, Fishtail Jumbo Banners
Stamps: My Favorite Things Life's Direction
Ink: Tsukineko Memento Tuxedo Black
Buttons: Buttons Galore
Adhesive: Scotch 3M ATG tape runner; Scrapbook Adhesives by 3L foam squares; Glue Dots adhesive dots

Tuesday, July 09, 2013

Celebrating Summer

Hello, and happy July! My blog has been a bit bare lately. I have been working non-stop on projects that cannot be shared on my blog! I am working on make-n-take projects for CHA and Scrapfest, plus creating some workshops for various other venues. Which means I am busy but you cannot get a peeky at my projects!

I have compiled a few summer-themed projects from the past for you to look at. Some of you may remember these, but some of you may have missed them or may be new to the blog. I hope they inspire you, regardless of their age. {wink}

This card was part of my Graphic 45 Place in Time Card Series. Click HERE for the tutorials.


I love the summertime themes of the July Place in Time papers.


I created this beach altered tray for Hampton Art last summer. We live 8 miles from the Pacific Ocean, so it is not surprising that we have beach photos!

Here is a project "from the vault." I created this mini album class a few years ago, using the Graphic 45 On the Boardwalk papers.


The sand castle mini is from Kaisercraft.


The inside is filled with fun vintage images and beach-themed items.


 I hope you have a fun-filled summer day! Thanks for visiting!