A sweet belly band keeps it all closed up!
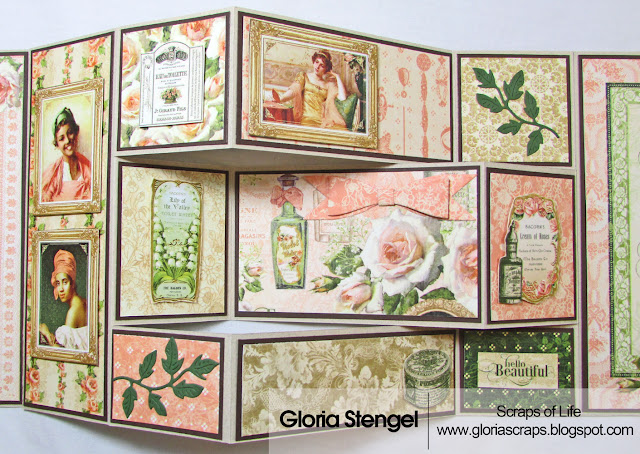
Once you slip the belly band off the card, the card opens to slightly wider than 36"! I simply created two tri-shutter fold cards and attached them together in the center. I then added a gate-fold section on each end.
Trim tan cardstock, to 6" x 12" and score along the long edge at 2", 4", 8", and 10".
Using a ruler and craft knife or a paper trimmer, cut a slit at 1 1/2" from the top edge, from the 2" score line to the 10" score line. Cut a second slit at 4" from the top edge from the 2" score line to the 10" score line.
Fold on each score line, alternating between mountain and valley folds as shown on the right-hand piece above. Burnish all folds with a bone folder.
Cut tan cardstock to 6" x 8" and score on the long side at 2" and 6" to create the gate fold section (the piece shown to the left in the photo above). Place double-sided adhesive onto the left-most portion of the shutter-fold, as shown on the right-hand piece above.
Attach the two pieces together. This is one half of the card mechanism. Repeat steps 1 through 4 to create the other half of the card.
Cut tan cardstock to 6" x 4" (the center piece shown above). Attach the two gate fold/shutter fold mechanisms to this piece of cardstock to create the full card. Make sure that you have the 1 1/2" shutter section at the top of both pieces.
Cut dark brown cardstock to fit each panel, making sure to cut each piece slightly smaller than the panels on the card.
7. Cut pieces of Portrait of a Lady paper to fit each panel. Cut each piece slightly smaller than the dark brown cardstock panels.
There are three (3) panels measuring 6" x 4". Use the ephemera cards for these panels.
Fussy cut some elements from the paper to add to your project. You may also wish to use some die cut embellishments.
You may notice that I have accidentally flipped my project upside down! I have the 1 1/2" sections at the bottom of the project! I did not notice until I had quite a few pieces decorated!
Decorate to your heart's content!
Create a belly band that is 17" long by 1 11/16" tall. Add decorative paper and other embellishments. I used a paper doily, some paper flowers, and a few die cut shapes. I placed a magnet onto the back of the belly band to keep it closed.
Thanks for looking!
For other versions of this project see the Cafe Parisian version or the Time to Flourish version. The Time to Flourish project is for creating a simple shutter fold card and comes with a printable project sheet.
Printed paper: Graphic 45 Portrait of a Lady 12x12 Pad
Cardstock: sand, ivory, dark brown
Die cut templates: Cheery Lynn Designs Pretty Pretty Bows, Mini Fanciful Flourish, French Pastry Doily, Flourish Leaf Strip; Papertrey Ink script words
Flowers: Wild Orchid Crafts, Prima
Tools: Martha Stewart score board
Adhesive: ATG tape, Multi Medium, hot glue, foam adhesive, Scor-tape


What a BEAUTIFUL card, very creative fold.
ReplyDeleteSue
http://suek86401.blogspot.com/
I love this! Thanks so much for sharing your creativity!
ReplyDeleteWhat a beautiful , top
ReplyDeletegrts , Emma
Your Post is very useful, I am truly happy to post my note on this blog . It helped me with ocean of awareness i really appreciate it.
ReplyDeletecorex