I created my journal 8" tall, 4" wide, with a 1 1/4" spine. I used the BEAUTIFUL Authentique Papers Dame Collection for this project. This collection has a Paris theme that works so well for a travel journal.
I used an elastic band to keep the book closed. I wanted this book to be user-friendly. That means it has a flat cover and an easy to open closure! I refrained from gluing umpty-bazillion flowers to the cover!
Here is a little tutorial on how I made my book.

Cut two pieces of chipboard to 8" x 4" for the covers. Then cut a spine piece to 8" x 1 1/4". Use a hole punch to punch three holes in the top and bottom of the spine. (When you make yours, try to get your holes straight instead of wonky like mine!)
These holes are for threading your elastic or twine to hold the signatures into the book. I wanted my inside pages to be roughly 7" tall, so I made sure that my holes were spaced to allow for that size paper.
Cut dark brown cardstock to 10 1/2" x 12". Attach the chipboard to the center of the cardstock so that you have a 1/8" gap between the cover pieces and the spine.
Angle the corners of the cardstock and attach double-sided adhesive to the tabs. Mark your holes. I used a Fiskars punch to punch the binding holes. This type of punch can go anywhere and can punch through even very thick items. I made sure to punch the holes any time I covered them with paper, so that I would not "lose" them!
Cut decorative paper (Dame Six) to 7 7/8" x 3 1/4" and add it to the spine area. And, yes, re-punch or mark your holes!
Flip your book over and add paper to the front covers and the spine. I used Dame Three for the front cover and then Dame One for the spine and back cover.
Now, you will need some elastic twine to thread through your holes. I have used regular twine in the past, but the elastic is stretchy, so it works a bit better. I found this particular elastic on Amazon for a good price and it comes in lots of colors. I like the 1.2 mm thickness of this style of elastic.
Thread your twine through the holes in a pattern that you like. Make sure you have one "string" for each hole. Each signature will slip under one of the strings of twine.
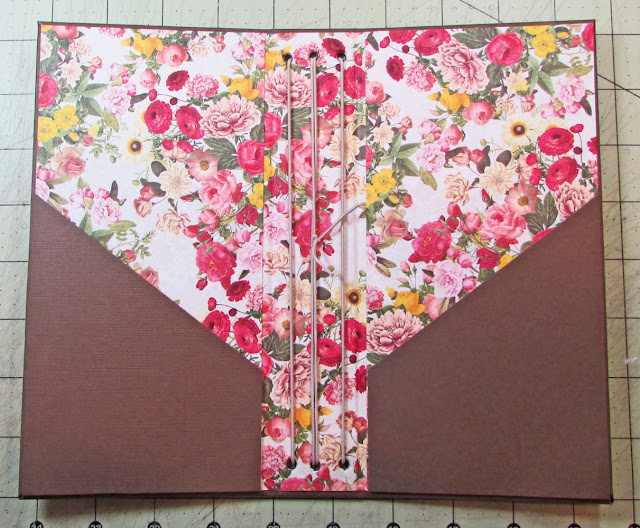
This is what my spine looked like after I added the elastic twine. Some people like to have the three strings showing on the outside of the spine also because it is a great way to add beads and such to the spine. I was keeping my book more simple, so I threaded the twine to only have the "stitches" showing.
I wanted to add some eyelets to the tholes, but I used SUPER thick chipboard and none of my eyelets were long enough! So, my book is eyeletless.
I added some pockets to the inside covers of my journal. You can add any style of pocket you wish, or add none at all. Click here to see a tutorial explaining how to make this style of pocket. This pocket measures 5" x 3 3/4" on the long side. The short side is 2".
I created three covers for my signatures by cutting the decorative paper to 7" x 7 1/2". I then folded each piece in half to make 7" x 3 3/4" covers. I cut the signature covers slightly wider than the inside pages.
For the blank inside pages, I used printer paper. I cut each page to 7" tall by slightly smaller than 7 1/2" wide and folded them all in half.

I placed a few sheets of the blank paper into a decorative cover and then slipped the signature under one of the strings in the journal cover. Since I added three strings, I can add three signatures.
For my signature covers I used Dame Seven, Dame Four, and Dame 5. (Since the back side of Dame Seven is the ephemera cards, I trimmed Dame One to cover the inside of the signature.)
I then added some of the ephemera cards from Dame Seven and Dame Eight, as well as some of the Stickers and Components die cuts.
So see all of the inside pages, view the video below.
Thanks for joining me today!
If you are interested in hand-made books, please CLICK HERE to see another tutorial AND get a chance to win this AMAZING prize!
Authentique Supplies Used:
Dame Collection Kit (with Details Stickers)
Dame 6x12 Components cardstock die-cuts
Additional Supplies:
Cardstock: American Crafts Rocky Road, WorldWin Natural
Chipboard: Grafix
Ephemera: 7Gypsies, Tim Holtz, Canvas Corp
Elastic cord: Sulyn
Elastic cord: Sulyn
Doilies: Gypsy Soul Laser Cuts Sew Doily Box
Clips: Staples, Tim Holtz
Tags: various
Dies: Sizzix File Folder, File Folder 2; Tim Holtz Tag and Bookplates
Tools: Fiskars anywhere hole punch, Kadomaru pro corner rounder, Stampin' Up 1" circle punch
Adhesive: Scor-tape, ATG tape, Scrapbook Adhesives by 3L foam squares, Blick Essentials glue


Love this Gloria!
ReplyDeleteGreat album-easy to follow tutorial and sweet papers.
ReplyDeleteAs always this album is truly amazing and looks fabulous too.
ReplyDelete