Fall-themed Mini Storage Box
Good morning, Crafters! Happy November! I am celebrating my one year anniversary as part of the Authentique Design Team this month! It has been an amazing year and I hope to continue for a while longer!
As fun as it is to use older collection and to look back on older projects...today is NOT that day! I have a brand new project, using the Pleasant Collection to share today!
I have been wanting to do some sort of explosion box for you, but could not think of an idea that was new to me, or one that seemed easy enough to make. I normally don't use other designers' tutorials for my design team work, but when I found THIS tutorial, by Norma at From My Craft Room Blog I knew it's what I wanted to make!
This tutorial is from a few years ago, but I had never made this style of box before, so I wanted to give it a try!
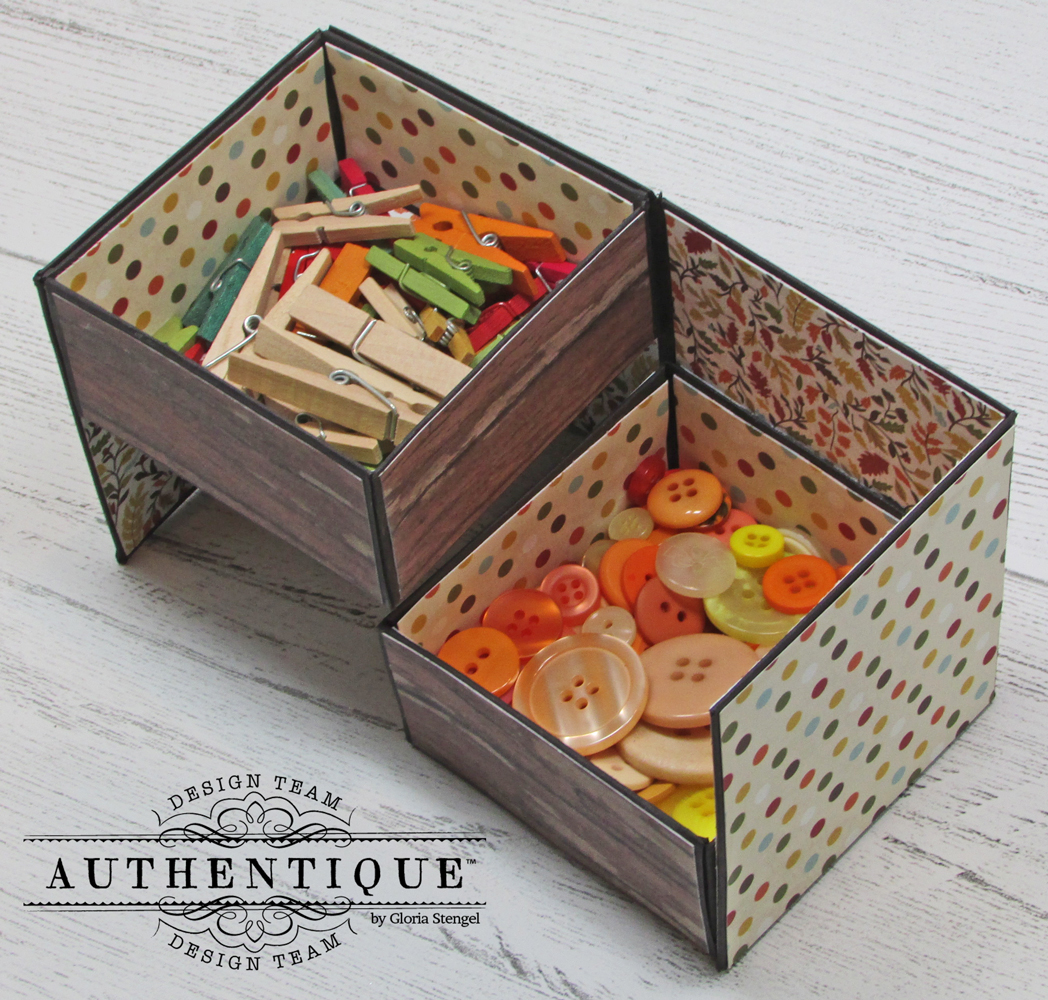
Once you pop the lid off this little box (approximately 3 1/4" x 3 1/4" x 3 1/4") two trays are revealed! The trays are perfect for small gifts or for fun storage! I put some fall-themed mini clothes pins and some buttons in mine!
I love how the trays fold up into a small box, with a matching lid. You can make these in other sizes, I am sure, and in all different themes. This would be a fun item to give each Thanksgiving guest. The top of the lid could also hold a place card!
Follow Norma's tutorial for the basic box assembly HERE. She has amazing photo directions and printable sheets on her website. I decided to just direct you there, rather than try to recreate the steps for you.
You need four (4) sheets of dark brown cardstock for my version, plus two or three sheets of Pleasant 12x12 paper. I used up some scraps from sheets One, Three, Four, and Six, and then a cut-apart from the 6x6 pad.
Once you have cut and scored the pieces for the lid, two trays, and the box mechanism (sides), decorate them with your paper BEFORE you assemble. I found it so much easier to glue all my paper on while the pieces were still flat.
Assemble the lid and both trays. The "side" piece wraps around the trays, which allows them to fold together into a box.
This is what the trays look like when the box is fully open. You will have two trays that are about 3 1/8" square and 1 1/2" deep.
Once the trays fold together, the lid will fit perfectly. I am not that great at 3D projects, as they tend to be precise and fiddly. However, this one went together with no trouble at all.
Once the box is all assembled, feel free to decorate as you wish! I used hot glue to add a bunch of fall-themed flowers and other bits to the lid.
Some of the flowers were left over from another project, where I sprayed white flowers with various ink mists to give them an autumn look. Mostly, I poked around in my "fall odds and ends" box and found enough stuff to glue to the top!
I cut out one of the messages from the Pleasant 6x6 pad and added it to the top of the box.
Thanks for stopping by today. If you have a chance to use Norma's tutorial or to print out her directions, please give her the credit. She did a fantastic job and her tutorial was very easy to follow.
Authentique Supplies Used:
Pleasant Collection: 12x12 paper, 6x6 paper
Additional Supplies Used:
Cardsock: WorldWin Brown
Flowers: Prima, Wild Orchid Crafts, Petaloo
Floral elements: craft supply
Spray mists: Tattered Angels Glimmer Mist Pumpkin Pie, Sun Sisters; Ranger Color Wash Sunset Orange, Wild Honey
Adhesives: hot glue, white glue, Scor-tape
Tools: scoring board, paper trimmer, bone folder, sharp scissors


Just gorgeous! The papers are perfect!
ReplyDelete