For those looking for the July Coloring Project, in order to comment for a chance at a prize, please click HERE.
Happy Independence Day, America! Join the Authentique Paper team as we share lots of fantastic patriotic-themed projects this week!
I make no secret that I am a true red, white, and blue American! My favorite holiday to spend with my extended family has always been the glorious 4th! I have not had the opportunity to return to Pennsylvania to be with my family in many years, but I think fondly on the small town parade, the carnival, "cooking out" in my parents' back yard, and fire works over the Susquehanna river! Such memories!
I especially love red, white, and blue and I wait impatiently each year to see what the NEW Authentique patriotic collection will look like! This year, the Liberty Collection did NOT disappoint! It is a true red, white, and blue collection, with lots of extra imagery to recall America's past days!
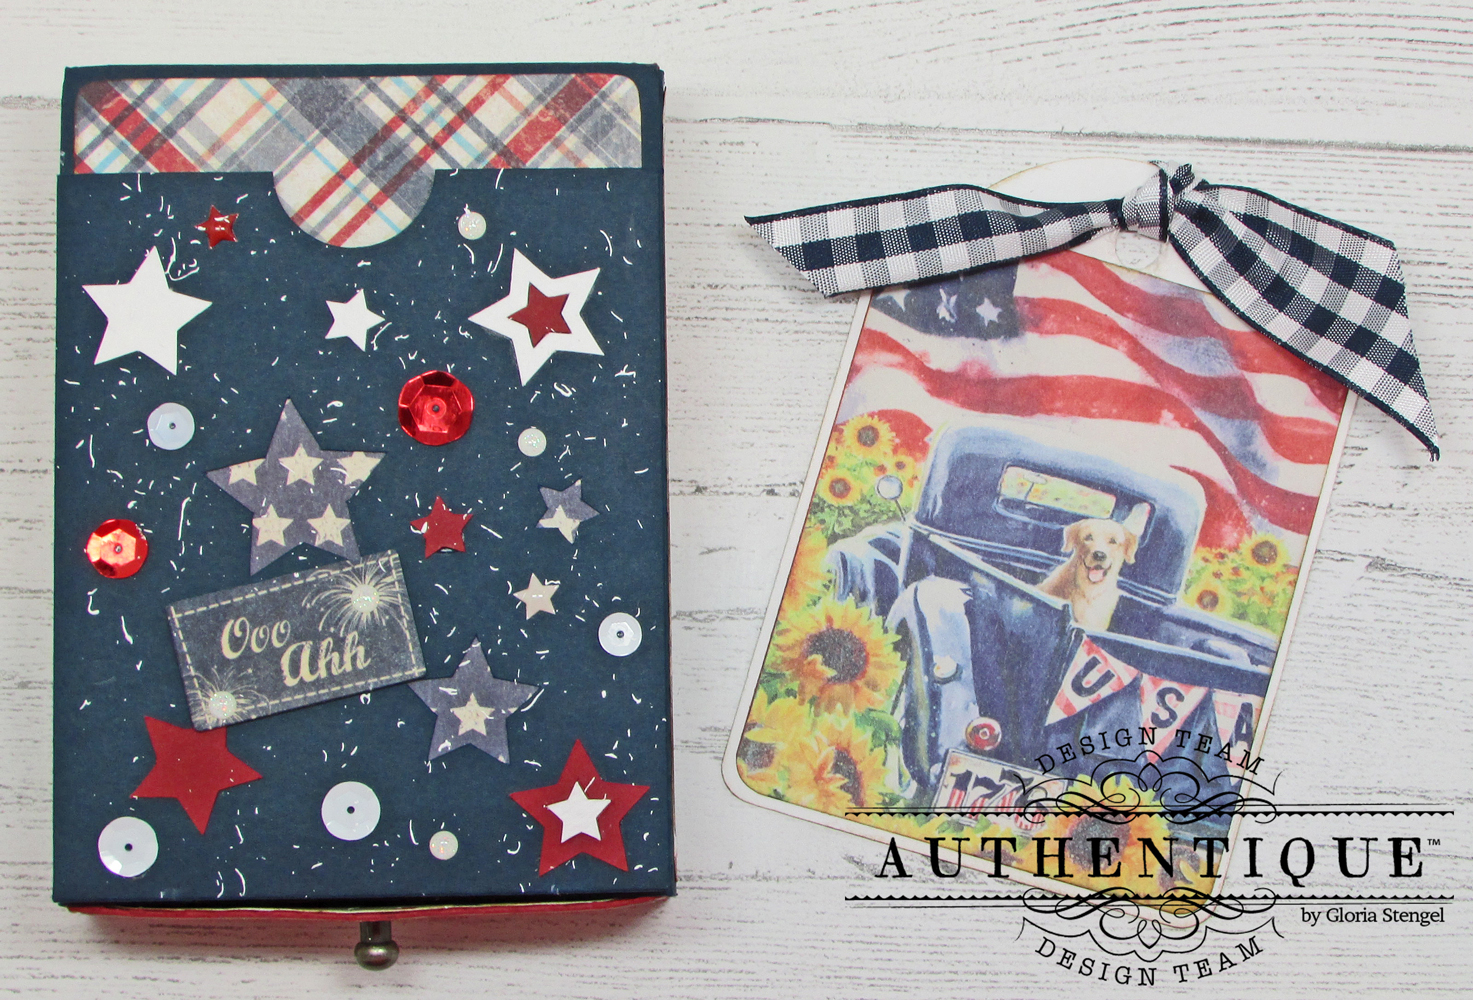
I created a 3 3/4" x 5 1/4" x 1 1/2" gift box, complete with a closure band and stunning rosettes!
Inside the gift box is another box! This one has an easel pocket for a tag and gift card, plus a drawer to hold a surprise!
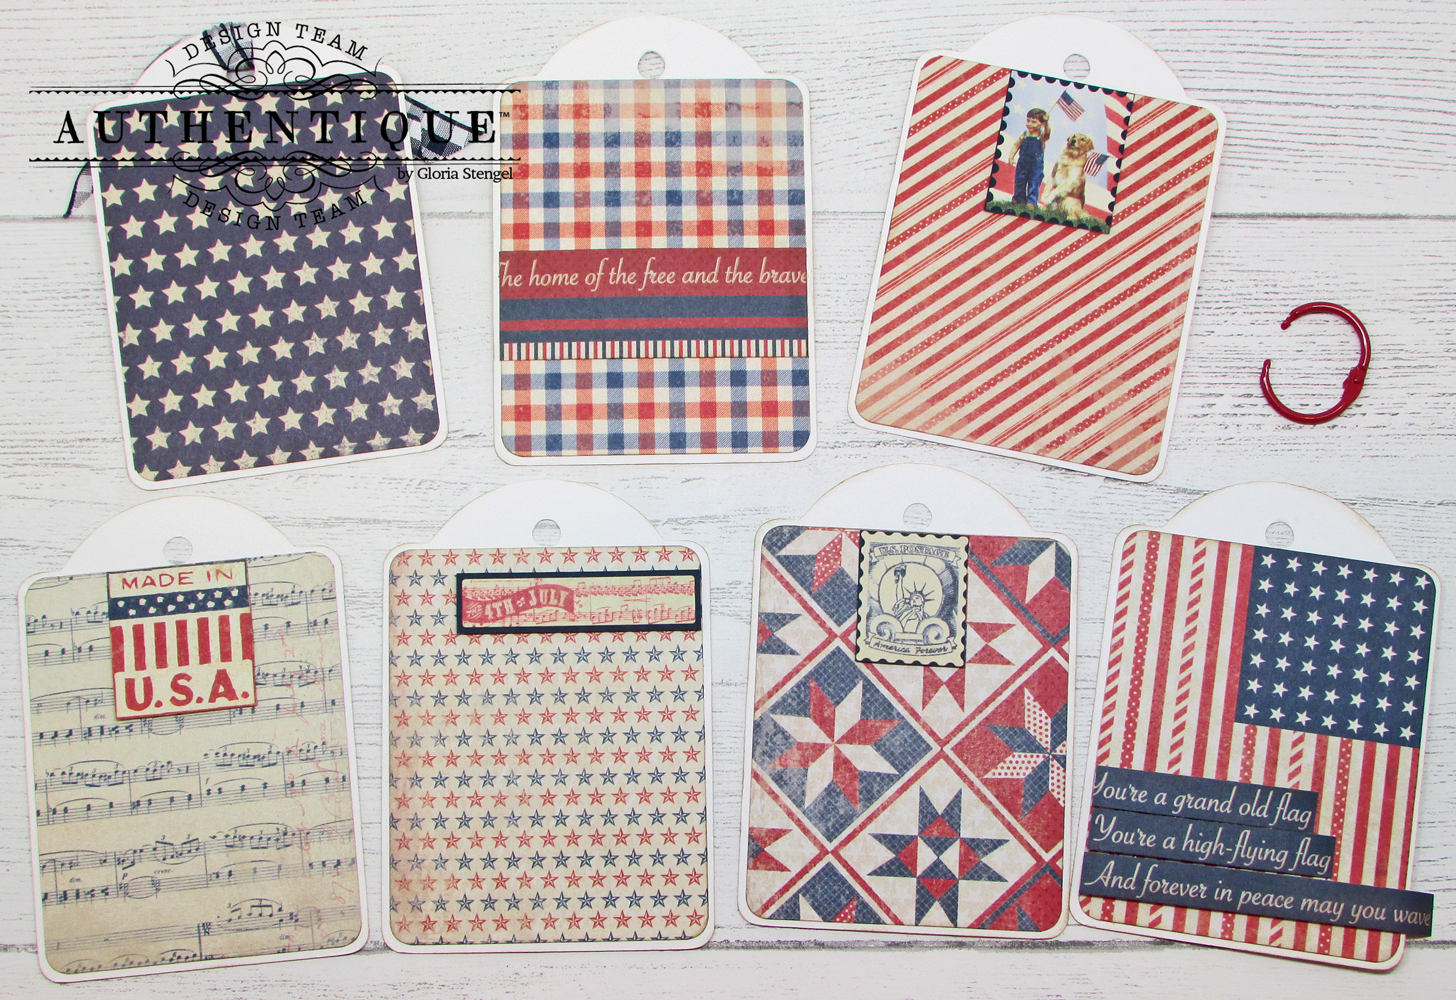
Inside the drawer is a tag mini album, perfect for photos and journaling! Or more gift cards!
TUTORIAL:
Follow along with this tutorial to make your own project!
First, you will need a few cut files for your electronic cutting machine (or a similar template to cut out by hand). I used the Star Gift Card Box with Pocket Easel Card by Lori Whitlock for the boxes and easel pocket. I did not care for the tag that came with the project, so I cut new tags from another tag shape that I had in my files. The tag I used is no longer available, but it is similar to the yellow tag shown HERE.
Cut the project from heavy weight dark blue, red, and white cardstock.
I wanted to make my box a bit larger than how it was designed. Using the Silhouette Design software, I simply selected the project (while everything was still grouped together) and sized the pieces so they would be proportionally the same. I sized the items so that the gift box section would just fit onto the 12x12 cutting mat. I made everything approximately 1/4" larger than the original.
Cut the drawer from red cardstock. The drawer will measure 3 3/8" x 4 3/4" x 1 1/8". Cut Authentique Liberty paper to 3 1/4" x 4 5/8" and attach to the inside bottom. Place double-sided adhesive on the tabs, as shown.
Flip the drawer piece over and cut Liberty paper for all the outside surfaces. For the outside bottom cut one piece of decorative paper to 3 1/4" x 4 5/8". Cut four pieces to 1" x 4 5/8" and four pieces to 1" x 3 1/4". Attach the paper as shown, except for the one piece where the drawer pull will attach. Place double-sided adhesives on the tabs, as shown.
Assemble the drawer (use THESE directions if you are stuck). Before you tuck the flaps into the drawer, make sure to attach the drawer pull to the front. Then add the last piece of decorative paper to the inside to cover the drawer pull mechanism.
This is what your assembled drawer will look like.
You will need seven tags, cut out of white cardstock. The tags should be approximately 4 1/2" tall and 3 1/8" wide. Any style of tag will work, but I prefer the style shown. Set the tags aside for now.
Next cut the drawer wrapper/box from dark blue cardstock. The finished box is 3 3/8" x 4 3/4" x 1 1/4". Cut Liberty paper for the inside of the box (this is step is not necessary, but I like to line everything with pretty paper!
Cut two pieces of paper to 4 5/8" x 3 1/4" and two pieces 4 5/8" x 1 1/8". Attach the panels to the inside of the drawer wrapper/box. Add double-sided adhesive as shown.
Flip the drawer wrapper over and add paper to the outside area. Cut two pieces of paper to 4 5/8" x 3 1/4" and two pieces 4 5/8" x 1 1/8". Attach the panels to the outside of the drawer wrapper. Add double-sided adhesive to the tab as shown. Note: you do NOT need to attach paper to the right panel as shown above as this is where the easel will attach. I got carried away and forgot, so I added paper there as well, as shown below.
Assemble the drawer wrapper and place the drawer inside. If your decorative paper is too thick, your drawer may not slide into the wrapper easily. You may need to rub it with a bit of waxed paper or bees wax.
Next, cut the easel mechanism from dark blue cardstock. This piece is approximately 9 1/2" x 3 3/8". Trim Liberty paper: one piece 4 5/8" x 3 1/4" and two pieces to 2 1/4" x 3 1/4". Attach the decorative panels as shown.
Using the ticket shapes that come with the cut file, cut one out of white cardstock and the smaller one out of dark blue cardstock. Attach a sticker ticket from the Authentique Glory Details sticker sheet to the blue cardstock ticket. Attach the ticket stack to the panel with two layers of foam adhesive, as shown above.
Flip the easel panel over. Trim one piece of Liberty paper to 2 1/4" x 3 1/4" and attach to the center area. Place double-sided adhesive to the panel, as shown. The larger, bottom section will attach to the drawer wrapper top. The smaller, top section will attach to the easel pocket. Set this aside for now, while we make the easel pocket and tag.
Now, we will make the pocket for the easel. Cut the pocket piece out of dark blue cardstock. It will look like the piece above. Trim a bit of Liberty star paper to go behind the pocket, so that the little stars show out of the die cut holes.
Trim a piece of the star paper to 4 5/8" x 3 1/4" and attach it to the bottom panel as shown. Decorate the top of the pocket with die cut stars, sequins, and enamel dots. Place double-sided adhesive on the tabs.
Flip the pocket piece over. The top portion is the back of the star paper you attached above. Trim a piece of the plaid paper to 4 5/8" x 3 1/4" and attach it to the bottom panel as shown. Assemble the pocket. and attach the pocket to the easel piece.
Attach the pocket easel to the top of the drawer wrapper, using the ticket embellishment as the "stopper" to keep the easel in place.
Here is the easel from the back.
The pocket easel folds flat. Decorate the pocket with a sticker element and some splatters of white paint. Trim decorative paper to 3 3/4" x 3 for the tag. I trimmed down one of the Liberty ephemera cards. Tie some blue and white check ribbon through the hole in the tag.
Place the tag into the pocket.
The gift box and tag pocket easel are finished!
Now, let's make the little tag album that goes into the drawer! First locate the other six tags you cut from white cardstock. You will also need a 1" binding ring. I found a red one in my stash!
Trim paper or ephemera cards to 3 3/4" tall and 3" wide. Round the four corners and attach them to the tags. Add a few stickers or other flat embellishments to decorate your tags.
Add paper and flat decor to the back of the tags, if desired. You can add photos or journaling to blank tags, or use a glue dot to attach a gift card to the back of each tag!
Bind the tags with the binding ring and place them into the drawer of your gift box.
We will now make the presentation box. Cut the box from dark blue cardstock. The box measures 3 3/4" x 5 1/8" x 1 1/2".
Trim Liberty paper for the inside of the box. Cut two pieces at 3 5/8" x 5", cut one piece at 1" x 5", cut two pieces at 1 3/8" x 5", cut 2 pieces at 3 5/8" x 1" and cut two pieces a 3 5/8" x 1 3/8". Attach the pieces as shown. Notch the front piece with a hole punch. Add double-sided adhesive to the tabs as shown.
Flip the box over. Trim Liberty paper for the outside of the box. Cut two pieces at 3 5/8" x 5", cut one piece at 1" x 5", cut two pieces at 1 3/8" x 5", cut 2 pieces at 3 5/8" x 1" and cut two pieces a 3 5/8" x 1 3/8". Attach the pieces as shown. Notch the front piece with a hole punch. Add double-sided adhesive to the tabs as shown.
Assemble the box per THIS video.
Make a closure band from dark blue cardstock. Trim cardstock to 14 1/2" x 1 1/2". (You will need to spice the 12" cardstock together to form a 14 1/2" length.) Trim a strip of the Liberty plaid paper to 14 3/8" x 1 3/8" and attach to the band.
Wrap the band around the box for fit, and attach the ends.Decorate the top of the band as desired.
Ad added two rosettes made from the decorative paper, plus a few other bits and pieces. Very festive!
Your project is finished!
Close the easel so that you can place the gift box with drawer into the presentation box.
Place your easel box into the presentation box, tucking the ribbon in as necessary.
Close the lid, tucking the flap as shown.
Place the band around the box...and deliver your gift!
Thanks for stopping by! Happy 4th of July!
Authentique Products Used:
Liberty Collection: 12x12 Paper, Details Stickers
Heroic Collection: 6x6 Paper Pad
Glory Collection: Elements Stickers, Details Stickers
Other Products Used:
SVG/Silhouette Files: Lori Whitlock Star Gift Card Box with Pocket Easel Card, Silhouette Design XOXO Tag (similar HERE)
Cardstock: WorldWin Papers Red, Flag Blue; Hammermill White
Ink: Ranger Distress Frayed Burlap
Paint: Plaid Folk Art Wicker White
Ribbon: Really Reasonable Ribbon Navy Bold Check (similar HERE)
Knob: Tim Holtz
Binder ring, star, sequins: craft supply
Enamel dots: Eyelet Outlet
Dies: Tim Holtz Rosette, Mini Rosettes
Tools: Silhouette Cameo, circle punches
Adhesive: Scor-tape, ATG tape, white glue, foam squares


Fabulous project, Gloria. Thanks for sharing this amazing project.
ReplyDelete