

At the end of the hop, comment on the RRR Blog post, answering the question listed, for a chance to win the February Ribbon Club Assortment shown below. (The Design Team appreciates your comments, too!)


I added Light Navy Checkerboard Satin ribbon to the spine area, wrapping it around to the outside. I knotted the ribbon on the outside of the spine. This ribbon i wonderfully shimmery and such a lovely shade of blue!
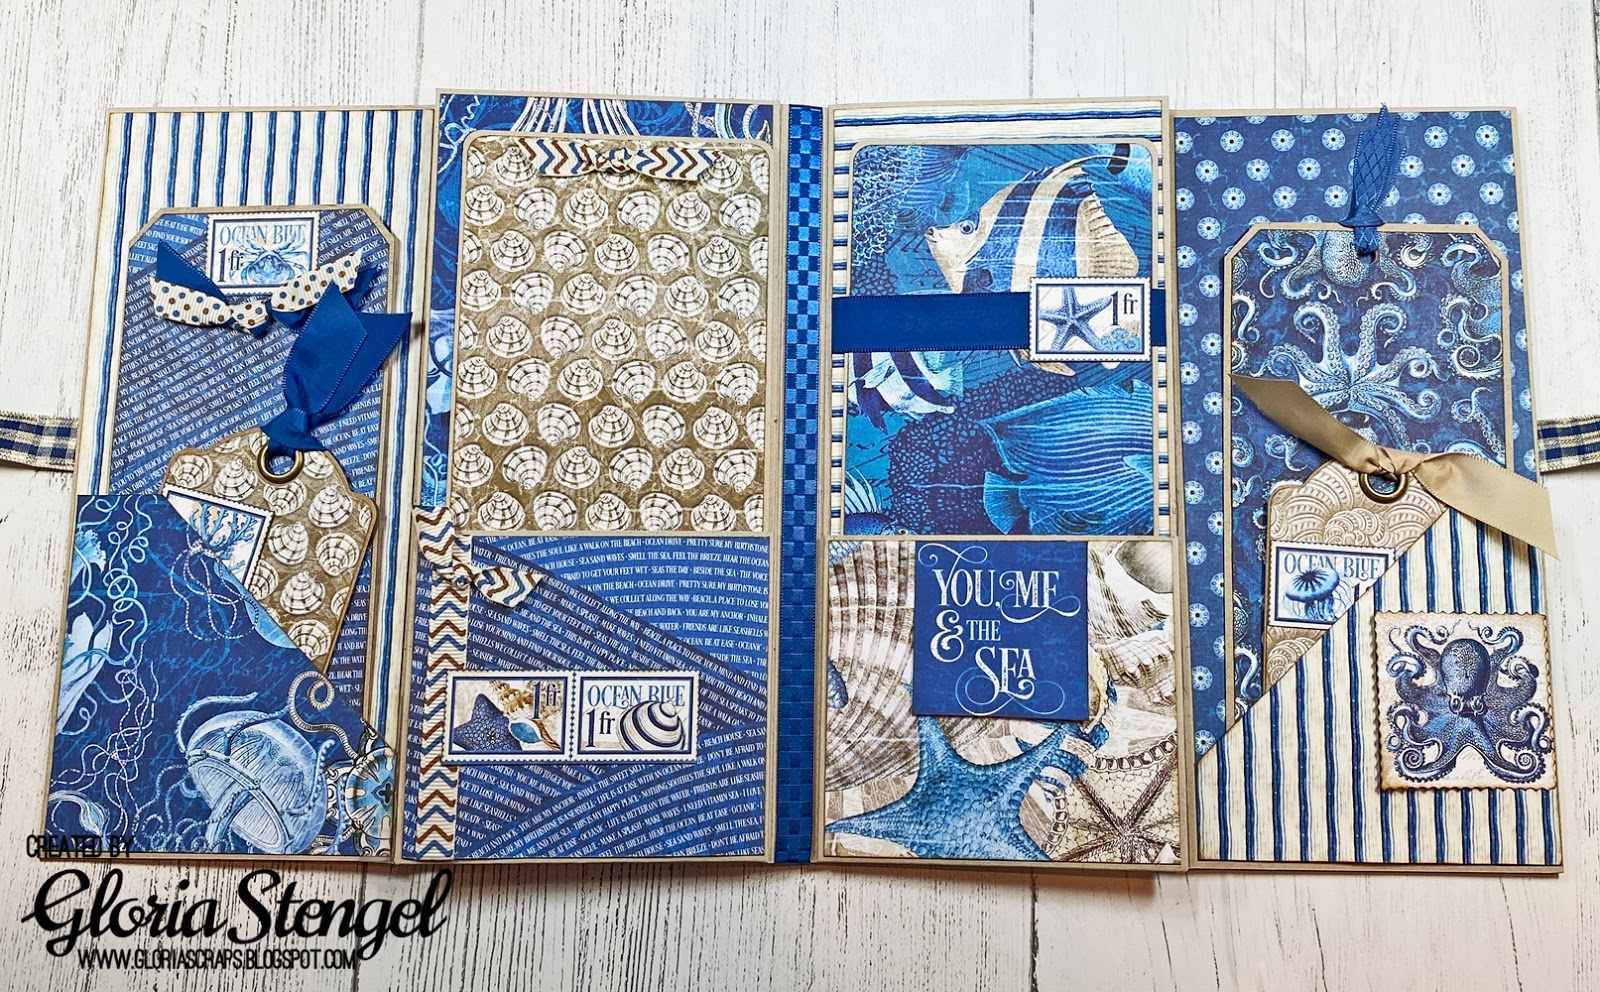
I have used the wonderful ribbon on each of these pocket pages: 5/8” Tan Taffeta, 3/8” Blue and Brown Chevron Stripe Grosgrain, 5/8” Light Navy Taffeta, 3/8” Blue and Brown Confetti DotGrosgrain, 3/8” Smoke Blue Diamond Satin ribbons.

There are two waterfall elements, each containing five pages.

If you want to make your own album, follow the directions below to make the album base.


Add pockets to both panels. Cut tan cardstock to 4" x 4 7/8" and score on three sides to make the pocket. Attach a pocket to each flap. Each pocket will be approximately 3 1/2" tall and 3 7/8" wide. (You will need to make four total pockets, plus two diagonal-style pockets.)
The pocket inserts/photo mats are 8" x 3 1/2" with four rounded corners. Cut these from tan cardstock. You will need to cut four inserts/photo mats.

You will add diagonal pockets to the first and last panels. I made my pockets from paper rather than cardstock. (This was a mistake, but before I realized it, I had the pockets glued down!) Cut the paper to 4 1/2" x 4 1/2" and trim on the diagonal. Then trim the corners off the as shown so that the pocket is 4" tall and 3 7/8" wide.
Attach the square pockets to the center two flaps as explained in the previous step.

The larger tag is a pre-made kraft tag, 6 1/2" x 3 1/8". I traced the tag onto the paper and then cut the paper a bit smaller. The small tag is a Graphic 45 Kraft ATC tag.

I used the G45 ATC tag die to cut the paper for the small tags.
I love how the ribbon looks with this paper! So fun and pretty! The knotted grosgrain is especially cute!
The pages will be 4 1/8": x 3 1/8" and can hold the 4" x 3" ephemera cards to pieces of paper.
Add the second waterfall as shown above. If you need help construction and adding a waterfall element, see THIS POST for directions.
I added magnets to keep the waterfalls closed; one on the base and one on the top waterfall page.

Attach the 5/8” Plaid Blue/Ivory/Gold ribbon as a tie closure by gluing it to the center of the album and wrapping it around the back. I used a yard of ribbon so that I could tie a nice, big bow!
Add your decorative paper over the ribbon, making sure to place extra adhesive around the edges to keep the ribbon from pulling up.
I did not add a lot to the cover, mostly because I was nearly out of paper! I added some of the border strips, and then one of the cut apart ephemera cards. I had planned to glue a bunch of stuff to the front, but in the end I felt that a simple cover was best!
If you wish to see all the insides of the album, and how it folds open, please view the video below.
Thanks for watching!

Here is the RRR Blog Hop Order in case you get lost!
Gloria - YOU ARE HERE!

Linsey
Really Reasonable Ribbon's Ramblings
REMEMBER, LEAVE A COMMENT ON THE RRR BLOG FOR A CHANCE TO WIN!
Really Reasonable Ribbon's Ramblings
REMEMBER, LEAVE A COMMENT ON THE RRR BLOG FOR A CHANCE TO WIN!

Trims: Really Reasonable Ribbon February Ribbon Club (see the body of the post for direct ribbon links)
Cardstock: Neenah Sand Storm
Printed paper: Graphic 45 Ocean Blue (coming soon)
Tags: large (unknown), small (Graphic 45 Kraft ATC)
Dies: Graphic 45 Large Tag, ATC Tag, and Flower Dies
Ink: Ranger Distress Vintage Photo (or G45 Decades Dark Cashmere)
Magnets: Basic Grey
Adhesive: ATG tape, Scor-tape, white glue
Oh my gosh. This is a work of art. It's beautiful and I love the colors. Excellent job! [Bunny]
ReplyDeleteThis ribbon assortment goes so perfectly with the sea life papers! And such a beautiful project (that I want to try!). I love the angelfish - my Dad always had a tan FULL of just angelfish (& catfish to lean it, of course!).
ReplyDeleteOh my word ...so luv your tall folio made with those Ocean Blue papers and those RR Ribbons! You are so right! They are made to go together! This ribbon set are my colors! TFS, Suzy Q
ReplyDeleteGloria, this is so fantastic! I love those colors! Thanks for the tutorial.
ReplyDeleteBeautiful, as usual.
ReplyDeleteSuch a cute card. Love the shades of blue and all the thought you put into making it. A treasure.
ReplyDeleteThis is incredible! So many layers and what a cool way it opens!
ReplyDeleteEven though I have already watched some projects being made with the G45 ocean, I never thought about the RRR ribbons matching it so well! This was really cool, and even thought about making it for my daughter, but she always takes so many landscape pics, I'd have to find a different design. Thanks for the beautiful walk through!
ReplyDeleteYou could turn this into a landscape format! That would be so fun!
Deletelove the book and love the paper
ReplyDeletelove the book and love the paper
ReplyDeleteBeautiful album
ReplyDeleteLove this album and blue and brown are one of my favorite color combos.
ReplyDeleteTrès bel album. Il ne sera pas nécessaire de mettre des photos.
ReplyDeleteBonne journée
Speechless......wow......AWESOME!!!!!!
ReplyDeleteRRR (Bonnie) sure does have a lovely color tone co-ordinated selection of ribbons. Thanks Gloria for the extra effort on the detailed project instructions. I have made some of your projects from instructions and truly enjoy the process.
ReplyDeleteSo happy you enjoy the projects!
DeleteBeautiful! I am going to try and make one!!
ReplyDeleteI love this
ReplyDeleteAbsolutely beautiful. I wish there was a kit.
ReplyDeleteLove this project You mentioned that you wished you had added extra inside spines to the first flaps wouldn't I need to add to the interior spine to accommodate for the addition? Trying to envision this in my mind.
ReplyDeleteSo pretty. Love this. Simple but very usable. I'm going to make several of these for friend gifts. Thank you for sharing.
ReplyDeleteThank you! thank you! thank you!!!! for posting instructions. Almost no one does and it’s so frustrating to see videos of crafters flipping g through beautiful albums just to find out there are no instructions. It feels like a “neener neener”.
ReplyDeleteSo THANK YOU! 😁😁😁😁❤️❤️❤️
You are so very welcome! My pleasure!
Delete