Sunday, October 30, 2011

Graphic 45 Thanksgiving Card Challenge!

Graphic 45 is having a fun Thanksgiving Card Challenge! Read all about it on the Graphic 45 Blog!

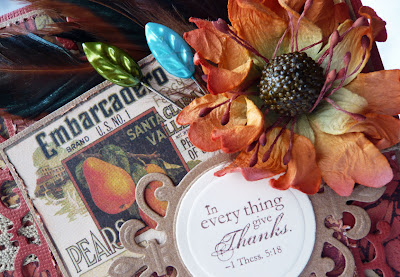
I created a card to get you started!


I used papers from Steampunk Debutante, Renaissance Faire, and Domestic Goddess - all in lovely fall shades!


I searched through my stash and found this fabbie flower and some feathers to add to my card. Such fun to shop in Gloria's Scrapbook Emporium!  {grin} 


Here is how to enter the contest:

Make a Thank You Card using Graphic 45 products

Load your card onto the Graphic 45 Facebook Page

Label photo "Thank You Card Challenge"

Submit by November 10 at 12pm PST

On November 11, three winners will be announced! Winners will get a PRIZE PACKAGE from the Christmas Emporium Collection!

(For my big announcement, scroll down to the next post....)

Supplies:
Graphic45 Papers: Steampunk Debutante: Fantasy Floral; Renaissance Faire: Bona Fide; Domestic Goddess: Farmers Market
Coredinations: Signature Series Graphic 45 Cardstock (Tuscan Sunset, Heritage Craft)
Clearsnap: Colorbox Blush Rose Chalk Ink; Colorbox Decades Dark Cashmere Antiquing Dye Ink
Spellbinders: Grand Calibur Die Cutting Machine, Nestabilities Templates (Fleur De Lis Accents, Fleur De Lis Squares, Standard Circles Large)
Scrapbook Adhesives by 3L: EZ-Runner, 3D Foam Squares
Neenah: Natural White cardstock
Stampin' Up: Sentiment stamps
American Crafts: Lace
Maya Road: Trinket pins
Prima: Flowers
Glue Dots: adhesive craft dots
Craft supply: feathers; glue

Big Announcement!

I'm back safe and sound from CKU Reunion, San Diego! (That's NOT the big announcement!) I will have highlights and photos from the event later this week. Once I get my act together and my bags unpacked. I only had to drive 25 minutes, but the baggage that came home with me is mind boggling!

The BIG ANNOUNCEMENT......drum roll.....

I have been selected to be on the Really Reasonable Ribbon Special Events Design Team! Read all about it HERE. Is that fun news, or what?!

I am super excited to be part of this team. I love ribbon and love the RRR Store! My first official event will be the November Blog Hop on November 13th! Make sure you tune in for that!

This is my current favorite product at the RRR Store: Divine Twine™ Baker's Twine Assortment. I love this twine! Stop by and pick some up for yourself...and see what else Bonnie has in stock!

Thursday, October 27, 2011

CKU Reunion San Diego!

Hey bloggers. I am heading out to CKU San Diego in a little while. I will be back on Sunday or Monday with some peeks of the projects I make at the event! If you are attending CKU, find me and say hi to me! I look just like the photo on the sidebar. That photo was taken in April, making me easy to spot! It's not like I put up my high school graduation photo or one where I'm 60 lbs thinner! {grin}

Also, as you can see I am getting close to 500 Followers, plus the Handmade Holidays Blog Hop is next week...so I will be doing a BIG PRIZE DRAWING. Stay tuned for information about that!

I also have an announcement to make on Sunday....wait for it....

Tuesday, October 25, 2011

Halloween Decor from Graphic 45!

(This is my second post for today. If you are looking for
the CPC Sketch, scroll down!)

It's all about the purple! I am not big into Halloween, but I like vintage images and old fashioned things, so I'm drawn to the Magic of Oz and Hallowe'en in Wonderland papers from Graphic 45, especially the purples! I created this "folding screen" project for the Graphic 45 Blog. Super fun!


To create the screen, I cut cardstock to 6x12 inches, and scored at 3, 6, and 9 inches. I glued heavy chipboard to the back of each panel for stability. (Cut the chipboard slightly smaller than 6x3 inches.)


I covered each panel with tan cardstock and then a strip of Graphic 45 paper...in purple, of course!


For the first panel, I added one of the Magic of Oz chipboard buttons tied up with twine, a ticket, and a bottle of "wizard polish." I cut the labels from Goblin Gazette and glued them to the 7Gypsies bottle!


For this second panel, I used one of the cards from Journey to Oz and a flower that I made from Graphic 45 Flower Staples. I inked the #31 with some Staz-on to make it look old. The text is a stamp that I found...somewhere. I have no idea who makes it. It's part of a quote from MacBeth, but I cut it up and used only part of it.


You can see the rest of the quote here: By the pricking of my thumbs, something wicked this way comes. Perfect for the Wicked Witch! I cut her out and popped her off the page! And I used more of the chipboard.


The purple stripe paper is The Mad Hatter from the Hallowe'en in Wonderland collection. More "ephemera" and another flower. And an Idea-olgy metal clock.


Here are a few more views of my little Halloween screen!


I wanted to try to show you the dimension. I like to pop things up and wrinkle everything. Makes it look more interesting.


Hope you enjoyed my little screen. I plan to make one for Christmas, too. So check for that in December. I had the idea of making one for each month/season/holiday. We'll see how I do by this time next year! {wink}

Make sure you check the Graphic 45 Blog for more sneak peeks of the NEW Graphic 45 collection: Tropical Travelogue!

Supplies:
Graphic45 Papers
The Magic of Oz: Journey to Oz, Goblin Gazette, There's No Place Like Home, Wicked!
Hallowe'en in Wonderland: The Mad Hatter
Graphic45 Staples: The Magic of Oz Chipboard Tags 1 and 2; Flowers

Partner Products:
Clearsnap: Colorbox Chestnut Roan, Creamy Brown Chalk Ink; Colorbox Decades Photogenic Dye Ink
Scrapbook Adhesives by 3L: EZ-Runner, 3D Foam Squares

Other:
Grafix: Bulk chipboard
Bazzill Basics: Raven, Kraft cardstock
Neenah: Natural White cardstock
Stampers Anonymous Stamps: Tim Holtz Collection Odds and Ends
Clear Art Stamps: Halloween Fun
Autumn Leaves Stamps: Ticketed
Tsukineko: StazOn Timber Brown ink
7 Gypsies: Glass bottle
Idea-ology: number plate, long brads, game spinners, clock
Glue Dots: adhesive craft dots
Craft supply: twine; brads; glue

Christian Paper Crafts Bonus Sketch!

Hello and good morning! I told you a few weeks ago that I was stepping down from Christian Paper Crafts, and that's still true. However, I had already made a sketch and sample for next month, so they decided to give it to you as a BONUS for today! Lucky you! Make sure you link up your project to the CPC Blog!


I made a pocket card sketch, which is fun if you have a gift card or book mark or something to tuck inside the pocket. I just used my pocket to hold decorative elements.


I use a lot of the Jenni Bowlin bingo cards. I found packs and packs of them the other day...in my stash. I told my daughter she should NOT let me buy any more of them!!!

Well, it is good-bye to CPC for real now. Thanks to the CPC ladies for having me as the Sketch Designer for the past two years! I've loved every minute of it!

When God shuts a door, He opens a window. And I have a FANTASTIC announcement coming on Sunday....so wait and see about that... {wink}

Supply List:
Cardstock: Bazzill, Stampin' Up!
Designer paper: Graphic45 Times Nouveau
Ink: Memento Tuxedo Black, Clearsnap Smooch Spritz Tea Party, Caramel Latte, Pralines and Cream, Clearsnap Colorbox Chalk Warm Red
Stamps: Hero Arts
Embellishments: Doily from craft store, Bingo card from Jenni Bowlin, Tag from Graphic45, Seam binding from Lawrence Schiff, Pins from Maya Road and craft store, Flower from Wild Orchid Crafts, Twine from May Arts
Tools: Die templates by Spellbinders (S5-027 Labels Twenty-one)

Monday, October 24, 2011

Graphic 45 - Tropical Travelogue

Graphic 45 has introduced a new line - Tropical Travelogue!


This collection will be perfect for tropical vacation scrapbook pages! If you love botanical prints, check this out!


Later this week I will show you a sneaky peaky of the new Tropical Travelogue stamp sets! I've had a chance to play with those already...and wow! (I normally get the stamps about a month prior to getting the paper since I make samples for the Hampton Art Stamps sales team!)

Saturday, October 22, 2011

Spellbinders Ad!

Back in August I was asked to create a fall ensemble for Spellbinders™. This is what I made for them. You can see it in the Gallery also.


I created a napkin holder, gift box, and name tag. Windy, one of my teammates, also created an ensemble, which you can see HERE.

Spellbinders combined our ideas to create this ad! (I spotted it on the back cover of the November 2011 issue of CardMaker.)


Below is a close-up of the ad. I love the Spellbinders gives their designers credit when work is used in advertisements! But in my case, they only used my IDEA for a napkin ring; they did not even use my actual project! And they still were kind enough to give me credit!


Here are some close-ups of the items I created. I used the Orchard Harvest Tags And Accents die set. This is one my favorites from the Summer 2011 Release!


When you stencil over the embossing with inks, you get such an amazing dimension look.


I think the leaves turn out fantastic using this technique!

I created the little box with the Hexagon Pinwheel Top Box die template. Spellbinders came out with several box templates for Summer Release. I love using them. It's so quick and easy to make a little gift box. Since the Grand Calibur® has a large cutting platform, you can cut the box templates in one easy pass!


I love the new ad and think Windy did a fantastic job with her projects and color scheme! I hope you check out more of the Design Team's work at the Idea Gallery!

Spellbinders Supplies:
S5-073 Orchard Harvest Tags And Accents
LF-008 Hexagon Pinwheel Top Box
Spellbinders™ Grand Calibur® Die Cutting Machine

Preferred Partner Products:
StampingScrapping, Tag Accents Stamps

Cross Promotional Partner Products:
My Mind's Eye, Stella & Rose Hattie Happy Polka Dots Patterned Paper
WorldWin Papers, CutMates Ripe Tomatoes, Butternut Squash Cardstock
Bazzill Basics Paper, Smooth Kraft Cardstock
Clearsnap, ColorBox Berrylicious, Butterscotch, Yellow Cadmium, Pumpkin Spice Fluid Chalk Ink, Ink Applicator

Other Supplies:
White Cardstock; Brown Dye Ink; Computer Journaling; Cloth Napkin; Plasticware

Friday, October 21, 2011

Announcing....

Spellbinders™ Paper Arts has just announced their design team contest for 2012-2013!


Remember, anyone can enter! It's open world-wide! The deadline for round one is December 9, 2011. So get busy making something! Best wishes to all who apply!

Have you seen the Spellbinder Guest Designers making "waves" on the Blog? Sherry Cheever was up on Thursday! Check out her fabbie project and video HERE.  Make sure you enter the give-away at the Spellbinders Blog while you are at it! Spellbinders is giving away a Spellbinders Edgeabilities® Classic Scallop die template to a lucky commenter! Just leave a comment on the Spellbinders Blog, and tell what kind of crafting you love! Comment by Midnight, Friday night, EST, and the winner will be announced on Saturday! (Contact Beth Pingry for questions on the giveaway.)

And just so you are not cheated out of a project, here is one of my Gallery projects. I made this little gift box out of one 12x12 sheet of cardstock. I covered it with designer paper and added some pizazz with Spellbinders dies.


I almost always stencil through the dies with ink. It just brings out the small details in the project!


This is the back of the little box.
 

And opened. You could put a candle or other small gift in there...a tennis bracelet...perhaps! I used hook and loop tape as a closure. Not very pretty, but it gets the job done!

Spellbinders Supplies:
S5-070 Ornate Artisan Tags And Accents
LF-002 Creative Book Pages Two
LF-006 Wonderful Wings
Spellbinders™ Grand Calibur® Die Cutting Machine

Preferred Partner Products:
Gina K. Designs, Famed Greetings Stamps

Cross Promotional Partner Products:
Fancy Pants Designs, It's The Little Things Spring Flowers Patterned Paper
Bazzill Basics Paper, Textured Raven, Sherbet, Smooth Walnut Cream Cardstock
Clearsnap, ColorBox Amber Clay, Peach Pastel, Alabaster Fluid Chalk Ink, Ink Applicator
Creative Impressions, Ribbon
Artistic Wire, Craft Wire
Scor-Pal, Scoring Tool
Glue Dots, Mini Glue Dots

Other Supplies:
Black Dye Ink; Hook and Loop Fastener; Transfer Tape; Foam Tape; Liquid Glue

Thursday, October 20, 2011

Graphic45 Art Box and Mini Album Tutorial


Graphic 45 has the most incredible art boxes that can be altered. Each box comes with a mini album inside, also perfect for altering! There are three sizes: 5x5 and 5x8 kraftboard, and a round metal film canister album. For my project I chose the 5x5 album.


The box is bare allowing you to add paint, paper, ink, or whatever you desire! I chose the Graphic 45 An ABC Primer paper collection for decorating my box.

   
I used more of the An ABC Primer paper to decorate the mini album. If you want to make one of these boxes of your own, follow the directions below!

Please note: For larger views, click on each photo.

Instructions:

1. Cut papers to cover the outside of the art box. (The Art Box measures 5.25" W x 5.25" H x 2" D when closed.) For the front panel, trim out the opening with a kraft knife. Sand all edges. Use: One Two Buckle My Shoe and Jumping Joan papers.


2. Paint Ornate Metal Door Knob and a Metal Tag Staples with white acrylic paint. Allow to dry. Attach the knob to the top left edge of the front panel. Attach the metal tag to the side panel opposite the box opening.


3. Attach decorative papers so that they show through the opening in the box. Use School Days and One Two Buckle My Shoe. Glue chipboard elements and images cut from Grammar School paper to decorate the front of the box. Distress as desired.


4. Attach papers to the inside sections of the box, sanding all edges. Decorate with elements cut from the paper. Use One Two Buckle My Shoe, Games and Playtime, Alphabet Soup, Bedtime Stories, Grammar School papers.


5. Remove the album from the box and add a decorative panel to the inside of the box, if desired.


6. The album has four panels to decorate. The album is 4.75" x 4.75" when closed and 4.75" x 19" when opened. We will decorate the front and back of each album page.


7. To decorate the cover panel, trim image from Happy Go Lucky paper and attach to the front cover of the album. Tie twine to the clock button chipboard die cut, and attach it to the upper right corner of the album with glue. Make sure to sand all edges.


8. For the next two pages, attach Calico Kids to the panels, making sure to sand all edges. Trim out the ruler images from An ABC Primer paper and cut to size. Attach one ruler to the bottom of page one and one ruler to the top of page 2. Add photos or photo mats (approximately 3.5" x 4") and cut images from Grammar School paper, attaching with foam tape. Make sure you can slide photos under the images.


9. To create a pocket for page three, first cover the panel with Happy Go Lucky paper. Then, trim the flash cards from One Two Buckle My Shoe paper to size, and place adhesive on three sides. Glue to the panel, leaving the top open. Attach twine and twill to chipboard tags and manila tags, then tuck them into the pocket.
 

10. Flip the alum over and decorate the back of each panel as shown.


11. For page four, attach Bedtime Stories paper to the panel, then attach a strip of Grammar School paper to the center,. Make sure to sand all edges. Attach a photo mat and an element cut from Grammar School paper.

For the page five, attach Calico Kids paper to the panel, making sure to sand all edges. Trim out the ruler image from An ABC Primer paper. Attach the ruler to the bottom of the page. Add a photo mat and an image cut from Grammar School paper. Use foam tape to attach the images, and make sure you are able to slide your photos under each image.


12. To create the tag on page six, trim Graphic45 packaging (use packaging from one of the Graphic45 Staples products) to fit the panel, and cover the bottom of the tag with black cardstock. Round the bottom corners. Tie twill to the opening, and decorate with an image cut from Grammar School paper.


13. To create a pocket for page seven, first cover the panel with Bedtime Stories paper. Then, trim Grammar School paper to size, and place adhesive on three sides. Glue to the panel, leaving the top open. Attach twine and twill to chipboard tags, manila tags, and library cards, then tuck them into the pocket.

Enjoy creating your very own school memory box and album!


Supply List:
Box and Mini Album - Graphic45 (5x5 Kraftboard Altered Art Box w/Album)
Cardstock: Bazzill Raven
Designer Paper: Graphic45 An ABC Primer (Bedtime Stories, One Two Buckle My Shoe, Games and Playtime, School Days, Calico Kids, Happy Go Lucky, Grammar School, Jumping Joan, Alphabet Soup)
Embellishments: Ornate Metal Door Knob and Metal Tag Staples by Graphic45, Chipboard Tags 1 and 2 by Graphic45 An ABC Primer
Paint: Deco Art White
Trims: Graphic45, May Arts, fabric store
Tags: Office supply store, Graphic45 packaging
Library card: teacher supply store
Tools: Sand It Gadget from Core'dinations, Anywhere hole punch from Fiskars
Adhesive: Scor-tape, ATG tape and foam tape from Scotch 3M, Glue Dots, Tombow Mono Metal glue

Wednesday, October 19, 2011

Hello, Dorothy!

This is my second post for today, so scroll down to see another fabbie Halloween card.

For this post I have a Graphic 45 card for you! I used The Magic of Oz to create this a sweet Dorothy card. I saw a funny quote the other day on a friend's Printerest wall..."The Wizard of Oz is just a story about two women fighting over a pair of shoes." Made me laugh! This card is all about the baskets that Dorothy is carrying!


To mimic the basket weave I cut a mat from cardstock using the Spellbinders™ Lace Doily Motifs die template. I used the blue checked pattern from Yellow Brick Road to mimic a ribbon on the card.


And every girl needs a magic wand...so I gave one to Dorothy, too! Really, it's a star pin from Maya Road!

Supplies:
Cardstock: Bazzill, Stampin' Up!
Designer paper: Graphic45 The Magic of Oz (Journey to Oz, Yellow Brick Road)
Ink: Clearsnap Colorbox Chalk Blackbird
Pin: Maya Road
Tools: Grand Calibur Die Cutting Machine by Spellbinders, Die templates by Spellbinders (S5-053 Lace Doily Motifs)
Adhesive: tape by Scotch 3M, glue by Tombow

Fun 4 Fall Challenge at Really Reasonable Ribbon


I have not had time to participate in any extra challenges in months! When I saw the Really Reasonable Ribbon Challenge #34, I knew I wanted to play! Halloween is in the fall, right?! I made this cutie card just for the challenge, mostly to use the FANTASTIC shimmer satin ribbon and baker's twine I got at the RRR store! Love me some purple!


I colored these cuter than all get out stamps with Copics. (My friends and I get together once a month for a coloring party. We all bring stamps and our markers and colored pencils and...color. How fun is that?!)


I stamped the greeting directly onto the patterned paper, and colored the stars with glitter pens. You can't see it in the photo, but there is glitter on the main image as well.


I decorated the inside of the card with this super cute paper.

Supply List:
Cardstock: Bazzill, Stampin' Up!
Designer paper: Fancy Pants Designs
Stamps: Papertrey Ink, Clear Art Stamps
Ink: Copic Markers and Atyou Spica Glitter Pens; Memento Tuxedo Black Dye; Clearsnap Colorbox Wisteria Fluid Chalk
Ribbon and twine: Really Reasonable Ribbon
Adhesive: Scotch 3M

Tuesday, October 18, 2011

Spellbinders and Unity Stamp Company Blog Hop - Day 2

Welcome to our TWO-day event!


You should be joining me from Wendy Chang's blog, if not then head to the beginning at the Unity Stamp Co. Blog.

With all the blog-swaps that are happening out there lately, I can't think of one more exciting than when the amazing women of SPELLBINDERS™ get together with the rock stars of UNITY STAMP COMPANY!

We can't wait to show you a special line of coordinating products featuring SPELLBINDERS dies and SAMANTHA WALKER for Unity Stamp Co. rubber stamps!
  
Not only are we thrilled to be collaborating on such a special 2-day event, but ONE of you will win ALL of the coordinating stamps and dies from the Samantha Walker collection! We will also have 1 winner each day from the comments that will receive 1 Samantha Walker stamp set and coordinating dies.

So be sure to enjoy our hop both days, leave comments on all of the blogs each day and check back to see if you won!

(Winners will be posted on Wednesday, October 19th on the Unity Blog and Spellbinders Blog.)

When I received my stamps...I got to playing and could not stop! I made three cards for you! I am such an over-achiever! I concentrated on the Orchard Harvest Tags and Accents die templates and stamps.


For this first card I paired the Orchard Harvest set with Lacey Ovals and lots of ink! I stamped each image, then cut and embossed with the die templates. I then inked each diecut again. Yum!


You can see the dimension here!

For the next card, paired the Orchard Harvest stamps with the Ornate Artisan Tags and Accents die templates and stamps, and some oval templates. It so fun to play around with different combinations!


The Graphic45 paper is so bright and pretty and reminds me of the beauty of chrysanthemums which bloom in the fall in many areas of the USA. I made a rolled flower from some felt and the Spiral Blossom One die template. It's a perfect match for the fall flowers in the paper.


I trimmed away some of the flower to make a smaller blossom, then added some leaves.

My last card is actually the first card I made. I was not happy with it, which is why I kept making more cards! I was using Kaleidacolor ink pads to ink the stamps, which worked great, but I just could not seem to make the card look like I wanted. But, no effort wasted, so here it is anyway!


Again, you can see how the stamps work with the embossing feature of the die templates to create stunning, layered looks!


That's it for me. Now please head over to Shemaine Smith's blog (click the graphic below)!


Supply List:

Spellbinders™  Products:
S5-073 Orchard Harvest Tags and Accents
S5-070 Ornate Artisan Tags and Accents
S4-328 Foliage
S4-314 Lacey Ovals
S4-110 Classic Ovals LG
S4-111 Classic Scalloped Ovals LG
S4-351 Spiral Blossom One
Grand Calibur™ Die Cutting Machine

Unity Stamp Company Products:
Orchard Harvest Tags and Accents (by Samantha Walker)
Ornate Artisan Stackers (by Samantha Walker)

Other:
Cardstock: American Crafts Coffee; Neenah Natural White; Bazzill Kraft
Designer Paper: Echo Park Little Boy Road Map, A Walk in the Park; My Mind's Eye Darling Deer; Graphic45 Domestic Goddess Farmer's Market
Ink: Tsukineko Kaleidacolor Cappuccino Delight, Autumn Leaves Rainbow Dye; Clearsnap Colorbox Yellow Citrus, Lime Pastel, Warm Red, Tangerine, Yellow Cadmium, Blush Rose, Burnt Sienna, Amber Clay, Olive Pastel, Dark Moss Fluid Chalk Ink; Clearsnap Decades Triumphant Red Dye Ink
Ribbon: craft supply
Felt: craft supply
Twine: Westrim Crafts
Buttons: Buttons Galore and More
Adhesives: tape runner, foam squares Scrapbook Adhesives by 3L; craft adhesive dots Glue Dots; glue