

Tuesday, November 29, 2011
Only two more days!
Less than two days are left to enter my Blog Candy Prize give-away! I'll draw the winner on December 1st! Plus my 4-part December project will kick off at the same time! Don't miss it!

Monday, November 28, 2011
Graphic 45 Christmas Tin
I finally had the chance to alter one of the Graphic 45 metal film canisters. These tins are the perfect size to hold cookies, fudge, or other Christmas treats! I removed the round mini album that comes inside the tin. I am not big fan of round mini albums, but I am sure I'll find a use for that guy in the future! {grin}

I cut my paper in a large circle and attached it to the top of the lid. Then I decorated the tin all pretty for Christmas, including using some very sparkly ribbon from Really Reasonable Ribbon!

I used more paper and ribbon to go around the bottom of the tin and the lid. Very pretty!

I fussy cut the holly from several sheets of Santa Express, then I popped some of the holly to create dimension.

The sparkly poinsettias are from a huge kit that I won from Prima YEARS ago. And yep, I still have a bin of them!
I hope this inspires you to create a gift tin or fancy gift bag for someone this year! For more inspiration, stop by the Graphic 45 Blog.
Supply List:
Graphic 45 Christmas Emporium: All I Want for Christmas, Santa Express, Toyland
Graphic 45 Christmas Past: Letters to Santa
Graphic 45 Staples: Metal Film Canister
Clearsnap: Colorbox Decades Antiquing Ink Triumphant Red; Colorbox Fluid Chalk Dark Brown, Creamy Brown; Smooch Spritz Vanilla Shimmer, Ginger Ale
Spellbinders: Grand Calibur Die Cutting Machine, Labels Five Nestabilities
Scrapbook Adhesives by 3L: My Stik tape runner, foam squares
Flourishes stamps: Tag Lines
Embellishments: Really Reasonable Ribbon satin ribbon, Prima flowers, Maya Road pins, craft supply berries, doily
Other adhesive: Glue Dots adhesive dots
Thursday, November 24, 2011
Happy Thanksgiving
For seven days celebrate the Feast to the Lord your God at the place the Lord will choose. For the Lord your God will bless you in all your harvest and in all the work of your hands, and your joy will be complete.
~ Deuteronomy 16:15


Happy Thanksgiving to all of my Blogger friends. May your blessings be ten-fold and may you know that the author of all is Christ Jesus, who died so we could be made free.
~ Deuteronomy 16:15


Happy Thanksgiving to all of my Blogger friends. May your blessings be ten-fold and may you know that the author of all is Christ Jesus, who died so we could be made free.
Monday, November 21, 2011
500+ Followers Blog Candy!
Well, the day has arrived! I've been promising you some fancy, fantastic, and fabulous blog candy when I reached 500 Followers! Well, today is the day! I have a 12x12x2 "pizza box" stuffed with goodies! Check it out!

I receive a lot of stuff as part of my design work. I get far more than I can ever use. Since some of the companies I design for are partners, I sometimes I get doubles and triples of certain products. I want to share some of the excess with my faithful Readers!
In this prize box are products from: Graphic 45, Core'dinations, Clearsnap, Want2Scrap, Hampton Art Stamps, May Arts, Caftwork Cards, Scrapbook Adhesives by 3L, Bazzill Basics, Die Cuts with a View, and more! I am also giving away one of my altered gift card holders!

This gift card holder is an unclaimed prize from a few weeks ago. The winner of my prize box will also get this lovely holiday creation!
All you have to do to win this prize is leave a comment on this post telling me what you love most about crafting for the holidays!
I'll draw a winner on December 1st, when I post an AMAZING 4-part Graphic 45 holiday project. See the sneak peek:

The Graphic 45 Blog will reveal a teaser to the project on December 1st, 8th, 15th, and 22nd. You will then come here, to my blog, for step-by-step directions to a one of a kind holiday project!
Leave a comment to win! If you are not a Follower, follow along and see what's up here in my bloggy world!
Edited to add: I am loving reading all the comments! It gives me warm fuzzies inside! Keep 'em coming! I'll draw a winner December 1st, so make sure you CHECK BACK! My last few prizes went unclaimed!
Graphic 45 "An ABC Primer" Wall Hanging
Good morning, Blogger peeps! I am sure fall is in the air for most of you. Even here in southern California we've had some fall weather! We are gearing up for Thanksgiving and the upcoming Christmas season. To celebrate the fall, I have a Graphic 45 project to show you.
I found a 6 1/8 x 6 1/8 square of chipboard in my stash and decided to make a wall hanging out of it. It's amazing what you can make with trash these days!

I inked all around the edges of the chipboard with chalk ink, and then covered the square with An ABC Primer papers (Building Blocks and Happy Go Lucky). I loved the little poem on the paper and thought it was perfect for a fall project.
I used a Crop-a-Dile to punch holes in the chipboard, then used some May Arts thick twine as a hanger.

To create all of the leaves, I die cut the shapes from Core'dinations Signature Series Graphic 45 cardstock using Spellbinders™ Foliage and Orchard Harvest Tags and Accents die templates.

Once I had cut all of the shapes, I sanded them to reveal the core of the paper. The distressed leaves give a vintage and dimensional look to the wall art.
If you love to decorate for the holidays, I hope you find some inspiration here, and at the Graphic 45 Blog!
Drop back later today to see my "500 Followers Thanksgiving Blog Candy" give-away! It's loaded with Graphic 45 product!
Supplies:
Graphic45 papers: An ABC Primer: Building Blocks, Happy Go Lucky
Partner products:
Core'dinations Signature Series Graphic45 Cardstock, Sand it Gadget
Clearsnap Colorbox Blackbird Chalk Ink
May Arts twine
Spellbinders™: Die templates S4-328 Foliage, S5-073 Orchard Harvest Tags and Accents
Other products:
Office supply: Chipboard
Stampin' Up! Basic Black Cardstock
We R Memory Keepers: Crop-a-Dile
Scotch 3M: taper runner adhesive and foam tape
Glue Dots: adhesive dots
Thursday, November 17, 2011
Graphic 45 Romantic Art Box
The Graphic 45 Altered Art Boxes are wonderful to work with. The possibilities for decorating the boxes are ENDLESS! I used the 5x8 Kraftboard Altered Art Box to create a memory box. I removed the matching accordion mini album (which I can use for another project) and turned this art box into the perfect storage box for letters, memorabilia, jewelry, and more.

I chose Le' Romantique papers to create my one-of-a-kind memory box.
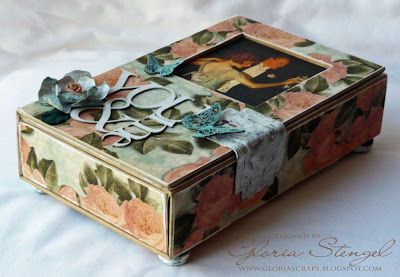
It's easy to cover the box with paper; just trim and glue! To create shabby edges, I used a fine grain sandpaper to sand the edges. Four of the Metal Button Staples make the perfect feet for my box. Using a rubber hammer, I bent one of the large Metal Tag Staples to create a latch for the box.

I used Imaginarium Designs chipboard shapes and Graphic 45 Metal Flower Staples to decorate the front of my box. I painted all of the metal with white acrylic paint, to go with the romantic mood of the box.

To create the rose, I painted the metal flowers white, then dabbed them with ice jade chalk ink. Once the flowers were dry, I bent them into shape and glued a paper rose and leaves to the metal flower.

I inked the butterflies and word art with chalk ink and then sprayed them with Smooch Spritz.

I covered the inside of the box with paper, but there is space to add some photos or memorabilia as well. Since I removed the chipboard album, the box can be used to store jewelry, letters, or other items.

The soft teals and dusky pinks of this paper line just scream ROMANCE!

I hope you enjoyed looking at my romantic memory box! Visit the Graphic 45 Blog for more inspiration!
Please visit on Saturday, as I am having a HUGE prize give-away in honor of reaching 500 Followers!
Supplies:
Graphic 45 Papers: Le' Romantique: Le' Romantique, Loves Labyrinth, Daydreams, Sweetheart of Mine
Graphic45 Staples: 5x8 Kraftboard Altered Art Box, Metal Tag, Metal Flowers, Metal Buttons
Imaginarium Designs: Chipboard word, butterflies
Clearsnap: Colorbox Ice Jade Fluid Chalk Ink; Colorbox Frost White Pigment Ink; Spun Sugar Smooch Spritz
Core'dinations: Sand it Gadget
Scrapbook Adhesives by 3L: EZ-Runner
Other: Flowers and leaves from Wild Orchid Crafts; White Acrylic Paint from Deco Art; Glue from craft supply; pliers, hammer, paper piercer

Art Box size when closed: 5.25" W x 8.125" H x 2" D. Album size 4.75" x 7.75"
I chose Le' Romantique papers to create my one-of-a-kind memory box.

It's easy to cover the box with paper; just trim and glue! To create shabby edges, I used a fine grain sandpaper to sand the edges. Four of the Metal Button Staples make the perfect feet for my box. Using a rubber hammer, I bent one of the large Metal Tag Staples to create a latch for the box.

I used Imaginarium Designs chipboard shapes and Graphic 45 Metal Flower Staples to decorate the front of my box. I painted all of the metal with white acrylic paint, to go with the romantic mood of the box.

To create the rose, I painted the metal flowers white, then dabbed them with ice jade chalk ink. Once the flowers were dry, I bent them into shape and glued a paper rose and leaves to the metal flower.

I inked the butterflies and word art with chalk ink and then sprayed them with Smooch Spritz.

I covered the inside of the box with paper, but there is space to add some photos or memorabilia as well. Since I removed the chipboard album, the box can be used to store jewelry, letters, or other items.

The soft teals and dusky pinks of this paper line just scream ROMANCE!

I hope you enjoyed looking at my romantic memory box! Visit the Graphic 45 Blog for more inspiration!
Please visit on Saturday, as I am having a HUGE prize give-away in honor of reaching 500 Followers!
Supplies:
Graphic 45 Papers: Le' Romantique: Le' Romantique, Loves Labyrinth, Daydreams, Sweetheart of Mine
Graphic45 Staples: 5x8 Kraftboard Altered Art Box, Metal Tag, Metal Flowers, Metal Buttons
Imaginarium Designs: Chipboard word, butterflies
Clearsnap: Colorbox Ice Jade Fluid Chalk Ink; Colorbox Frost White Pigment Ink; Spun Sugar Smooch Spritz
Core'dinations: Sand it Gadget
Scrapbook Adhesives by 3L: EZ-Runner
Other: Flowers and leaves from Wild Orchid Crafts; White Acrylic Paint from Deco Art; Glue from craft supply; pliers, hammer, paper piercer
Wednesday, November 16, 2011
Really Reasonable Ribbon Challenge #36
The Really Reasonable Ribbon Challenge #36 is - Clean and Simple Christmas. My long-time readers know that simple is not really my thing! But I managed it! Have a peek!

I only used two patterned papers! That's as simple as it gets for me!

I used ribbons from the November Ribbon Club. I placed the Diamond Satin in shell gray around the top of the sentiment block, then tied a bow with silver metallic edge satin ribbon. I used the Bow Easy tool to create a perfect bow.
I have not started on my Christmas cards yet, but this card would be easy enough to make in bulk, plus I can change up the prints and colors fairly easily to make use of the huge hoard of paper I have!
Visit the RRR Blog to add your challenge entry! Remember, RRR gives away two $10 gift certificates for each challenge. One for the best project (voted on by the Design Team) and one to a random winner. You can see all the details on the challenge post.
Supply List:
Cardstock: Bazzill Pomegranate
Designer paper: Fancy Pants Saint Nick
Stamps: JustRite Cling Merry and Bright
Ink: Memento Rich Cocoa
Spellbinders™ supplies: Grand Calibur™ Die Cutting Machine, Nestabilties® S4-169 Small Labels, S4-168 Large Labels, S4-116 Standard Circles Large, S4-293 Lacey Circles
Ribbon: Really Reasonable Ribbon November Ribbon Club Assortment, Bow Easy tool
Monday, November 14, 2011
Spellbinders and Crafters Home Fall Sneak Peek Blog Hop - Day Two
Join Spellbinders™ Paper Arts and Crafters Home as we celebrate a Fall Sneak Peek!
Spellbinders and participating stores in the Crafters Home Buying Group are excited to introduce three new die template sets sold exclusively through Crafters Home stores through January! You’ll have to wait until February to find these die template designs in non-member stores.
These new dies are in stock! Get yours now at a participating Crafters Home store! See the Spellbinders Blog for a list of participating stores.
Visit the Spellbinders Blog November 14 - 16 to see a new Spellbinders die template revealed each day! Visit designer blogs to enter the daily contests and see inspiring projects using the new releases. Comments on Designers Blogs and the Spellbinders Blog count as entries into daily drawings. Daily winners receive all three of the new designs!
Today's new die is S4-068 Dress Forms (Price: $19.99).

Dimensions:
Lattice Dress: 1 7/8 x 2 ¼”
Scalloped Hem Dress: 2 1/8 x 2 5/8”
Plain Dress Form: 1 ¾ x 3 1/8”
Swirled Dress: 1 ¾ x 3 1/8”
I have created a card for you today, using the NEW Dress Forms die templates and some fun My Mind's Eye papers!

I cut and embossed the Plain Dress Form from patterned paper, then inked the edges of the dress. I then tied some baker's twine around the waist and added a decorative button to the shoulder. I used some foam squares to pop the dress from the page.


Visit these Designers Today!
Gloria Stengel YOU ARE HERE!
Contest Details:
Participants wishing to be included in the daily drawing for the Spellbinders Fall Sneak Peek contests should adhere to all of the following rules.
• The Fall Sneak Peek starts November 14, and ends November 16, 2011. It consists of three individual contests, one each day.
• Each Fall Sneak Peek Bog will accept comments as entries from 12:00 am until 11:59 pm Eastern Standard Time, on its scheduled day.
• Each comment counts as one entry. One entry per person, per blog please.
• One winner each day will receive the three new die templates available exclusively at Crafters Home stores.
• All three winners will be announced on the Spellbinders Blog on November 17. The winners will have 48 hours to respond to the email address on the winning post to claim their prize. If a winner fails to respond within 48 hours, a new winner will be drawn.
• By entering, you allow Spellbinders to publish your first name, city, state, and country of residence and a quote from you, on the Spellbinders Blog, website, and in promotional materials.
• Spellbinders Designers, contractors, employees and immediate family members are not eligible to win.
• The invitation to the Fall Sneak Peek Blog Hop is extended to all, we are happy to ship prizes worldwide.
Any questions regarding this contest should be sent to ContestQuestions@Spellbinders.us
Supply List:
Spellbinders products: Grand Calibur Machine™, S4-324 Ribbon Banners, E8-001 Classic Scallop, S5-068 Dress Forms
Cardstock: American Crafts Coffee, Stampin' Up! Whisper White
Designer paper: My Mind's Eye Lime Twist Life of the Party 6x6 pad
Stamps: Flourishes Birthday Pennants
Ink: Memento Rich Cocoa, Clearsnap Colorbox Chestnut Roan Fluid Chalk
Trims: Really Reasonable Ribbon (shimmer satin ribbon, baker's twine)
Craft supply: Button, string
Adhesive: Scrapbook Adhesives by 3L My Stik tape runner, 3D foam squares
Sunday, November 13, 2011
Really Reasonable Ribbon November Blog Hop

Welcome! This is my very first Really Reasonable Ribbon Blog Hop as part of the Special Events Design Team! I hope you enjoy the hop!
You should be coming to me from Dawn's Blog. If not, go back to the Really Reasonable Ribbon Blog and start the hop! (It's fun, trust me!)
I used the November Ribbon Club Assortment for my project.

You get approx. 10-15 yards of lovely ribbon in each club assortment! This assortment is filled with lovely gold and silver ribbons!
I used my ribbon to make this cute little gift bag. This bag is perfect for filling with treats for your neighbors or co-workers.

This project is simple enough to make in bulk. You could replace the colored image with a pre-made image to save even more time. (Or, you could color a stack of images at night while you watch your favorite TV program!)

I stamped and colored my image, then cut a small square of decorative paper in half to make a napkin for the basket. I used foam squares to pop the napkin up for dimension. I cut the entire image and mat with Spellbinders™ die templates. I also used one of the new Spellbinders Edgeabilities die templates to cut a decorative edge on the top of the bag.
I create all of my perfect bows with the Bow Easy tool! This little tool is worth every penny!
Now, keep on hopping! Go to Jan's Blog next!
Supply List:
Paper bag - Craft supply
Designer paper: Echo Park Season's Greetings 6x6 pad
Stamps: Waltzing Mouse Basket Additions
Ink: Memento Rich Cocoa dye ink, Clearsnap Colorbox Creamy Brown Fluid Chalk ink, Copic Markers
Die cutting: Spellbinders Grand Calibur die cutting machine, Labels Four Nestabilities, Labels Four Small Nestabilities, Classic Triple Scallop Edgeabilities
Ribbon: Really Reasonable Ribbon November Ribbon Club Assortment
Adhesive: Scrapbook Adhesives by 3L foam squares, Scotch 3M tape
Thursday, November 10, 2011
Graphic 45 and a Sketch!
I have a sketch for you today! And it's a layout sketch! Don't faint! For you card makers, you can probably make a card instead. {grin} I created this sketch, then adapted it for a masculine layout by replacing the flowers with gears, clocks, and other metal embellishments.

I created my layout using Graphic 45 Transatlantique papers. Transatlantique is an older line, but I love the blues and aquas, plus the map on Bon Voyage is awesome!

This layout is of my oldest son, who will be 20 years old on December 12th. I am amazed at the man he is becoming. One of these photos was taken when he was 10 and the other when he was 17, nearly 18. To watch a boy become a man is one of the miracles of parenting!

Here is a close-up of the metal embellishments I used. The chipboard word-art is from Imaginarium Designs. Make sure you check the Graphic 45 Blog for MORE inspiration!
Supplies:
Graphic45 Papers
Transatlantique: Around the World, Souvenir Stripe, Bon Voyage, Exotic Destinations, Transatlantique Tags
Graphic45 Staples: Buttons
Imaginarium Designs: Chipboard word
Clearsnap: Colorbox Blackbird, Chestnut Roan Fluid Chalk Ink
Scrapbook Adhesives by 3L: EZ-Runner, 3D Foam Squares
Cardstock: Bazzill Basics Raven
Other: metal embellishments from Idea-ology and 7Gypsies, Stickers from Jenni Bowlin Studios, Glue from craft supply
Wednesday, November 09, 2011
Handmade Holiday Hop Prize Winner!
The lucky winner of my Christmas tag and prize pack is:
voyager said...
Wow! How beautiful! Your Gift Card Tag is awesome!!! Thanks for the tutorial, too. I love Graphic 45 products!!
Please contact me with your mailing information so that I can get your prize in the mail.

voyager said...
Wow! How beautiful! Your Gift Card Tag is awesome!!! Thanks for the tutorial, too. I love Graphic 45 products!!
Please contact me with your mailing information so that I can get your prize in the mail.

Design Team Call - Imaginarium Designs!
One of my Graphic 45 Teamies, Jane Tregenza, also has a company called Imaginarium Designs. She sells the most amazing and intricate chipboard shapes! Well, Imaginarium Designs is having a design team call right now. Anyone interested is asked to create a blog post showing 10 of their favorite projects using chipboard!
I adore Jane (who I got to meet last January) and I love her products. I would love to be on her design team, but even if I'm not selected, I want to support Jane and her fantastic chipboard images! Therefore, here are my "Top 10" chipboard projects!
I created this chipboard mini from scraps of chipboard, and several Imaginarium Designs shapes. I inked the shapes, then covered them with Stickles glitter glue.

Below is a close-up of a few of the pages. This little mini is really a fancy gift card holder!

This next project is an altered trick-or-treat bag I made just recently. I used lots of chipboard: the button, the house, the fence, the fancy "roof" are all chipboard shapes.

I made this "steampunk" project from a scrap of chipboard that I cut into a tag shape. Then I decorated pre-made chipboard shapes with paper, ink, and embossing powder.

I love chipboard shapes, and used a lot of different shapes and a large alphabet to create this banner.

I used the very detailed Imaginarium Designs word art for the layout below. I inked and glittered the letters.

I like to use chipboard on cards as well as on layouts, mini albums, and mixed media pieces. Many folks feel that making a "lumpy" card is not a good idea. I think that if someone is special enough, I don't mind paying extra to mail the card in a padded envelope! So I lump up my cards!

I love large chipboard shapes, like this one below. Large shapes are easy to cover with paper and then decorate to make a home decor piece. For this wall art, I added some small chipboard shapes as well.

Mini books are my favorite things to make, but they take a long time to create! This one is filled with chipboard shapes and alphas!

I used chunky glitter on the chipboard alphas, covered the large chipboard bird with paper, and inked and stamped on the chipboard flourish! Whew!

Here are a few close-ups of an inside pages. Lots of chipboard.

This is a layout I made using some Imaginarium Designs chipboard shapes; the intricate butterfly and the fence. I sprayed them with glimmer mist. The chipboard takes the mist very well!

This last item is a card and altered box I made. I used chipboard shapes and some scrap chipboard to add dimension to my images.

That's my all chipboard all the time post! I hope you enjoyed looking at all these projects!
I'll be back later today with a winner for my Christmas tag drawing!
Subscribe to:
Posts (Atom)