Thursday, September 27, 2012

All Things Altered Fall and Halloween Blog Hop


Welcome to the "All Things Altered" Fall and Halloween Blog Hop! You should be coming to me from Betty's Blog. If you are lost, see the list of blogs at the end of this post to make sure you visit everyone!

You may be wondering what this Blog Hop is all about. Well, in the spring Pam at Scrapbook Flair organized a group of crafters for an altered art blog hop. It was so successful that she decided to do a hop each quarter! (I missed the summer hop due to my crazy schedule.) I was happy to be asked play along for the fall hop!

Pam has put together a line-up of 13 designers, all making some sort altered art for you to use for inspiration!

And there are PRIZES! Pam, our hostess (Scrapbook Flair), is giving away an AMAZING prize! Plus, some of the designers are also giving away goodies! Here is a peeky at my prize package!
 
 
I am giving away an 8x8 Graphic 45 Happy Haunting paper pad, plus three Colorbox Mix'd Media Inx, and all the other goodies you need to create your own altered project!
 
To be entered to win the main prize package:

1. Leave a comment on all the designers' blogs
2. Sign up to Follow the blogs. (To follow my blog, check the left side bar to see the methods for doing so.)
3. Leave a message on the Scrapbook Flair Blog telling Pam you did what you were supposed to do! {grin}

To win MY prize pack, just leave a comment on this post and I will draw one winner to win it!

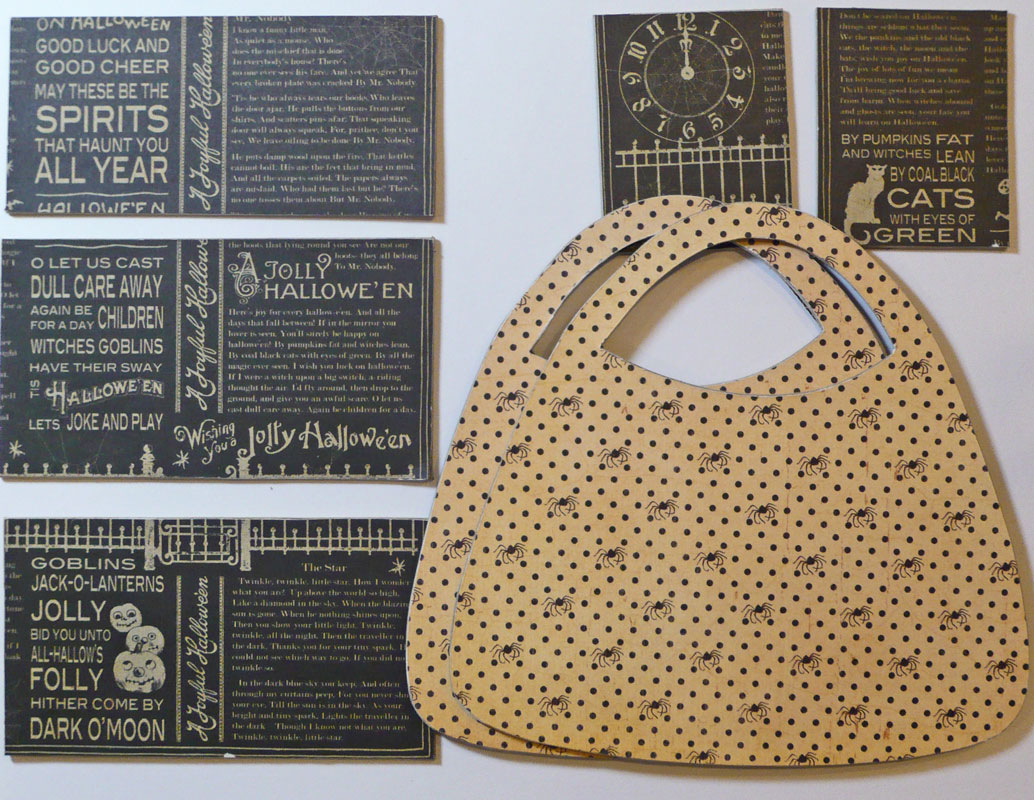
Now, here is my altered project...a Halloween purse!


When I was trying to figure out what to make, I came across a purse-shaped mini album in my stash. And, I got to thinking that maybe I could use two of the pages to make a purse-shaped box for holding treats or other goodies. I emailed my pal Jim, the Gentleman Crafter to ask him what sort of adhesive to use to glue my box together, and for some other tips on creating chipboard items from scratch. (You see, Jim is the EXPERT on making chipboard stuff, and he gets on my case because I say I cannot make anything from scratch. I was determined to make something, even if it was just a chipboard box!)


To make my box, you need two chipboard shapes that are approximately 6x6 inches. I used two pages from a purse-shaped mini album. The shape also looks a bit like a fat candy corn! You also need five pieces of chipboard in the sizes listed above.


Cover your chipboard with patterned paper. I used Graphic 45 Happy Haunting papers.


Flip the chipboard over and cover the other side. Then, sand and ink the edges.


Use Ranger Glossy Accents to glue the box together. It dries pretty fast, so you only need two hands to get it all glued together! Mine is a little wonky, but it's functional.


Once the box is glued together, use Scor-tape to glue the purse shapes to the front and back of the box. Then you are ready to decorate!


I had fun adding ribbons, flowers, and embellishments to my box.


The little box is big enough to hold treats, candles, or even a set of A2 sized cards.


I created a triple bow, and then I added a button and a charm, tied with twine.


Black and gray flowers are pretty and spooky! Or is that pretty spooky?!


I just purchased this image from The Greeting Farm. She is adorable! I loved coloring her and adding some glitter. She's the perfect embellishment for my purse!


Can you spot my mini light bulbs? There are two!


I hope you enjoyed looking at my little Halloween purse! Remember, leave a comment, follow the blogs, and be ready to win!

Now, hop on over to Irit's Blog!

If you get lost during the blog (so sad to get lost!), here is the list of Designers!

Pam
Nicole
Betty
Gloria - YOU ARE HERE!
Irit
Christine
Debbie
Jennifer
Jess B.
Barbara R.
Shelley
Candice
Eileen
Scrapbook Flair

Designer paper: Graphic 45 Happy Haunting 8x8 pad
Cardstock: Copic Xpress Blender Card White
Ink: Clearsnap Colorbox Fluid Chalk Blackbird, Gray Whale; Memento Tuxedo Black; Copic Markers; Sakura Gelly Roll Star Dust
Stamps: The Greeting Farm Sweet and Toxic
Chipboard: Studio18 (purse); Grafix (bulk for making the box); Graphic 45 (Happy Haunting tag)
Embellishments: Prima flowers, velvet trinket charm; Tim Holtz gears; Oriental Trading Company black gear; Sky Blue Pink mini light bulbs; Buttons Galore and More button
Trims: May Arts (orange and black check ribbon); Really Reasonable Ribbon (orange and black satin, black twine)
Die cuts: Spellbinders Labels Twenty-eight
Adhesive: Beacon Fabri-tac, 3-in-1 glue; Scotch 3M tape; Ranger Glossy Accents

Wednesday, September 26, 2012

TE Last Card Standing - Round Two!

 
Here we go! Round two of the Taylored Expressions Last Card Standing Contest! For the next round we had to:
 
1. create a NEW card
2. using at least one TE stamp
3. in the theme friendship
4. using at least two printed papers
5. using ribbon


We were supposed to think of "our very best friend" and make a card for her (or him). I have a lot of BFFs. All my friends are my BFF! So I made a feminine and sophisticated card that I would give to any and all of my friends!


I stamped a piece of paper with brown ink and the TE Hexagon Background stamp. I just purchased the background stamp a few weeks ago and this was the first time I inked it up. It stamps perfectly, as you can see! Amazing! Love it!


I have the TE Spring Tulips stamp set, which contains several friendship-themed sentiments! I stamped the tulips and colored them with Copics. I used one of the sentiments on the front of the card, and a second one on the inside.


To create this fabbie bow, I used three different ribbons and a button (tied with twine). Yum!


I found some velvet ric rac in my stash and added that as well. And this card needed some bling, so I added two tiny rhinestones! Oh, and in case the actual ribbon was not enough, I cut a few paper ribbons and added those. You cannot have too much ribbon!!

As for the printed paper, I mixed Authentique and My Mind's Eye. I found a few pads in my stash that have a similar color palette. I think I count 7 different prints. Yeah, I like me some printed paper!


Here is a peeky at the inside of the card.

Ok, I am still giddy over that hexagon stamp! I have so many ideas of how to use it!

And that is my entry for the next round of TE Last Card Standing! Check out my Splitcoaststampers Gallery HERE. Look for the keyword TEFRIENDSHIP to see all of the entries!

Cardstock: American Crafts Coffee, Copic Xpress It Blender Card White
Designer paper: Authentique Carefree; My Mind's Eye Miss Caroline Howdy Doody
Stamps: Taylored Expressions Spring Tulips, Hexagon Background
Ink: Tsukineko Memento Rich Cocoa; Clearsnap Colorbox Fluid Chalk Peach Pastel; Copic Markers
Ribbon: Really Reasonable Ribbon Peach Double Faced Satin, Sheer Iridescent Peach; Fabric store: peach wired ribbon, velvet ric rac
Button: Buttons Galore and More
Rhinestones: My Mind's Eye Fine and Dandy True Blue Bling
Die cuts: Spellbinders Classic Ovals Small, Classic Scalloped Ovals Small; My Favorite Things Die-namics Fishtail Flag Stax
Tools: Bow Easy; Spellbinders Grand Calibur
Adhesive: Scotch 3M tape runner; Scrapbook Adhesives by 3L foam squares; Beacon Fabri-tac

Halloween with Hampton Art Stamps!

Have you seen the NEW Hampton Art Stamps Halloween stamps? Super cute! Check out the catty HERE. I used two of the sets to make some cards.

Are those stamps cute or what?!


This is a fun card with lots of layers. I am addicted to Halloween paper pads. I have a huge stack of them! And I am forever buying more! This is a new one called Authentique Enchanted.


I stamped the chandelier and colored it with Copics. I sponged some ink to grunge it up a bit. That spider is so cute...to bad I am TERRIFIED of spiders in real life! I scream and run when I see a spider in my house!


The Spellbinders inverted scallop circle die really makes a good spider web shape behind my image.


I decorated the inside as well. Another cutie spider. The sentiment is Graphic 45 Happy Haunting (also a Hampton Art stamp).


Can you stand another cute spider?! More purple this time! The paper is an older line from Fancy Pants called Oct 31. I made a nice bow with ribbon from Really Reasonable Ribbon. I LOVE the diamond satin ribbons they have. Tons of cool colors!


I colored with Copics again. I've been coloring a lot lately...it relaxes me!


Here is a nice shot of all the layering of paper and ribbon. I am in no danger of using up my stash even with all these layers!


This time we have cute bats! Who know those words would ever come out of my mouth?!

Make sure to stop by the Hampton Art Stamps Blog and Facebook Page. You never know what inspiration you may find!


Hi Card:
Hampton Art Stamps:
Outlines Boo
Doodlebug You Said It
Graphic 45 Happy Haunting

Ink:
Clearsnap Colorbox Dye Ink Seattle Sky
Memento Tuxedo Black
Ranger Distress Old Paper

Cardstock: Stampin' Up! Whisper White; American Crafts Black; Copic White
Designer paper: Authentique Enchanted 6x6
Ribbon and twine: Really Reasonable Ribbon
Markers/Pens: Copic Markers
Tools: Spellbinders Standard Circles Large, Large Classic Inverted Scalloped Circles, Back to Basics Tags
Other: Button, Brad
Adhesive: Scrapbook Adhesives by 3L foam squares; Scotch 3M tape; Beacon Fabri-tac

For You Card:
Hampton Art Stamps:
Outlines Boo, Scary
Kelly Panacci Patchwork Pals
Doodlebug You Said It

Ink:
Clearsnap Colorbox Fluid Chalk Gray Whale
Memento Tuxedo Black

Cardstock: Stampin' Up! Whisper White; American Crafts Black; Copic White
Designer paper: Fancy Pants Oct. 31 (6x6)
Ribbon and twine: Really Reasonable Ribbon
Markers/Pens: Copic Markers
Tools: Spellbinders Labels Four, Back to Basics Tags
Bling: Want2Scrap
Other: Button
Adhesive: Scrapbook Adhesives by 3L foam squares; Scotch 3M tape; Beacon Fabri-tac

Monday, September 24, 2012

LAST CARD STANDING!


I am a fan of Taylored Expressions - not only of the stamps, but of the fact that they carry 6x6 paper pads and other fun goodies! I just received some new items from the online store and saw that they are having a contest to win a guest DT spot for the November/December release. (Plus other goodies!)

Well, Round 1 was an open call and the projects did not have to be new. I had just made this card for a Really Reasonable Ribbon challenge, using the TE Autumn Wreath stamp set, so figured, why not enter the Last Card Standing competition?!


I dusted off my Splitcoaststampers gallery and loaded my card. (I have been a member of Splitcoast since 2004, but I am more of a lurker and my gallery has been sadly neglected! I have been trying to load some things to make it less sad!)


Anyway.....I have been one of the 15 card makers chosen to move on to the next round!!!! I am so excited!

Sunday, September 23, 2012

All Things Altered Blog Hop! Sept. 28-29

Do you like Halloween and Fall projects? Do you want some inspiration? Then....

You are invited to attend the All Things Altered Blog Hop on September 28-29. You are sure to be inspired by the projects that will be shared on each of the designers' blogs. We know that you will love "the out of the box" projects. Along the way you will be able to leave comments for some fabulous prizes and of course we would love for you to start following our blogs. Please tell your other scrappy friends about our hop.  It will be a wonderfully creative time!

I am one of the stops on the hop...and I have created a BRAND NEW altered project to share with you! I will also be giving away a fantastic prize! Make sure you come back n September 28th for all the fun!

Until then, here are a few "already been seen" projects to tide you over!

 Created for Paper Crafter's Library

Created for Imaginarium Designs
 
 
Created for Graphic 45 - altered mini screen

Created for Graphic 45 - altered box and mini album


Thursday, September 20, 2012

NEW Graphic 45 Collection - Place in Time!


Graphic 45 is revealing a NEW Collection, called Place in Time! This is a calendar collection!  It includes 26 papers, two chipboard die-cuts, two sticker sheets. The Design Team have not received this collection yet, so this is all I know...but I am SUPER excited for this one!
 
Sneak Peeks will begin on the Graphic 45 Blog on Monday, September 24th. Graphic 45 will be giving out four WIN IT BEFORE YOU CAN BUY IT prize packages valued at $40 each day, for a total of 12 prizes!

Wednesday, September 19, 2012

Graphic 45 Halloween Card - Two Ways!

I don't make very many simple cards, as I always tell you! However, once again, Graphic 45 asked the team to make a "simple" project using the Happy Haunting Collection.

I use too many layers and embellishments to qualify as a "clean and simple" card maker. However, I do think that "simple" means different things to different people. For me, simple means "easy to reproduce." And the easiest way to create a card is to use a sketch as your "pattern." Using a sketch is an easy way to copy a card without being sidetracked by the papers and embellishments used by the original card maker.


Here is a sketch for you. It is very basic, with just a few layers. You could eliminate the layers and use embossing or just a plain background. Sketches are easy to modify!


Using products from the same collection also makes projects come together in a snap! For this simple card, I used paper from the Happy Haunting 8x8 paper pad. The small-scale prints are perfect for card making. I combined the paper with Happy Haunting chipboard and stamps to create a 10-minute card.


The sketch shows a flower embellishment, but I used one of the chipboard clocks from the collection.

I moved the sentiment to the inside of the card. When you buy the stamps to match paper collections, you have all you need to create quick projects at your fingertips!

If you have more time, and you have a lot of various Halloween stamps and embellishments in your stash, you can "step it up" and make a 45-minute card. Many of us have lots of papers and stamps. It is fun to mix and match when creating projects. I again used the Graphic 45 Happy Haunting Collection, but added items from my stash to "step it up."


Both cards have the same basic design, but I flipped the vertical panel to the right and added more embellishments.  I used the same sketch, but modified it a bit to accommodate a circle shape rather than a rectangle. I also added more embellishments.To create visual interest in the "stepped up" card, I cut a fence (Taylored Expressions Picket Fence Border die) and some tree branches (Spellbinders Cherry Blossoms die) and inked them with chalk ink before attaching them to the card.

Note: The Spellbinders Cherry Blossoms die set is a spring-themed die set. However, by cutting the branches from black cardstock and inking the with gray ink, they are now spooky and perfect for Halloween!


Instead of using pre-made chipboard for the image, I stamped and colored an image with Copic markers (Stampin' Up! Greeting Card Kids stamp set). Once the image was colored, I trimmed it into a circle shape. I used Spellbinders dies to cut a circle and then cut a decorative circle to mat my image.

Graphic 45 papers CAN be used with cute images. I am staying true to my vintage roots, but adding a cute factor with the little stamp.


I used one of the Happy Haunting chipboard clocks, and tied three strands of various colored twine to the center. I added a strip of ribbon and a die cut sentiment.


I folded the ribbon over and cut one end into a banner shape.


I used stamps to decorate the inside of the card. I dug into my stash of Halloween images to show that several different stamp lines can all go together. Sometimes we don't have the funds to buy "the latest and greatest." If all you can afford is the paper pad, you still have many options for creating something that looks fresh and new! 

It is easy to take the same basic card design and create a completely different look, just by changing your image, embellishments, and sentiment. Have fun!


Simple Card:
Graphic 45 paper: Happy Haunting 8x8 paper pad
Graphic 45 chipboard: Happy Haunting
Graphic 45 stamps: Happy Haunting
Cardstock: American Crafts Black, Stampin' Up! Very Vanilla
Ribbon: Really Reasonable Ribbon Halloween Geometric Print on Black Grosgrain, Black Satin; May Arts 1/4" Black Silk
Ink: Memento Tuxedo Black
Adhesive: Scotch 3M tape runner, Aileen's Tacky Glue

Advanced Card:
Graphic 45 paper: Happy Haunting 8x8 pad
Graphic 45 chipboard: Happy Haunting
Cardstock: American Crafts Black, Stampin' Up! Very Vanilla, Copic white
Other stamps: Stampin' Up! Greeting Card Kids; Hero Arts Happy Halloween; Hampton Art Stamps Boo
Ribbon: Really Reasonable Ribbon Apple Shimmer Satin, Twine (orange, green apple, black licorice)
Ink: Memento Tuxedo Black, Clearsnap Colorbox Fluid Chalk Gray Whale, Copic Markers
Die cuts: Spellbinders Standard Circles Large, Classic Inverted Scallop Circles Large, Cherry Blossoms; Taylored Expressions Picket Fence Border; Sizzix Tim Holtz Alterations Tattered Banners
Adhesive: Scotch 3M tape runner, Ranger Glossy Accents, Scrapbook Adhesive by 3L foam squares