Wednesday, August 31, 2016

Back to School Page Layout

Hello I am up on the CutCardStock Blog today. It is back to school time, and with that season of the year comes the mad scramble for quick and easy projects to give to children, teachers, and coaches.
Since I have been on a layout kick these past few weeks, I thought I would create another 8" x 8" scrapbook layout that is perfect for a child's scrapbook, but is also simple enough to create in bulk for each student in a classroom! By simply varying the background papers and embellishments, you can quickly and easily create a custom page layout for all the children in your life!

Begin by cutting Pop Tones Black Licorice Cardstock to 8" x 8". Trim Brown Bag Kraft Cardstock to 7 7/8" x 7 7/8" and attach to the black base panel. Trim printed paper to 7 3/4" x 7 3/4" and attach to the layout.
Trim Pop Tones Black Licorice Cardstock to 4 1/4" x 4 1/4" and attach the panel to the right side of the layout. Trim Brown Bag Kraft Cardstock to 4 1/8" 4 1/8" and attach to the black panel. Add a photo to the kraft panel. Attach a sticker tab to the upper right edge of the photo block.

Use a large number die cut template to cut your child's grade from Basis Dark Red Cardstock. Attach the number to the upper left corner of the layout with foam squares. Add sticker letters to complete the grade designation. (True confessions - my son is actually in 11th grade, but...I lost the die cut numbers that I had cut out!)
Trim a strip of Pop Tones Black Licorice Cardstock to approximately 1 1/2" x 8". Use a bracket border punch to cut a decorative edge across the bottom of the strip. Attach the black strip to the bottom of the layout as shown. Wrap a piece of printed twill around the black strip, securing the ribbon at the back of the layout. (If you cannot find printed ribbon, simply use a coordinating cardstock strip, cut to 1" x 7 7/8".)

Use foam adhesive to add decorative sticker elements to the left side of the border strip.

CutCardStock:
Pop Tones Black Licorice Cardstock
Brown Bag Kraft Cardstock 
Basis Dark Red Cardstock
Double Sided Foam Adhesive Squares
Scor-tape
Tombow Mono Multi-purpose Liquid Glue

Other:
Printed paper: Simple Stories Smarty Pants, Elementary
Die cuts: My Favorite Things Big Numbers
Punches: Fiskars bracket border, Stampin' Up 1" circle
Ribbon: unknown
Ink: Ranger Distress Spiced Marmalade

Tuesday, August 30, 2016

Heartfelt Creations August Alumni Blog Hop


Welcome to the August Heartfelt Creations Alumni Blog Hop! Each month, on the last Tuesday of the month, the Heartfelt Creations Alumni Team participates in a Blog Hop! Be sure to visit each blog on the hop, and leave a comment, because one fortunate Blogger will be chosen to receive a $25 gift card to Heartfelt Creations! The winner will be announced on Saturday, September 3rd, at noon. (Check the Heartfelt Creations Facebook Page for winners!) The August Hop starts 8am EST on Tuesday, August 30th  and closes Friday, September 2nd at midnight. 


You should be coming to my blog from Kathy Clement's Blog. After visiting me, head on over to Archana Joshi's Blog. For a list of the Alumni Blogs, see the end of the post.

(Please note that Loretta Lock had to withdraw from the hop at the last minute, so the LAST stop on the hop will be Vicki Dutcher.)

I created a 12" x 12" scrapbook layout for you this month! {Don't faint!}
A friend of mine asked me to make a page layout for her friend's wedding and this is what I came up with based on her theme and color palette. (Please don't be sick of the Under the Sea Collection yet!)

I added flowers and papers from a few older collections as well to create this layered and bright layout. 
I super-love those goldfish! I thought they were the perfect love birds...er fish...for the layout! I sprayed chipboard letters with silver glitter mist to give some sparkle and depth to the project. As always, I created the flowers, using the shades of pink, coral, and blue from the paper collection.  
I love the pop of yellow from the little fish peeking out of the corner. The paper has lots of layers and rips to look like beachfront weathering. 
I also added a shy seahorse to the mix! I love how the different paper collections work together to make a perfect project! 
I also gave my friend this card (see post HERE), reworked as a wedding congratulations card, that she can give to the happy couple. I created a matching gray box/envelope to hold the card. I added some sea creatures to the front and back of the envelope as well. 

Hop on over to Archana Joshi's Blog next. DON'T FORGET...POST A COMMENT FOR YOUR CHANCE TO WIN A $25 GIFT CARD TO HEARTFELT CREATIONS!

August Heartfelt Creations Alumni Blog Hop List:

Kathy Clement
Gloria Stengel - YOU ARE HERE!
Archana Joshi 
Sarah Miller
Mary Faus
Kristie Taylor
Oksana Clegg
Ujjwal Gupta
Emily Niehaus
Vicki Dutcher


Heartfelt Creations Products:

HCDP1-266 Under the Sea Paper Collection
HCDP1-227 Vintage Floret Paper Collection
HCDP1-229 Countryside Evening Paper Collection
HCD1-799 Under the Sea Die
HPCP-3674 Blazing Poppy Petals Cling Stamp Set
HCD1-764 Blazing Poppy Die
HCPC 3668 Cascading Fuchsia Cling Stamp Set
HCD1-763 Cascading Fuchsia Die
HCD1-761 Everyday Heroes Die
HCD2-750 Cut Mat Create 1B Die
HCPC-3608 Arianna Blooms Cling Stamp Set
HCD1-748 Arianna Blooms Die
HCPC-3598 World Map Cling Stamp Set
HCST1-401 Deluxe Flower Shaping Kit

Other Products:

Cardstock: gray, white
Ink: Ranger Distress Picked Raspberry, Abandoned Coral, Worn Lipstick, Spun Sugar, Peacock Feathers, Tumbled Glass, Mowed Lawn, Frayed Burlap, Black Soot, Pumice Stone; Versafine Onyx Black
Spray mist: Cosmic Shimmer Silver
Gems and pearls: Want2Scrap
Chipboard letters and numbers: open stock
Adhesive: ATG tape, foam adhesive squares, white glue, hot glue

Sunday, August 28, 2016

Ombre Hello Card for Cheery Lynn Designs

Hello and good morning Cheery Lynn Designs Fans! I am back again with my last guest post for the Cheery Lynn Blog. (It is a sad day, indeed!)


I decided to give you a taste of Clean and Simple today, which is a newer style that I have been exploring lately. I am in love with the look of ombre, so I am giving you a "double ombre" card!

I used four shades of distress ink to create the blue panel. Once all the ink was blended well, I sprinkled on some water to create droplets. The blue is just stunning! To contrast, I used four shades of orange distress ink to make another ombre panel from which to cut the feathers.


I used the Chicken Wire Die to cut the chicken wire shape from white cardstock. I sniped some bits of the frame away with scissors to get this pattern. I cut the feathers twice from the orange ombre panel that I created. I used foam adhesive to stack the Feathers Die in the upper left corner. I tied on a loopy bow from black twine.


I cut the Hello Die die from a scrap of black cardstock and glued it to the card. I tucked two feathers next to the sentiment.


I love the stunning blue and orange combination, grounded by black and white! The beauty of this type of card is that you can sit in front of the TV and color ombre panels all day long, and then die cut Cheery Lynn shapes out of the panels all night long!

Thanks for looking! And a huge thank you to Cheery Lynn Designs for having me as the August Guest Designer. I had an absolute blast! 

Remember, the winner of the current challenge will be chosen randomly. They will receive $20 towards shopping at the Cheery Lynn website. The challenge will end on Wednesday afternoon August 31st at 15:00 Eastern time. We will also showcase the Top 3 picks from our Design Team.


Cheery Lynn Dies Used:

Other products:
Ink: Ranger Distress Dried Marigold, Wild Honey, Spiced Marmalade, Rusty Hinge, Tumbled Glass, Broken China, Salty Ocean, Peacock Feathers
Cardstock: white, black
Twine: Really Reasonable Ribbon Black Burlap String
Adhesive: ATG tape, foam squares, glue

Tuesday, August 23, 2016

8" x 8" Calendar Layout - August

Hello, Summer-time People! It is my turn again on the Gypsy Soul Laser Cuts Blog. My project this week is a bit simpler than the past few have been, but I really love how it turned out!
I have been meaning to create a decorative calendar display for about 5-6 years! (I know, I know, I know!) Well, this is a page for an 8" x 8" display that I started last week! I shared the first page on Sunday. Click HERE to see that. (Do NOT hold your breath waiting for me to actually finish this before Christmas!)

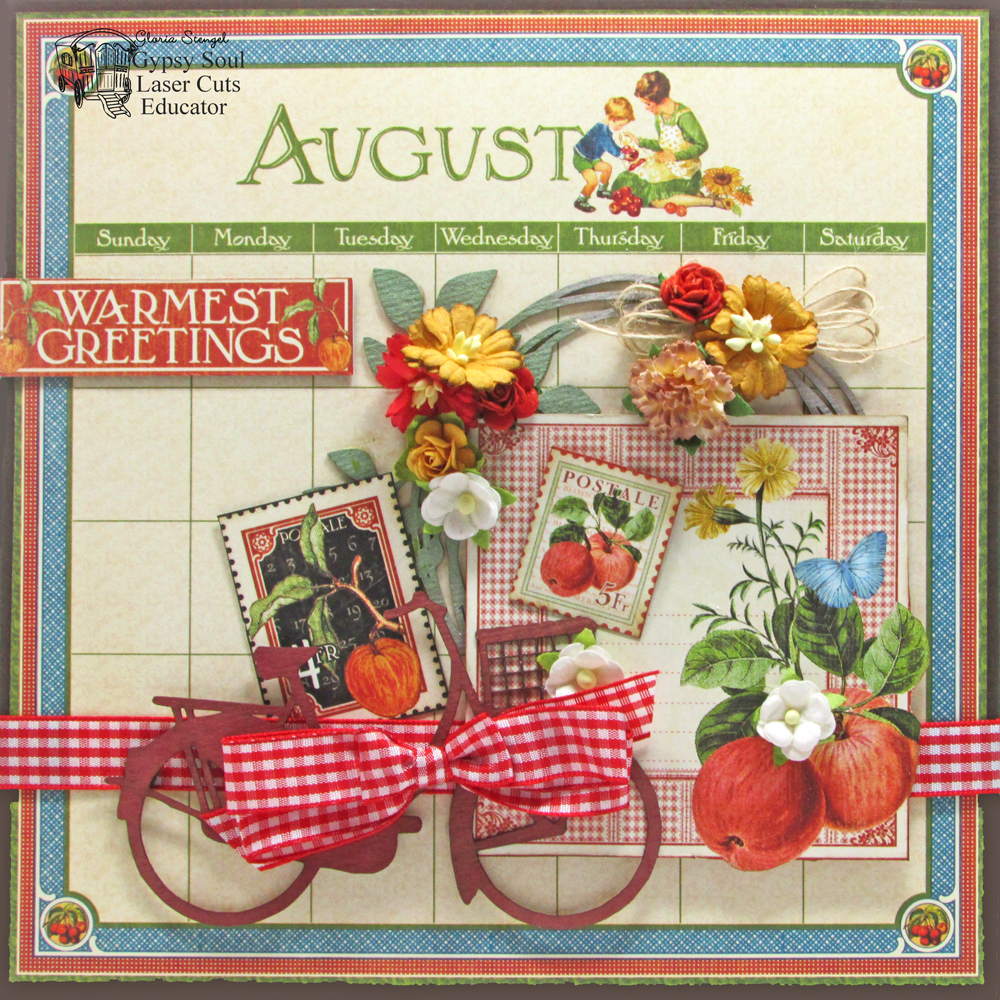
At any rate, I combined the Graphic 45 Children's Hour and Time to Flourish collections to make this page. I do not really want a calendar, rather I want something that I can display on a side table or shelf that show the months of the year. My plan is to make a page for each month, and then display them each month. I will also need to make a storage box......
I used inks to "colorize" the Scribble Frame Birds and a bike from the Bicycles Shape Set.
To make the page, I cut dark brown cardstock to 8 1/4" x 8 1/4". Then, I added the August calendar page from the G45 Children's Hour 8x8 Calendar Pad. I wrapped the page with some red checked ribbon. I did not want the birds, so I cut the little birdie off the wreath frame and set her aside for later. I then glued the frame to the page.
I trimmed out the apple image from the September Time to Flourish Cut Apart paper and added that to the page. I used foam tape to pop the image a bit. I then added the bicycle with foam tape. (I adore that bike with its basket!)
I added the sentiment cut from the Children's Hour August Collective paper.
I glued flowers and some twine around the wreath and tucked a few postage images in.
I created a large bow and glued that to the bike.

I kept the page fairly simple. I need to keep in mind that plan to make 10 more of them! (Make sure you see my October page HERE.)

Supplies Used:
Gypsy Soul Laser Cuts: Scribble Frame Birds and Bicycles Shape Set

Partner Products:
Graphic 45: Children's Hour and Time to Flourish Collections

Other: dark brown cardstock, flowers, ribbon, twine, ink (white, green, brown, red), adhesive tape, foam tape, glue

Sunday, August 21, 2016

October Calendar Layout for Cheery Lynn Designs

Hello and good morning. I am back with another Cheery Lynn Designs guest post! I had a great time creating handmade flowers for my project. I love making my own flowers, however it is VERY time consuming, so when I have a time crunch going I just grab the pre-made. I am super happy that I made my own for this project!
I adore the images in this paper collection, and I wanted to showcase all the purples and greens. I also wanted to participate in the current Cheery Lynn challenge (Challenge #236 - Doilies). I cut the doilies first, just to see how they would fit the 8 1/4" x 8 1/4" size I chose for my project. I cut the French Pastry Doily twice out of textured ivory cardstock. The doilies look better than the "real" doilies you buy in a pack! I love that I can cut them out of any thickness or color of paper!
I used the Small Gardenia, Medium Rose, Flourish Leaf Strip, and Mini Fanciful Flourish dies to create my flower and leaf clusters. I cut all the elements from textured cardstock. I don't think I have ever made flowers from a cardstock with this much texture before! They turned out very well! There is a doily behind those flowers, but I sort of covered it up with the lovely foliage!
I love the detail on the leaves and vines! Perfect for my pumpkin-y page. I added a chipboard number, colored with black ink.   
Thanks for looking! I will be back on August 29th with a new project! 

Remember, the winner of the current challenge will be chosen randomly. They will receive $20 towards shopping at the Cheery Lynn website. The challenge will end on Wednesday afternoon August 31st at 15:00 Eastern time. We will also showcase the Top 3 picks from our Design Team.


Cheery Lynn Dies Used:

Other products:
Cardstock: smooth black, Core'dinations textured (French Lilac, Spring Green, Sweet Apricot, Creme Brulee, Tuscan Sunset, Antique Moss, Bon Voyage)
Paper: Graphic 45 Children's Hour, Time to Flourish
Chipboard: Graphic 45 Happy Haunting, miscellaneous numbers
Ink: Ranger Distress Black Soot, Milled Lavender
Adhesive: ATG tape runner, foam squares, white glue

Saturday, August 20, 2016

Graphic 45 July Project Sheets - Summer Mix and Mash-up

Hello, Readers and Graphic 45 Fans! It is time to share the July Graphic 45 monthly project sheets! July is called the Summer Mix and Mash-up Project Set!

This month we are using the World's Fair and Children's Hour Collections, along with the Kraft ATC Alpha Banner. This is the first time since I started doing these monthly projects that I have been allowed to MIX the collections!

I used the alpha banners to spell out "ADVENTURE" and then hooked the letter tags together to make an accordion-fold, table-top display! The front shows the word, but the back of each tag is a beautiful "mix and mash-up" summer display!

To print the step-by-step directions for the tag project, click HEREThe project sheet includes a full supply list, plus step-by-step photo directions! Each month, you will be able to create a mixed media project for an approximate retail cost of $30. 

The metal staples option will be about $10 more. The directions explain how to create the project, and then show you how to add the optional Metal Staples items! This month we are using the Shabby Chic Ornate Metal Keys.
The banner folds up for storage or gift giving!
This project is a fussy cutter's dream! You will have a chance to fussy cut all the amazing images from the paper! Keep in mind, if fussy cutting is NOT your thing, you can remove some of the elements and still have a wonderful project!

We always have a card class for you, too!

You get a chance to use up your left-over supplies with a second project sheet for creating three cards! If you want to "add-on" the card class, the cost is around $5. If you wish to make ONLY the cards, the retail cost is around $20, plus any Metal Staples you wish to use.

The goal of the card class is to show beginners how to create cards with minimal product and without using a lot of special tools. Plus, this is a great way to show experienced crafters how to use up the scraps and left-overs from the larger class.

I am going to confess right up front - this month's class is a bit beyond beginner! I really got carried away with the fussy cutting! As always, you can remove some of the elements and still have some great cards. The cards are decorated inside AND out! This is your chance to go step-by-step into my card making process and make some "Gloria-style" cards of your own! 

Here is what they look like with the metal keys added:


Sharpen your scissors and have fun!

Don't miss out on any of the FREE project sheets this year!

January Mon Amour Card Class Project Sheet
February Children's Hour Altered Book Box and Tag Album Project Sheet (with Maria Cole)
February Children's Hour Card Class Project Sheet (with Maria Cole)
March Cityscapes Altered Window Shadow Box Project Sheet
March Cityscapes Card Class Project Sheet
April Enchanted Forest Mixed Media Album Project Sheet (with Maria Cole)
April Enchanted Forest Card Class Project Sheet (with Maria Cole)
May Voyage Beneath the Sea Square Tag and Pocket Album Project Sheet
May Voyage Beneath the Sea Card Class Project Sheet
June A Ladies' Diary Journal Class Project Sheet (with Maria Cole)
June A Ladies' Diary Card Class Project Sheet (with Maria Cole)
July Summer Mix and Mash-up Tag Banner Project Sheet
July World's Fair/Children's Hour Card Class Project Sheet

I will be back with the September project sheets in the beginning of October! Here is a sneaky peeky of what I am working on next....

Wednesday, August 17, 2016

Winner for Emma Lou's Birthday Blog Hop!

Hello everyone. Just popping by to announce that the winner of the Heartfelt Creations Emma Lou's Birthday Blog Hop is...

LENORIA


…chosen from Candy Slabaugh’s blog!

Lenoria receives a $25 gift certificate to shop at Heartfelt Creations! She has 72 hours to contact Liz Walker and claim the prize. Send Liz an e-mail at: passionforsparkle@gmail.com with “Winner of Emma Lou’s Birthday Blog Hop” in subject line.

Emma Lou was super surprised by all the birthday cards she received from the Heartfelt Creations Team and from the Alumni Team! It was fun to sneak one past her this year!! 
Here is the card I made for her. In case you missed the details, click HERE

Monday, August 15, 2016

Back to School Notepad

If you are looking for the CCB and D2BAtzy Blog Hop, please click HERE.

I am up on the CutCardStock Blog today! And, I am sorry to have two posts in one day, but that is they way it goes sometimes! 

It is back to school time for most American children. My homeschooled son will start his lessons on August 29th this year. He's in 11th grade, so my days of making fun, back-to-school gifts are over (sadly). However, everyone needs a cool notepad, right?!
I created a notepad cover and a matching envelope in a school theme. The notepad fits inside the envelope, but later, the envelope can be used to hold class notes, receipts, lunch money, PTA checks, letters to the teacher, and more!
This time of year, many moms are looking for FAST and EASY gifts to make for teachers or for students. This little project is both - fast AND easy! Plus, it is a good way to use up your paper scraps and embellishments. I used the Kraft Brown Bag Envelope with the button and string because it match my vintage theme. (A size "number 10" envelope is the kind that bills normally come in and are easy to find.)
Start by cutting Pop Tone Hot Fudge Cardstock to 8 1/2" x 5 5/8". Score on the short side at 2 3/4" and 2 7/8" to create a 8 1/2" x 2 3/4" folder. Cut two pieces of decorative paper to 8 3/8" x 2 5/8". Sponge the edges with brown ink and attach one piece to the front of the folder and one piece to the back.
Open the folder and cut two pieces of contrasting decorative paper to 8 3/8" x 2 5/8". Sponge the edges with brown ink and attach one piece to the left side of the folder and one piece to the right side.

Attach a notepad to the right side of the folder with strong adhesive. The notepad used here is 8" x 2 1/5" and is approximately 1/8" thick. If you cannot find this size notepad, most office supply stores sell 8" x 5" notepads. For a small fee, they will cut them in half for you!

Create a belly band for your notepad holder. Cut Pop Tone Hot Fudge Cardstock to 1 1/2" x 8". Cut decorative paper to 1 3/8" x 7 7/8" and attach it to the the cardstock strip. Wrap the strip around the notepad, securing at the back. Decorate the band and the notepad as desired.
Decorate a matching envelope by cutting Pop Tone Hot Fudge Cardstock to 9 3/8" x 3 7/8" and attaching the panel to the front of a Kraft Brown Bag Envelope. Cut decorative cardstock to 9 1/4" x  3/4". Sponge the edges with brown ink and attach to the envelope.

Die cut large numbers from a Brown Bag Kraft A6 Card. (I was able to cut several sets of numbers from each A6 card.) Sponge the numbers with brown ink and glue to the envelope as shown. Decorate with chipboard pieces.
Place the notepad into the envelop. Add a gift card or other small item and you have the perfect back-to-school gift!

CutCardStock:
Kraft Brown Bag Envelopes
Brown Bag Kraft A6 Cards
Pop Tone Hot Fudge Cardstock
Double-sided Foam Adhesive Squares
Scor-Tape
Tombo Mono Liquid Muli-purpose Glue

Other:
Printed paper and chipboard: Graphic 45 ABC Primer
Ink: Ranger Distress Frayed Burlap
Dies: My Favorite Things Big Numbers
Gems: Want2Scrap
Notepads: Papertrey Ink

Canvas Corp Brands and Dare 2B Artzy Blog Hop

If you are looking for the CutCardStock "Back to School" post, please click HERE.

Good morning, Crafters! I am participating in a fun product match-up blog hop today! Canvas Corp Brands has teamed up with Dare 2B Artzy Clear Stamps! I was given a box of goodies to play with and my mission (should I chose to accept it) was to share a technique using ink!
Well, I have THREE techniques to share! Seriously, you cannot give me a box of inks and mists and glazes and say, just do ONE thing!
I created a 6" x 5" top-fold card from black cardstock. I cut a piece of Black and Kraft Barbed Wire Cardstock to 5 7/8" x 4 7/8" and sponged the edges with Paradise Ink. I wrapped the kraft cardstock with Cord Rope - Natural. The rope is quite thick, so I pulled the fibers apart to get three, thinner strands. I attached the kraft panel to the card front with foam adhesive.

I sprayed a piece of Canvas with glimmer mist and allowed it to dry. Once the ink was dry, I added some layers of glimmer glaze and set that aside to dry. I stamped the large image from the Dream Catcher set onto the canvas with permanent black ink. After the ink was dry, I die cut the image with a circle die and attach the piece to the card front.
I layered a piece of Avocado Burlap onto the left side of the card. Then, using the Paradise, Pumpkin, and Sunset Yellow Premium Inks I sponged a piece of Garden Words on Ivory Reverse Cardstock with an ombre pattern, Starting at the bottom, I sponged the Paradise ink and then gradually faded into the Sunset Yellow (which created a green "bridge" color). I then faded into the Pumpkin orange. I trimmed the inked paper to 6" 1 3/4" and attached it to the burlap. 

To create the feathers, I first stamped the images (Dream Catcher set) onto ivory cardstock with white ink. Next, I heat embossed the images with white embossing powder and allowed the images to cool. Using the same ombre technique described above, I colored each feather. I wiped the ink off the embossed areas with a dry cloth. Using the D16 Feather Die, I cut out each feather. I attached the feathers with foam adhesive. 
I stamped a portion of the sentiment from the Dream Catcher set onto ivory cardstock with black ink. I cut the sentiment into a banner shape and attach it to the card. I added an Avocado Mini Clothespin to the top of the feathers. 

Take a look, leave a comment on the CCB Blog, include the #d2baccbmatchup!!! Then tell us your favorite social media site – Facebook, Instagram, Pinterest, YouTube and follow us there. You will then be eligible for this gift package from Dare 2B Artzy, plus a $25 gift card from Canvas Corp Brands to spend in the online shop
Blog Hop List - CCB Team:
Canvas Corp Blog
Gloria Stengel - you are here
Monica Edwards
Kim Rippere

Blog Hop List - D2BA Team:

Dare 2 B Artzy Blog
Chris Olson Pozzi
Karen Nofziger
Tonya Meyer


CCB Products:
Black on Ivory Cardstock
Black and Kraft Barbed Wire Cardstock
Garden Words on Ivory Reverse Cardstock
12x12 Burlap Sheet - Avocado
12x12 Canvas Sheet - Canvas
Mini Clothespins - Avacado
Cord Rope - Natural
Glimmer Mist - Sun Sisters, Limeade
Glimmer Glaze - Desert Sun
Shimmers Paint - Yellow-green

Dare2BArtzy Products:
Dream Catcher Clear Stamps
Feather Die
Premium Inks (Paradise, Pumpkin, Sunset Yellow)

Other Products:
Dies: My Favorite Things Sentiment Strips, Spellbinders Standard Circles Small
Ink: My Favorite Thins Sweet Tooth, Versafine Onyx Black
Embossing powder: Hampton Art white
Adhesive: ATG tape runner, foam adhesive