The Mini Album Makers Challenge will feature a monthly challenge, with each Design Team Member posting a link to a mini album tutorial, tip, or trick on the 1st of each month. Then, one team member will post a full tutorial on the 14th of each month! (My BIG tutorial month is not until February, but I will post smaller tutorials monthly.) In addition, there will be guest makers each month!
Click HERE for the October Challenge!You will have all month to make a NEW project and enter the challenge for a chance to win a prize. (See prize details at the end of the post.) Winners will be posted on the 7th of each month on the Mini Album Makers Blog. I have made a brand NEW project to share with you this month! If you are a long-time follower of mine, you know I love to make a mini album! However, it has been four or five months since I made a proper mini album! It was a blast to get back to my one true love...mini album making!
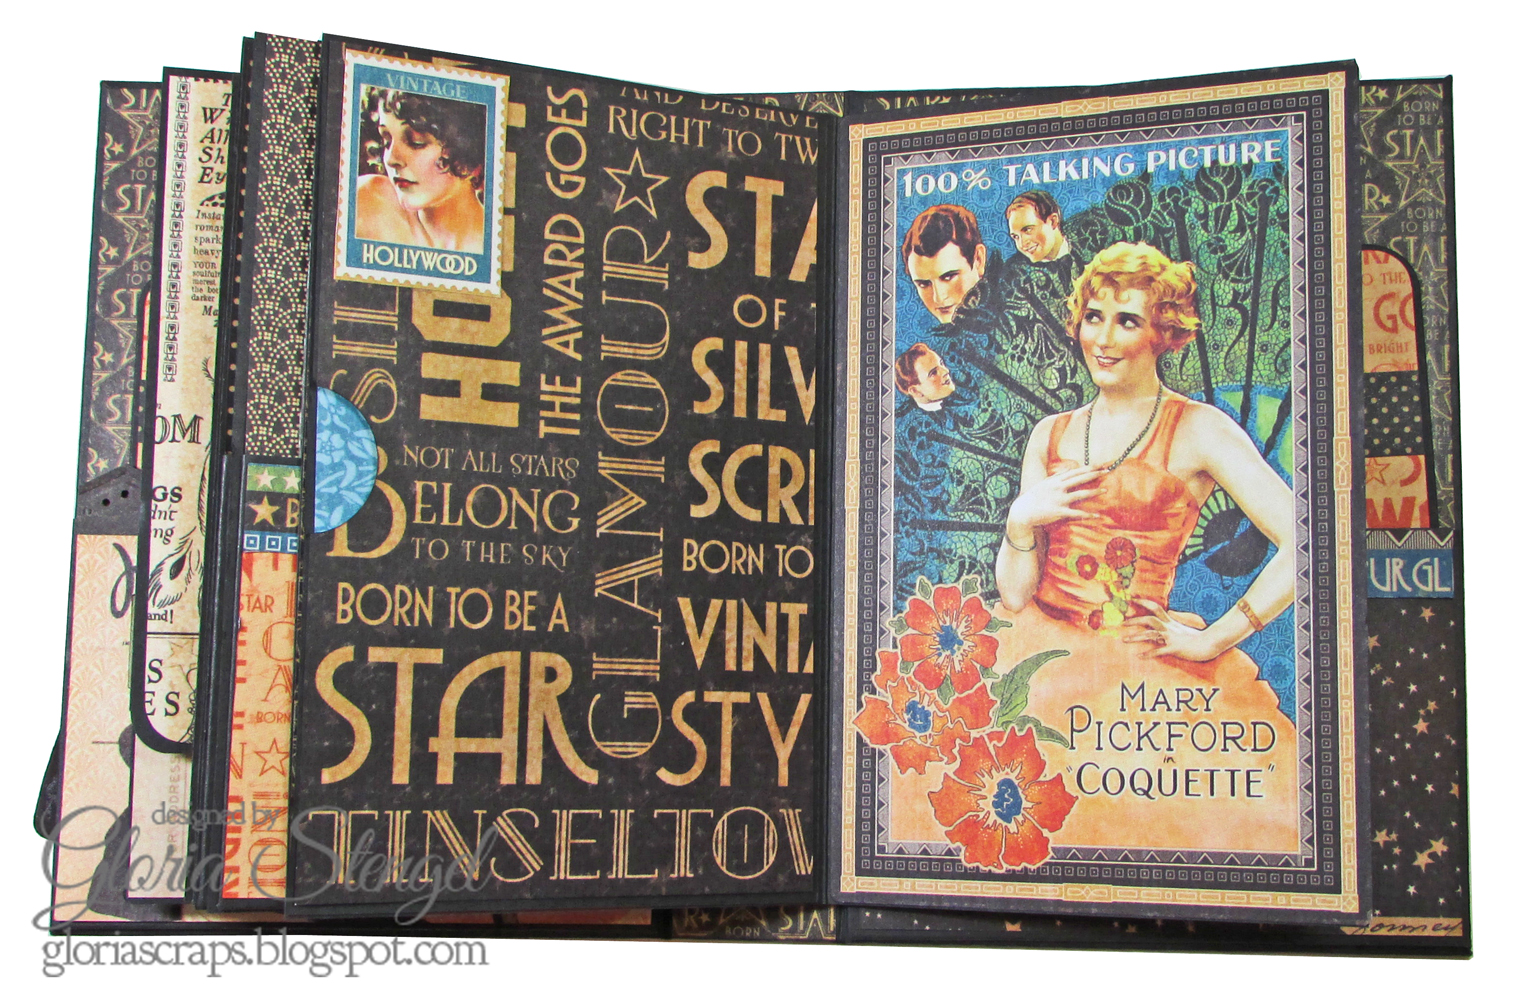
I created a sweet little mini that is 6 1/2" tall, 4 1/2" wide, with a 1 1/4" spine. This is the perfect size for 6x4 photos! Graphic 45 is a sponsor of the team so I used Graphic 45 Vintage Hollywood papers for my book, plus some bits and pieces of Artisan Style and Curtain Call (quite old and quite retired).
I had such fun with this theme and style of mini album. When my husband saw it he said that it was "classic Gloria"! Which is a pretty great thing to hear!
I make this style of mini most of the time, but for this particular mini, I had an idea for making folded pages. My dear friend Wanda is always showing me what she makes by folding a 12x12 piece of paper, which is usually something genius. I wanted to try her ideas for making mini album pages, but I could not remember how she showed me to fold and cut the paper. Since Wanda does not have a blog, I took myself to Pinterest, and in my search to discover how to fold the paper, I ran across THIS VIDEO TUTORIAL by Ginger Ropp (My Sisters Scrapper), which was just the idea I was looking for! My measurements, dimensions, and methods are a bit different than what Ginger used, and I have added more page sets than she used, but if you would like a great video for this style of book, give hers a look!
I generally stuff my mini albums too full for the spine I create, but this time, I was careful to make my spine the correct size, with the correct number of pages! The mini closes the way it was designed to do! I tend to make very chunky minis, so this skinny mini was a lot of fun to do!
I kept the embellishment on the front of the book to a minimum. I really wanted to make something practical and eye-catching without gluing the whole kitchen sink to the front of the album!
You can see from the back and the spine that the book does not bulge out! I still had a bit of an issue with the black cardstock wanting to crack, but I painted a thin layer of gel multi medium over the weak areas and that seemed to keep the paper from trearing. This is the first time I used plain cardstock for my base layer. Normally I wrap the chipboard with printed paper - which ALWAYS cracks! So, I am learning what works and what does not. (See the tutorial below for how I constructed the album base.)
The mini has three tab (or accordion fold) hinges and three page sets. I would normally try to cram twice that many pages into a book. I hope I have learned my lesson about hinges, gutters, and page number restraint! But I doubt it! I still have lots of pockets and some flip outs, but it is less bulky than usual. Each page is the perfect size for the dazzling Graphic 45 Ephemera Cards!
If you wish to see every page of the mini, see the video at the end of the post. I take a jazzy walk through the mini so you can see all the pockets and flips.
Let's get started with the tutorial. I will show you how to construct the book and the base pages, then you are on your own to decorate. This is the same style of mini that I always make. The size of the covers and spine varies from book to book, but it is the same basic construction that I use for most of the minis that I make from scratch.
Cut three pieces of chipboard for the covers and the spine. The front and back covers are 6 1/2" x 4 1/2". The spine is 6 1/2" x 1 1/4". Place adhesive on the back of each piece. I used Scor-tape, but you can use what works best for you.
Cut black cardstock to approximately 8 1/2" x 12". Remove the adhesive backing from the back of your covers and spine and place the pieces in the center of the cardstock. Make sure you have a 1/8" gap between each cover and the spine. Trim the corners at an angle and place adhesive on the cardstock flaps and on the spine. Each time I make a mini album I learn more and more what NOT To do. Back in August of last year, I made four little minis (see the post HERE) and they turned out cute, but I had some issues with the spine, as I was trying something a little different with the construction. This time I had a better experience with getting the base of the book together.
Remove the adhesive backing and fold the excess cardstock in toward the center and burnish everything. Trim a piece of printed paper to 6 3/8" x 1 1/8" and attach it to the spine, then burnish. (The area with the printed paper is where the hinge mechanism will be attached.)
I make a style of hinge that I was taught to call the accordion fold or tab fold hinge mechanism. I learned to make this from a book about, what else, book binding, that I purchased way back in the early 1990's! {Yes, I have been paper crafting for a LONG time!} There are other variations of this hinge floating around, but I still make mine this way. To make the hinges, cut black cardstock to 5 1/2" x 6". Score on the long side at 1", 1 1/2" 2", 2 1/2", 3", 3 1/2", 4", 4 1/2", and 5". Accordion fold on the score lines and burnish. Place adhesive on the 3rd, 6th, and 9th sections, as shown.
Remove the adhesive backing and fold the sections together to form three "tab" hinges. You should have a 1" section at the front, then a hinge, then a 1/2" gutter, a second hinge, a second 1/2" gutter, a third hinge, then the 1" back section.
Flip the hinge mechanism over the place adhesive on the back.
Remove the adhesive backing and attach the hinge mechanism to the spine as shown. Burnish everything and gently work the hinges from side to side. Use your bone folder to GENTLY score the space between the chipboard covers and the spine. You do NOT want to tear or puncture the cardstock. You simply want to stretch the fibers of the paper.
Gently fold the covers closed. Fold each cover and gently work it open and closed to stretch the cardstock fibers and keep the paper from tearing.
I do not normally use cardstock for my covers. I normally paint the chipboard, which often causes it to swell or warp. Or, I use printed paper to wrap the chipboard, but it tears dreadfully. I still had a bit of an issue with the cardstock wanting to crack, but I painted a thin layer of gel multi medium over the weak areas and that seemed to work.
Trim printed paper to 6 3/8" x 4 3/8" to decorate the inside of the covers. I like how crisp this looks with the black cardstock. Your cover base is finished. You can move on to the page sets. To make the pages, I folded some sections of cardstock to make three page sets, one to fit over each of the hinges. This is a bit different from how I have made my page sets in the past. I wanted to try this folded method, so I thank both Wanda and Ginger for their inspiration!
You can cut three pieces of cardstock in the same manner, but depending on how you fold the cardstock, you will get various styles for each page set. I will show you one way to fold the paper.
Cut black cardstock to 8" wide by 12" long. Score at 4" on the 8" side. Rotate the paper and score at 6" on the 12" side. You will have four panels, each one 6" x 4". Orient the cardstock so the 8" side is on top. Cut along the score line from the top edge to the center score line.
Use your craft knife to trim next to the original cut line to remove a 1/16" section of cardstock, as shown. Trim 1" from the right-hand, top panel, and round the corners.
Fold the cardstock in half on the score line so that you have a 12" long by 4" wide folded piece. Burnish the fold.
Fold the top section down, along the center score line.
Flip the page set over and fold the rounded edge flap down, as shown. Burnish all folds.
This is what the back page looks like with the flap lifted up.
Turn the page set over again to the front, and open the flap. Use a 1" circle punch to punch a notch in the upper right edge. Place double-sided tape along the bottom edge, as shown.
Fold the flap down, securing it at the bottom. You will have an open pocket. The left edge of the pocket will attach to the tab hinge. The right side will become the pocket opening.
Open the page set. You will have two pages that measure 6" tall by 4" wide. You may create a pocket for one or both of these pages.
I created four pockets for my mini. To make a pocket, cut black cardstock to 4 3/4" x 3 1/2". Score at 1/2" from the edge on three sides. Angle the bottom corners and add adhesive to the tabs. Fold on the score lines and burnish.
Place the pocket on the page as shown. For the sample, I placed a pocket on both pages in the first page set. The other page sets have just one pocket each.
If you wish to create a flip page instead of a pocket on your page cut cardstock to 6" x 3 1/2" and score at 1/2" from the top edge. Round the bottom corners.
Place adhesive above the score line, fold on the score line and burnish. Attach the little flap to the top of the page.
This is what the page looks like with the flap added (the blue panel above).
As I finished each page set, I labeled the open edge where the hinge would be inserted. That way I would not get confused and have things upside down! I have put things together with upside down pockets one too many times! Place adhesive on both sides of your hinges.
I attach my pages to the hinges BEFORE I decorate. You may decorate first, but I always make mistakes when I do it that way, so I attach my pages first. Each page will have an open space that slides over the hinge so that the hinge is tucked up inside the page set. (If you make a different style of page, you can simply attach a page to each side of the hinge, which gives you three pages or 6 sides.)
Attach one page set to each hinge. My pages fold open so that there are actually seven (7) pages(14 sides) in total. Depending on how you fold your cardstock, you may have more or fewer pages than I do.
I also created pockets for the inside front and back covers. Cut black cardstock to 3 1/2" x 5 1/2". Score at 1/2" from the edge on three sides. Angle the bottom corners and add adhesive to the tabs. Fold the tabs and attach the pockets to the inside covers.
I decorated each pocket and slipped a decorated a Graphic 45 Regular Black Tag into the pockets. The pockets on the inside covers are slightly wider than the pockets in the mini album, which means the tags fit into the larger pockets, but not into the page pockets. If I make this book again, I will make every thing a tad wider so that a regular or square tag will fit the interior pockets!
I repeated the process for the inside back cover. The photo mats that fit each side pocket are made from black cardstock and measure 5 1/2" x 3 1/2". I rounded all four corners and attached decorative paper to both sides. If you want to see all the inside pages, see the attached video.
Thanks for joining me today! I hope that you are as excited as I am about this new challenge blog! Below is a full list of the Design Team, with links to their blogs!
I was on the Gypsy Soul team for a few years, and they have incredible chipboard elements! HERE is a mini I made when I was on the GSLCuts design team. It not only shows the amazing chipboard elements, but also shows you that this basic album construction can work for any size covers or spine.
Our challenge follows a few simple rules:
Any Handmade Book Goes. Enter any form of handmade mini albums, scrapbooks, journals, and book arts. Our focus is on completed works, so no layouts or journal spreads that are not part of a complete handmade book project. You do not have to provide a tutorial, but we wish you would. Feel free to use one of the DT tutorials to make your project and give proper credit where due. No back links allowed. Combine with any other challenges as applicable. No limit on entries. Share the love by visiting and commenting on other entries. Please become a follower. That's it - have fun! Click HERE to enter your project! Come back on Noivember 1st for a new set of tutorials from the team!
Plain chipboard: WorldWin Papers Cardstock: WorldWin Papers Midnight (80 pound) Printed paper: Graphic 45 Vintage Hollywood, Artisan Style, Curtain Call Ephemera cards: Graphic 45 Vintage Hollywood Decorative chipboard: Graphic 45 Vintage Hollywood Tags: Graphic 45 black and kraft Regular and ATC sizes Film strip ribbon: Tim Holtz Flowers: Wild Orchid Crafts Jewelry findings: Michael's Crafts Circle punches: Stampin' Up (1/2" and 1") Border punch: Martha Stewart Corner rounder: Creative Memories Score board: Martha Stewart Adhesive: Liquitex Matte Gel Medium, Scor-tape, Tacky glue, ATG tape, Hot glue
What a fantastically detailed tutorial - thank you for so generously sharing your method and the time it took to do! Brilliant use of the papers to create a fabulous album. Alison x
Wow Gloria! I love your gorgeous mini album and all those wonderful pages. Your tutorial is excellent and so detailed and I loved watching your video to see the pages in more detail! I had a similar problem to you with cracking paper, I use a slightly damp cloth, or nearly dry baby wipe and wipe over the scored card and it seems to crack less when folded. Hugs, Anne xx
Now this is the Gloria I fell in love with...how fabulous! I love, love, love the design with all the pockets and tags and tuck spots. I am most impressed by the fact that the album actually closes, as mine never do! LOL Truly wonderful, Gloria!
Wow, Gloria, what an amazing book and such a fabulous detailed post!! I have bookmarked it for future reference!! Stunning details on every page, great to see you return to your love of mini books, wonderful use of those papers and thanks so much also for the link to the video that inspired you. I will definitely check that out too!
Oh Gloria, this is really wonderful. I love that you took the card size into consideration and this showcases them perfectly. A real must make! The paper is very pretty and I can't imagine it looking any better than in this book. Thanks so much for another great month of inspiration. Hugs, Autumn
Oh, how I love seeing a new mini album made by you! Gorgeous, simply gorgeous! All the pockets, beautiful pages and bits & bobs are signature Gloria. Thanks so much for the grand tutorial. You rock!
Gloria, since I've been stalking you for much longer than I've been blogging, I do remember seeing your albums. So good to see you enjoying yourself so much making this, and your tutorial and post is fabulous! I tired to get an album made for last month's challenge, but didn't finish. I was trying to make this kind of spine without using any instructions and I didn't like how it was coming together, so now I think I may be able to get that book done after all. Thank you for the inspiration and motivation I needed! What a great mini album with so many fun details to look at! I could sit and turn these pages over and over again! Sending hugs! Sara Emily
I am excited to see what you enter this month! I love your creativity and your excellent projects! I have missed seeing your work...because I have been a bad blog-looker these past months! ;)
Wow!! Totally brilliant Mini Album Gloria. I love the papers you've used on this, they are gorgeous and the page design is brilliant!! A wonderfully detailed tutorial and absolutely stunning book!! x
Wonderful G45. Journal I love the design of the pages something I haven’t tried before you have inspired me to try this style thanks for sharing all the details will also watch video later. MaggieH


Love your style!
ReplyDeleteWhat a fantastically detailed tutorial - thank you for so generously sharing your method and the time it took to do! Brilliant use of the papers to create a fabulous album.
ReplyDeleteAlison x
Great tutorial! Beautiful album!!!
ReplyDeleteWow Gloria! I love your gorgeous mini album and all those wonderful pages. Your tutorial is excellent and so detailed and I loved watching your video to see the pages in more detail! I had a similar problem to you with cracking paper, I use a slightly damp cloth, or nearly dry baby wipe and wipe over the scored card and it seems to crack less when folded. Hugs, Anne xx
ReplyDeleteNow this is the Gloria I fell in love with...how fabulous! I love, love, love the design with all the pockets and tags and tuck spots. I am most impressed by the fact that the album actually closes, as mine never do! LOL Truly wonderful, Gloria!
ReplyDeleteThank you! It is fun to get back to my love of mini albums, for sure!
DeleteWow, Gloria, what an amazing book and such a fabulous detailed post!! I have bookmarked it for future reference!! Stunning details on every page, great to see you return to your love of mini books, wonderful use of those papers and thanks so much also for the link to the video that inspired you. I will definitely check that out too!
ReplyDeleteThank you for sharing your amazing tutorial, Gloria!!! You album is so beautiful!!! Very very nice layout.
ReplyDeleteHenry
Brilliant tutorial Gloria! and a fabulous journal, love it. Happy crafty week, Angela xXx
ReplyDeleteWOW !!!!!!!!!!!! All I can say is what a GREAT tutorial... Thank you so much for all the time you put into this.
ReplyDeleteOh Gloria, this is really wonderful. I love that you took the card size into consideration and this showcases them perfectly. A real must make! The paper is very pretty and I can't imagine it looking any better than in this book. Thanks so much for another great month of inspiration. Hugs, Autumn
ReplyDeleteOh, how I love seeing a new mini album made by you! Gorgeous, simply gorgeous! All the pockets, beautiful pages and bits & bobs are signature Gloria. Thanks so much for the grand tutorial. You rock!
ReplyDeleteThanks, Pam. When my long-time followers get all jazzed up about a project, I know that it was worth the effort to make it and write the tutorial. ;)
DeleteGloria, since I've been stalking you for much longer than I've been blogging, I do remember seeing your albums. So good to see you enjoying yourself so much making this, and your tutorial and post is fabulous! I tired to get an album made for last month's challenge, but didn't finish. I was trying to make this kind of spine without using any instructions and I didn't like how it was coming together, so now I think I may be able to get that book done after all. Thank you for the inspiration and motivation I needed! What a great mini album with so many fun details to look at! I could sit and turn these pages over and over again! Sending hugs! Sara Emily
ReplyDeleteI am excited to see what you enter this month! I love your creativity and your excellent projects! I have missed seeing your work...because I have been a bad blog-looker these past months! ;)
DeleteWow!! Totally brilliant Mini Album Gloria. I love the papers you've used on this, they are gorgeous and the page design is brilliant!! A wonderfully detailed tutorial and absolutely stunning book!! x
ReplyDeleteThank you so much!
DeleteThis is stunning! Awesome tutorial! Your page and pocket and flips are really neat. Hope I can try to make this one day soon
ReplyDeleteWonderful G45. Journal I love the design of the pages something I haven’t tried before you have inspired me to try this style thanks for sharing all the details will also watch video later.
ReplyDeleteMaggieH