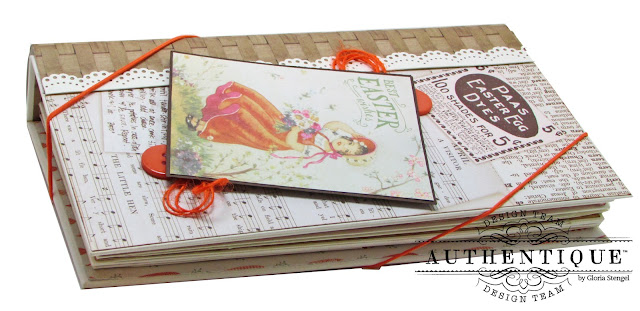
This mini is similar in shape to a traveler's journal, but inside it is a standard mini album. I wanted to have lots of pull-outs and flaps for photos and journaling. I kept the front of the mini very simple and used an elastic string closure.
The mini album is 8 3/4" tall and 4 1/2" wide with a 1 1/4" spine. I added a curved decorative spine to the album also, which I will explain in the tutorial below.
I created five page sets (with five hinges) for the book. I really enjoyed working with the long, skinny pages!
Some of the sections have magnetic closures, like this double-page spread.
You can open the pages and then lift up the two flaps in the center. To see all the pages, view the video linked below.
You will need several sheets of each printed paper style in the Jubilee Collection. I used paper from both the Jubilee Collection Kit and the Jubilee 12x12 Paper Pad.
Let's get started!
Trim two covers from heavy weight chipboard to 8 3/4" tall and 4 1/2" wide. Trim a spine piece to 8 3/4" x 1 1/4". Cut off-white cardstock to 10 1/4" x 12" and center the chipboard pieces onto the cardstock, attaching securely. Make sure to leave a 1/8" gap between each cover piece and the spine. Angle the corners and add double-sided tape to the flaps.
Wrap the cardstock around the covers and secure. Gently score the 1/8" gap between the chipboard pieces to stretch the paper fibers. Carefully work the covers to open and close the book.
Cut a piece of the basket weave paper to 8 5/8" x 2" and attach it over the inside spine area. Once again, score the 1/8" gap between the chipboard pieces to stretch the paper fibers.
Now, let's create the accordion-hinge mechanism. Trim basket weave paper to 8 1/2" x 6". Score on the 6-inch side at: 1/2", 1", 1 1/4", 1 3/4", 2 1/4", 2 1/2", 3", 3 1/2", 3 3/4", 4 1/4", 4 3/4", 5", 5 1/2".
Place double-sided adhesive on reverse side of the paper, following the pattern above. The dark lines indicate the score lines.
Accordion fold the paper, attaching each 1/2" section together to form a hinge. You will have five (5) hings and four (4) 1/4" gutters. Trim the ends of each hinge to an angle shape and place double-sided tape on both sides of each hinge. Attach the hinge mechanism to the spine.
Trim two pieces of the carrot paper to 8 5/8" x 4 3/8" and attach them to the front and back inside covers.
Optional step: Trim basket weave paper to 8 3/4" x 4". Trim a piece of off-white cardstock to 8 3/4" x 4" and glue to the reverse of the basket weave paper. Attach one edge of this panel to the back cover, approximately 1" from the edge of the spine. Gently curve the paper and attach the other edge to the front cover at 1" from the spine. You will have a pretty, curved spine.
However, if you add this curved piece your mini album will NOT lay flat when opened. If you wish your mini to lay flat when opened, simply cut the basket weave paper to 8 5/8" x 3 1/8" and attach it directly to your spine.
Trim the collage print paper to 8 3/4" x 3 1/2" and attach it to the front cover. Trim a decorative border from off-white paper and attach to the seam where the two prints join.
Repeat the above step for the back cover. Decorate your covers as desired.
For each page set you will need (cut five of each item below):
1 piece off-white cardstock cut to 8 1/2" x 8", scored at 4 /14" on the 8-inch side.
1 piece off-white cardstock cut to 8 1/2" x 4 1/4". Cut a notch in on one long edge with a 1 1/4" circle punch.
1 piece off-white cardstock cut to 7 1/2" x 4". Score at 1/2" on the long side. Rotate so that the score line is at the top of the panel and round the bottom two corners.
1 piece off-white cardstock cut to 7 3/4" x 3 3/4". Round all four corners. (these are your pull-out mats .)
Attach one long edge of the scored sheet to the first hinge. Fold on the score line.
Flip the page over and add adhesive to the top and bottom edges. Remove the adhesive backing from the hinge and from the top and bottom edges. (This will allow you to create a pocket.
Attach the panel with the notched edge to the page. This is the back of the page and also the pocket page. Add your hinged flap to the top of this page (not shown). Place your pull-out mat into the pocket.
Add your page elements to the remaining four hinges. I added mine an various configurations so that each page set would be a bit different. Decorate your pages as desired.
To see all pages, view the video linked below.
Authentique Supplies Used:
Jubilee Collection Kit (comes with Details stickers)
Jubilee 12x12 Paper Pad
Jubilee Details cardstock stickers
Spectrum Series Cardstock (Mustard Seed check, Green Thumb stripe, Bubble Gum Pink stripe)
Additional Supplies:
Cardstock: American Crafts Rocky Road, World Win Papers Smooth Natural
Ink: Ranger Distress Vintage Photo
Magnets: Basic Grey magnetic discs
Buttons: from my stash
Twine: Really Reasonable Ribbon Orange Burlap String
Enamel dots: Doodlebug Design Lily White Glitter Sprinkles
Elastic string: Sorrento Crafts
Die cuts: Spellbinders Standard Circle Large
Tools: Creative Memories corner rounder, Martha Stewart lace border punch, Martha Stewart score board, Stampin' Up circle punch
Adhesives: ATG tape, Scor-tape, Scrapbook Adhesives by 3L foam squares, 3M foam tape, white glue


lovely album!
ReplyDeleteA really fabulous and beautiful album once again here. I just LOVE all your different albums.
ReplyDelete