If you are looking for the Graphic 45 #Selfie Challenge post, click HERE.
Good morning, Crafters! The Authentique Paper Team is sharing some Father's Day projects today, so make sure you hop over there and take a peek!
Father's Day is very difficult for me as I lost my dad in 1997 and my father-in-law in 2011. My dad loved my creations, from the time I crocheted a 12-foot long scarf, to the picture frame made from rocks, to the lopsided ashtray! Pop always acted like I was the world's greatest artist and crafter! He did not get to live to see my "Craft Emporium," but I know he would have loved seeing my creations. My husband is not much for celebrations, but I still make him a card every year! He always says that I don't need to because he's not my dad! But...I just like to let him know he's a great father and husband!
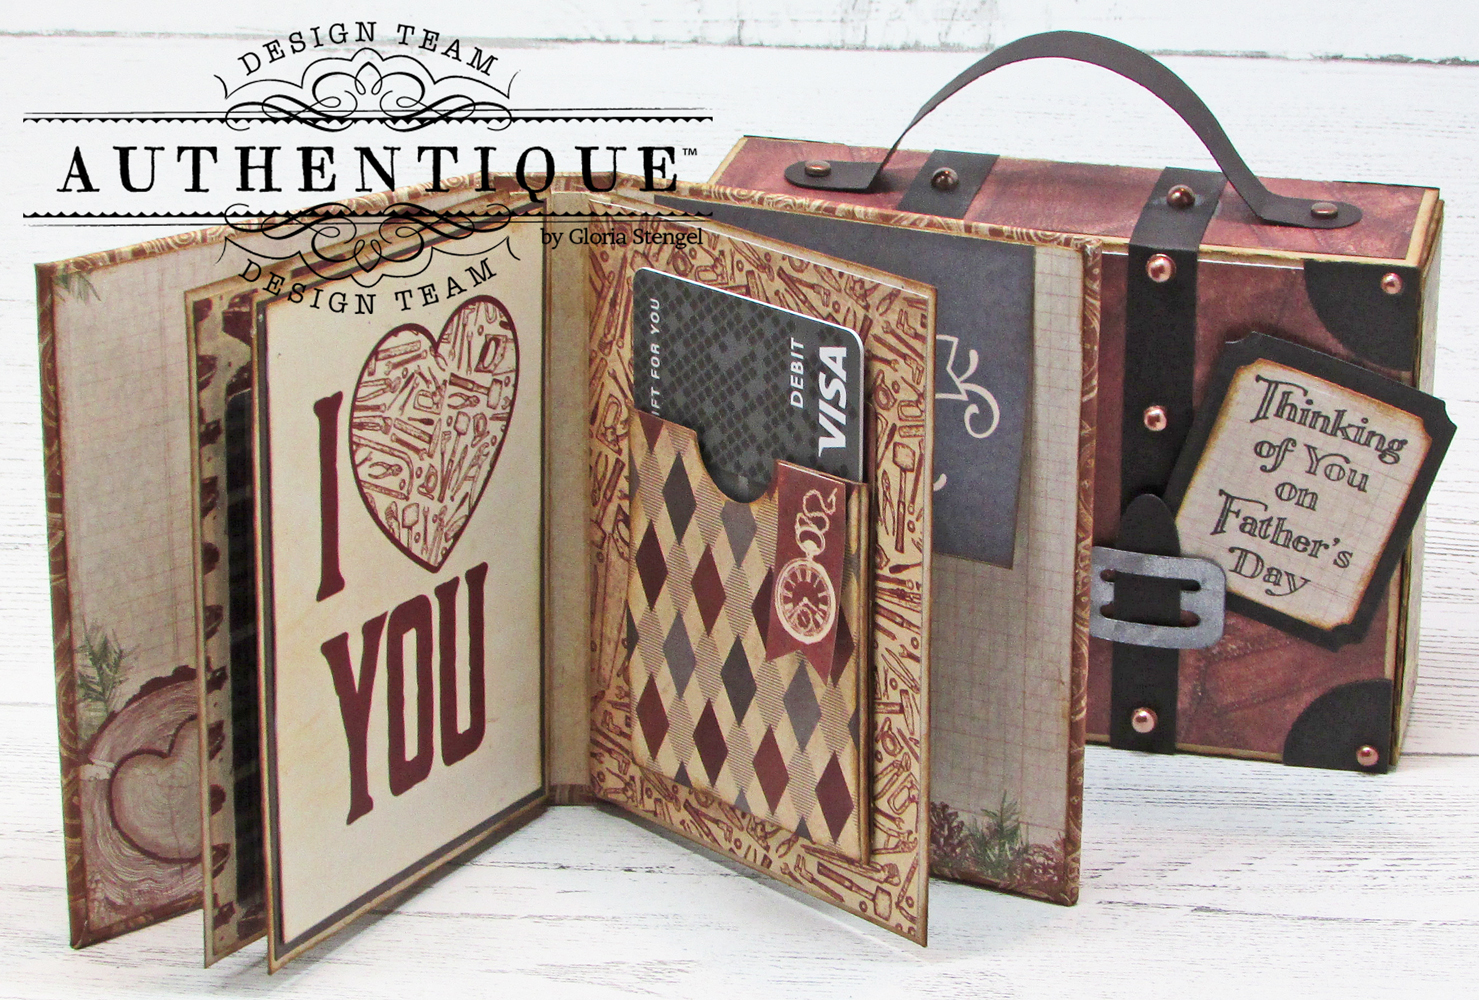
I used the Mister Collection to make this wonderful, vintage suitcase box. (I included a bit of the Rustic Collection, too.) The box is approximately 4" x 5" x 2", which is perfect for a little gift or, even a mini album!
A drawer slides out of the suitcase to reveal a little mini album.
The little album is perfect for tucking away a few gift cards, love notes, or even wallet-sized photos for your special man! To make the little suitcase, you will need a cut file for your electronic cutting machine. You can use any machine that can read SVG files. I use a Silhouette Cameo 3. (You can make this box by hand, but I used a cut file so there are no instructions for cutting one by hand.) I used the Matchbox Magical Mini Album. I think it is around $3 to download.
I cut the box and the wrapper from kraft cardstock and inked all the edges with Ranger Gathered Twigs Distress Ink. (The box is on the left, the wrapper on the right.) The wrapper becomes the outside of the suitcase.
Add decorative paper and tape to the outside of the box. The papers are from the Authentique Mister Collection. They are perfect for this project! I love the plaid and paisley prints.
For the inside of the box, simply add decorative paper to the bottom and the two long sides. The short sides get folded in and you won't see them.
Assemble the box per the instructions that come with the cut file (there is a video tutorial HERE).
Trim decorative paper for the top of the suitcase, where you want to attach the handle. Then, use mini brads to attach the handle. I cut the handle out of 110# dark brown cardstock.
Trim paper for the rest of the outside of the suitcase (box wrapper). I used Mister Three paper because it looks just like old, stitched leather! Save the last panel until you have the wrapper assembled as it will cover the last seam.
Flip the wrapper over to the inside and cover the area where the brads are attached.
I also covered the full inside of this piece, but it is not necessary as it does not really show. I like to cover all the exposed cardstock because, well, that is just my preference.
Assemble the suitcase wrapper and attach the last decorative panel to the bottom. Slide the box into the wrapper. (I am showing you a bit of my work desk in the tutorial today! It can get pretty messy...this is actually quite clean!)
:Locate the corner pieces from the cut file. I cut these from 110# dark brown cardstock.
Attach the corner pieces to all the corners with glue. To create the straps, I simply used the Silhouette software to stretch out the handle piece to 11 1/2" long, keeping the original width. Cut two from the dark brown cardstock. Wrap the straps around the suitcase and glue in place, making sure to keep one end free for attaching the buckles. The buckles are part of the cut file. Cut two from silver cardstock. I actually cut mine from black cardstock and rubbed them with silver ink. Thread the buckles through the end of the straps and glue in place.
I added copper-colored, flat-backed pearls to my suitcase. I stamped a sentiment onto a scrap of paper and cut it out into a label shape. I just glued the sentiment in place.
I decided to create a mini album for my box. Because the box is only 1 1/4" tall, I had to keep the cover pretty plain and the insides fairly flat.
I used the cut-aparts from the Mister Eleven and Twelve for some of the pages. I created a gift card pocket as well. This is the perfect little mini to add notes, gift cards, and wallet-sized photos.
To see all the inside pages, view the walk-through video below.
To create the mini album, follow the directions for THIS mini.
In order for the mini to fit into the box, you cannot decorate the cover with lumpy embellishments, so take that into account when making your little album.
Thank you so much for looking!
Authentique Supplies Used: Mister Collection: 2x12 Paper (Eight, Eleven), 8x8 Paper Pad, Details Stickers Rustic Collection: 6x6 Paper Pad Additional Supplies Used: SVG File: Lori Whitlock Matchbox Magical Mini Album Cardstock: Kraft, Dark Brown Stamps: Stampin' Up (Father's Day), Sweet N Sassy Stamps (Scripture) Ink: Ranger Gathered Twigs Distress, Delicata Silver Shimmer Pigment Brads: stash Pearls: Queen and Company Chocolate Delight Dies: Spellbinders Labels Large and Small. Graphic 45 Regular Tag and Gears, My Favorite Things Gift Card Pocket Chipboard: Grafix Black Adhesive: ATG tape, white glue, Scor-tape, Scrapbook Adhesives by 3L 3D Foam Squares


Absolutely gorgeous!!!!
ReplyDeleteAnother great mini album project! You are going crazy with that Silhouette!!
ReplyDeleteWonderful Project. Thanks for sharing.
ReplyDelete