
Hello, everyone! I started working on a 20-page mini album the other day and thought I would share the cover with you for my Really Reasonable Ribbon post this week! It will probably take me quite a while to finish the full album, but so far...I am loving the cover and the first few pages!

The base album is a Simple Stories 4x6 Sn@p! Flipbook (Speckle Dots). The actual album is really 4 5/8" x 7 7/8". The inside of the album is supposed to contain photo sleeves, but I really don't like those, so I cut black cardstock for my inside pages. (I will explain more about that once the full album is finished.) For now, let's just talk about the front cover! The paper collection is Simple Stories Simple Vintage: Lemon Twist. I purchased this project as a kit in September 2022, but as always, I don't usually follow the kit instructions very well. Since I received full packs of the paper, I am able to cut it myself and just do what I like, using the original instructions (by Sue Kendall) as a loose guide.
 The called for cover element was not to my taste but there was a fun saying on the sticker sheet that I liked. However, the lettering was in a pale yellow and did not stand out very well. So I recreated the saying using my own fonts, in my own style, and printed it in black onto white cardstock. I cut the word art out with a stitched die and matted it with black cardstock. Much more striking...and more to my taste (sweet, not sour)!
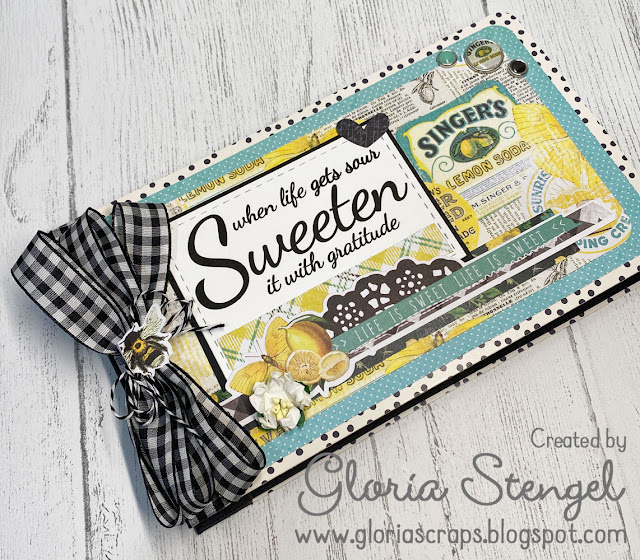 I used lots of paper layers as well as the Squeeze the Day Page Pieces and Lemon Twist Decorative Brads from the paper collection. Funny thing, the "brads" are now flat-back with adhesive on them rather than actual brads! I love that change from Simple Stories!
  I tied a small loopy bow with Black Licorice Baker's Twine and glued that to the gingham bow. I used the die cut bee (page piece) from the paper collection to add a "topper" to the bows, which also hides a glue blob! (It happens!)
 For the inside of the front cover I added a layered series of banners cut from various papers. You can see how I wrapped the 5/8" Bold Black Check ribbon around the cover. I love the plaid and polka dots together!
Does this make you think of summer days in the countryside, next to a lemonade stand?! It is so cute!


For the AMAZING gingham bow I used 5/8" Bold Black Check ribbon. I wrapped a length of the ribbon around the edge of the front cover, then tied a bow with three long loops. I glued the bow to the cover, making sure that the size was the full height of the cover.

I also added a Miniature White Gardenia to the lemon cluster on the paper strip decoration.

Looking at this again, I am tempted to pull the banners off and create a pocket for the inside cover. If I can get it to lift off without ripping, I will use this element on one of the inside pages, and do something else on the cover...maybe.
 I added a few paper flowers. I confess that those paper flowers have been in my stash for about 15 years or longer! I just have never used them, nor could I bring myself to toss them out! Happy happy!

I placed another bow made from the Black Licorice Baker's Twine to the sticker element.


Thanks for joining me today! I am super excited to continue working on this album over the summer! I am not as fast as I used to be, but I am going to keep plugging along!


Really Reasonable Ribbon Supplies Used:
Other Supplies Used:
Cardstock: ColorMates Smooth Black, Neenah Solar White
Printed paper and elements: Simple Stories Simple Vintage: Lemon Twist 12x12 Collection Kit, 6x8 Paper Pad, Cardstock Stickers, Decorative Brads, Squeeze the Day Page Pieces
Album: Simple Stories Sn@p! Flipbook - Speckle Dots
Paper flowers: unknown
Dies: Elizabeth Craft Design Stitched Rectangles
Tools: hole punch, corner rounder, WRMK Layers, trimmer, score board, ruler
Adhesive: hot glue, Art Glitter Dries Clear Glue
No comments:
Post a Comment
Due to high levels of SPAM, your comment will be moderated and approved as soon as possible. Thank you for taking the time to visit and comment.