Well, that was a long break, wasn't it?! I am finally back with the September Folios! I cannot apologize enough for taking so long to get back into the groove. I needed the break, but it is so hard to get back to creating when you take that much time off!
Each month, on (or shorty after) the third Sunday of the month, I will release the tutorials for TWO (2) folios. I will have October, November, and December coming monthly. Then, I will release the summer folios (June, July, August) in January 2018. There is a chance that I will get to the missing summer folios sooner, but don't hold me to that!
The September Folios are all about going back to school and celebrating the beginning of the fall season. The colors are mainly red, gold, green, brown, and black. There are some blue accents as well.
We are continuing to use the Graphic 45 Children's Hour Collection for this month. We will use the 12x12, 8x8, and 6x6 pads, plus some of the other items from the collection. This month, we are also going to be using the Place in Time and ABC Primer Deluxe Collector's Editions (plus some of the original collections, since those are in my stash in abundance). We are also using Time to Flourish (which is retired, but you can still find it online). Graphic 45 has a new collection called Seasons which will make its way into the rotation in October! The best news is you can now order RETAIL from the G45 site!
I also used a few pieces of Simple Stories Smarty Pants Head of the Class. This is a sheet that looks like grade school penmanship. This is also retired, but you can purchase the digital papers to print at home, or you can substitute something else from your stash.
I have used black cardstock for the base, but dark brown cardstock will work as well. See the full supply list below.
The September folios consist of one calendar folio (8 1/4" x 8 1/4") and one scrapbook folio (8" x 8"). These folios hold AT LEAST twelve (12) photos. You can customize them for fewer or more photos, or for journaling, or to use as a planner.
The folios are the same basic construction as the all the other folios. To see the other tutorials, see the links at the end of the post.
Before getting started, I recommend cutting up ONE EACH of the Cut Apart and Collective sheets from the various paper collections. That way you will have all the images needed, as we will also use the prints on the reverse sides of most papers. (Note: I have used more than 2 sheets of some of the paper, but if you cannot do that, substitute something from the collections or from your stash that coordinates.) I also recommend the Ephemera card packs, if you can find them.
September Calendar Folio
The September Folio is side-fold folio, measuring 8 1/4" x 8 1/4" when closed. This theme is perfect for back-to-school and first day of school photos, plus it's great for friendship or class photos and memories.
The folio opens with areas for photos and journaling. This month we are going to create a large pocket, plus a pocket on the insert! Let's get started!
Remember, you may use either black or dark brown cardstock this month. I used black cardstock, because I have TONS of it in my stash!
Cut one sheet of black cardstock to 8 1/4" x 8 1/4". Cut a second sheet of black cardstock to 8 1/4" x 8 3/4". Score the second piece on the long side at 1/2" to make a second 8 1/4" x 8 1/4" panel. Fold and burnish the score line.
Attach the two sheets together to create a folio that is 8 1/4" tall and 16 1/2" wide. Make sure the fold is on the left-hand side of the folio, so that the folio opens like a book.
Now, close the folio, making sure the fold is on the left side. Now, let's decorate! We will start with the front cover.
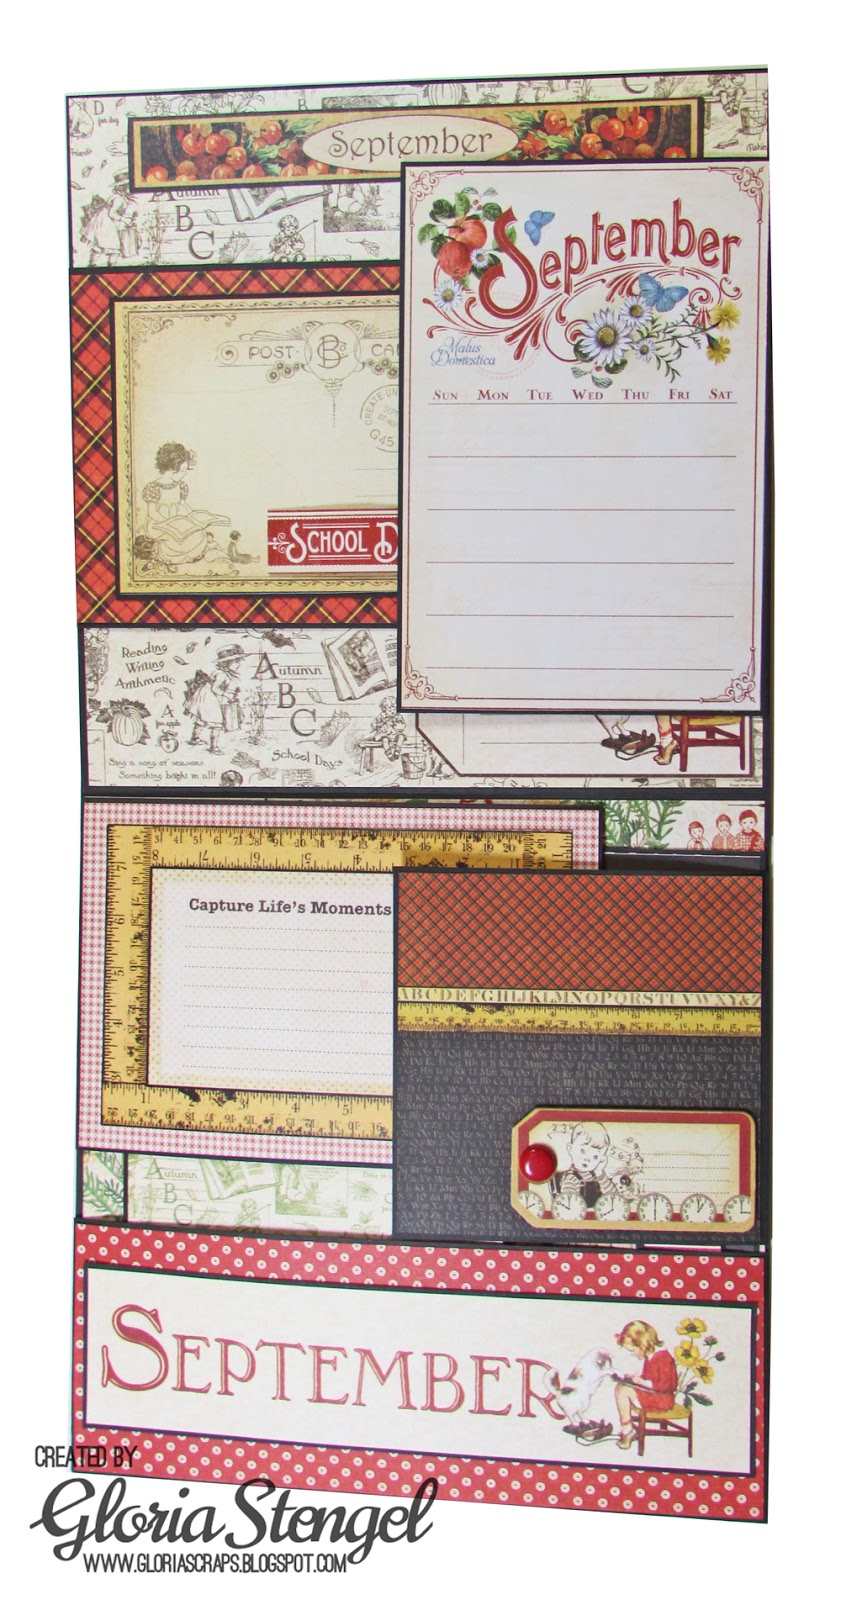
Cut Cajun (barn red) cardstock to 8 1/8" x 8 1/8" and attach the panel to the front of the folio. Attach the Children's Hour 8x8 September Calendar page to the front of the folio.
Trim the postage strip from Place in Time September Cut Apart paper and attach to the lower portion of the calendar as shown. Trim the September mini calendar from Children's Hour September Collective paper and attach it to the calendar front, placing it just under the "Tuesday-Wednesday" on the calendar page.
Trim two addition cards from ABC Primer One, Two, Buckle My Shoe paper. Attach them to the left side of the September mini calendar as shown. Glue a metal clock to the top of the addition cards.
Glue the ABC Primer chipboard decorative circle to the right side of the mini calendar. Top with an apple chipboard, also from ABC Primer (these items are from the original, retired collection. If you have the DCE, substitute something from that chipboard set).
Glue the School Days chipboard, from the Children's Hour Collection, to the calendar page, just above the postage strip, as shown. Glue a selection of red and yellow flowers around the lower right edge of the circle embellishment. Add a scrabble tile to the right side of the flower cluster.
The cover is finished. Open the folio and let's work on the left page.

Cut Children's Hour September Montage paper to 8 1/8" x 8 1/8" and attach the panel to the left side of the Calendar Folio. Trim the ABC Primer School Days ruler border strip to 8 1/8" long and attach it to the bottom of the panel.
Cut black cardstock to 6 1/8" x 4 1/8" and round all four corners. Round the corners of the Children's Hour September Ephemera card (reverse) and attach it to the black cardstock mat. Attach the ephemera card to the left side of the page. Use foam adhesive to attach a postage image from the Time to Flourish September Cut Apart paper to the upper right corner of the ephemera card.
Cut two circles from Children's Hour 6x6 Patterns and Solids paper (green and red dots). Cut one circle 2 1/2" in diameter and cut the second circle to 3". Mat both circles with black cardstock, cut slightly larger. Attach the circles to the right side of the page, as shown.
Let's create a pocket for the right-hand page.

Cut black cardstock 5 1/4" x 9 1/4". Score at 1/2" from the left, right, and bottom edges. Fold on the score lines and add double-sided tape to the tabs. If desired, trim the tabs at an angle, as shown.
Attach the pocket to the right-hand page.
Trim Children's Hour September Montage (reverse, red dots) paper to 3 1/2" x 8 1/8" and attach it above the pocket.
Trim Simple Stories Smarty Pants Head of the Class (text print) paper to 4 5/8" x 8 1/8" and attach it to the pocket. Trim the month border strip from Children's Hour September Collective paper and attach it to the top center of the pocket. Trim a postage stamp image from Place in Time September Cut Apart paper and attach it with foam adhesive to the bottom right corner of the pocket.
Now, let's create a large card to place into the pocket. Trim black cardstock to 7 3/4" x 7 3/4". Trim the ABC Primer 8x8 The Three R's paper to 7 5/8" x 7 5/8" and attach it to the card. (This paper is retired. Use a similar sheet from the DCE instead.)
Create a triangle pocket for the card. Trim black cardstock to 4 3/4" x 4 3/4" and cut in half on the diagonal. Score on two sides at 1/2" from each edge, then fold on the score lines as shown. Place double-sided tape unto the flaps.
Place the triangle pocket in the lower right corner of the card. Trim Children's Hour September Montage (reverse, red dots) paper to 4 1/8 x 4 1/8" and cut on the diagonal. Place the triangle paper onto the pocket. Trim the student image from Place in Time September Cut Apart paper and attach it to the pocket, as shown.
Flip the card over and cut Time to Flourish 8x8 September Flourish (reverse) paper to 7 5/8" x 7 5/8" and attach it to the back of the card. Trim a strip of postage images from ABC Primer Grammar School paper to 7 5/8" and attach it to the top of the card.
Decorate a Graphic 45 Square black tag to go into the pocket. Trim Place in Time September Cut Apart (reverse) paper to 4 1/8" x 4 3/8". Round the corners and attach the paper to the front of the tag. Trim the apple border from Children's Hour September Collective paper to 4 3/8" wide. Round the bottom corners and attach it to the bottom of the tag.
Flip the tag over and trim Children's Hour September Collective paper (reverse) to 4 1/8" x 4 3/8". Round the corners and attach the paper to the back of the tag.
Place the tag into the diagonal pocket. Then place the card into the large pocket of the folio.
This is what your folio should look like when finished. Close the folio and flip to to the back side.
Cut Children's Hour September Montage paper to 8 1/8" x 8 1/8" and attach it to the back panel. The calendar folio is finished! Add photos and journaling, as desired.
September Scrapbook Folio
This matching September Scrapbook Folio measures 8" x 8" and is a top-folding folio, decorated inside and out. It is perfect for journaling, ephemera, and photos. Like the calendar folio, this project can be displayed on your desk or shelf during the month of September. We will continue to use the same color scheme and theme as the first folio.
The inside of the folio contains four flaps and a pocket. Everything is decorated in a back-school theme.
We will construct the base for the folio first, and then decorate it.
Cut one piece of black cardstock to 8" x 8". Cut a second piece of black cardstock to 8 1/2" x 8" and score 1/2" from the top edge. Fold and burnish on the score line. Add double-sided tape to the tab. Attach the tab to the top of the 8" x 8" piece of cardstock, creating a top-fold folio, 8" x 8". Open the folio. It is 16" tall and 8" wide.
Cut a piece of black cardstock to 4 1/8" x 6 5/8". Score 1/2" from the right edge. Attach the scored tab to the top left panel of the folio. Place the flap 2" below the top edge. The flap will be 4 1/8" x 6 1/8".
Cut a piece of black cardstock to 6 1/8" x 4 5/8". Score 1/2" from the left edge. Attach the scored tab to the top right panel of the folio. Place the flap 1" below the top edge. The flap will be 6 1/8" x 4 1/8".
This is what the folio will look like after you attach the flaps.
Cut a piece of black cardstock to 4 1/8" x 6 5/8". Score 1/2" from the right edge. Attach the scored tab to the bottom left panel of the folio. Place the flap 1/8" below the fold. The flap will be 4 1/8" x 6 1/8".
Cut black cardstock to 4 1/8" x 4 5/8". Score 1/2" from the left edge. Attach the scored tab to the bottom right panel of the folio. Place the flap 1" below the fold. The flap will be 4 1/8" x 4 1/8".
Now, we will create a pocket for the lower panel. Cut black cardstock to 3 1/2" x 9". Score at 1/2" from the right, left, and bottom edges. Add double-sided adhesive to the tabs. (Note: I cut an angled bit off the ends of the tabs, where they meet, to decrease the bulk at the bottom edge of the pocket.)
Attach the pocket to the bottom edge of the lower panel, as shown above.
Cut several card panels from black cardstock to place into the pocket: cut one panel to 7" x 7", one to 5 3/4" x 5 3/4", and one to 6 1/8" x 4 1/8". Also, place a Graphic 45 black square tag into the pocket. We will decorate these items in the steps below.
Fold all flaps toward the center and close the folio.
Make sure your main fold is at the TOP of the folio! We will now decorate the front cover. Cut ABC Primer Alphabet Soup alphabet print paper to 7 7/8" x 7 7/8". Attach the paper to the front of the folio.
Cut ABC Primer Building Blocks (red plaid) paper to 7 7/8" x 4". Mat with black cardstock cut to 7 7/8" x 4 1/8". Attach this panel to the left side of the folio, approximately 1/2" from the left edge.
Use a notebook edge border punch to punch a strip of black cardstock. Trim to 7 7/8" long. Cut Children's Hour September Collective apple border strip to 7 7/8" long. Affix the punched border to the bottom of the apple border. Place the border at the top edge of the panel. Glue the Children's Hour "memories" chipboard tab to the upper right corner, as shown.
Note: I have used many pieces of this apple border. I had lots of extra in my stash. If you run out, feel free to substitute another border that coordinates.
Select the September ephemera card from the Children's Hour ephemera pack (or trim the image from Children's Hour September Collective paper). Trim the image to approximately 5 7/8" x 3 7/8".
Mat the image with cajun (barn red) and black cardstock, making each layer slightly larger, as shown. Attach the image to the right side of the folio, approximately 1 1/2" from the top edge and 3/4" from the right edge.
Trim the "School Days" sentiment strip from Children's Hour September Collective paper and use foam adhesive to attach it to the center left edge of the ephemera card, as shown.
Glue red, white, and yellow flowers in a cluster at the bottom left corner of the image. Tuck a postage image, cut from ABC Primer Grammar School paper, to the left side of the flower cluster.
Use foam tape to add the "September" title cut from the mini calendar (Children's Hour September Collective paper). Glue a chipboard tag from ABC Primer collection to the right side of the flower cluster.
We will work on the inside panels next.
We will decorate the top, inside panel and the two flaps.
Open both flaps so you can work on the center panel. Cut Children's Hour 8x8 September Collective (reverse, brown collage) paper to 7 7/8" x 7 7/8" and attach the paper to the top panel.
Trim out the September border from Place in Time September Cut Apart paper and attach it to the top center of the panel.
Trim the post card tag image from Children's Hour September Collective paper and attach it to the lower right edge of the panel. Make sure to only add adhesive to the right and bottom edges, to form a little pocket. Attach a small circle decoration from Time to Flourish Banners to the tag as shown.
Let's decorate the flaps. Attach the Time to Flourish September ephemera card to the the left-hand flap.
Trim Time to Flourish 6x6 Patterns and Solids green gingham paper to 6" x 4" and attach to the right-hand flap. Trim the September border from Children's Hour September Collective paper and attach it to the bottom of the flap. Trim the postage image from Children's Hour September Collective paper and attach it to the top right corner of the flap.
Close the left-hand flap. Trim ABC Primer Building Blocks (red plaid) paper to 4" x 6" and attach it to the flap. Trim the postcard from Place in Time September Cut Apart paper to approximately 3 1/4" x 5" and mat with black cardstock, cut slightly larger. Attach the postcard image to the center of the flap.
Attach a postage image cut from Time to Flourish September Cut Apart paper to the upper right corner of the postcard. Cut the "School Days" sentiment from Time to Flourish September Cut Apart paper and use foam adhesive to attach it to the bottom center of the postcard image. Close the right-hand flap. Trim the September journal card from Time to Flourish September Cut Apart paper to 6" x 4" and attach it to the flap.
Now, let's work on the bottom panel of the folio. Open both flaps. We will work on the bottom base first. Trim Children's Hour September Montage paper to 5 3/4" x 7 7/8" and attach it to the top portion of the panel, tucking the bottom edge into the pocket. Trim Children's Hour September Montage (reverse, red dot) paper to 2 7/8" x 7 7/8" and attach it to the pocket.
Close the right-hand flap. Trim the September journal card from Time to Flourish September Cut Apart paper to 6" x 4" and attach it to the flap.
Now, let's work on the bottom panel of the folio. Open both flaps. We will work on the bottom base first. Trim Children's Hour September Montage paper to 5 3/4" x 7 7/8" and attach it to the top portion of the panel, tucking the bottom edge into the pocket. Trim Children's Hour September Montage (reverse, red dot) paper to 2 7/8" x 7 7/8" and attach it to the pocket.
Trim the September title from the Children's Hour 12x12 Calendar Pad to approximately 1 7/8" x 7 1/2" and mat with black cardstock, cut slightly larger. Attach the title to the center of the pocket.
Let's decorate the flaps, and then make some items for inside the pocket.
Start with the left-hand flap. Trim the week day journal block from Children's Hour September Cut Apart paper to 4" x 6" and attach it to the panel.
To decorate the right-hand flap, trim the apple image from Time to Flourish September Cut Apart paper to approximately 3 3/4" x 3 3/4". Mat the image with cajun cardstock, cut to 4" x 4". Attach the image to the flap.
Now, let's make some goodies for our pocket!
We are going to make a three photo mats and a square tag to tuck into our pocket.
Cut Simple Stories Smarty Pants Head of the Class (text print) paper to 6 7/8" x 6 7/8" and attach it to the black cardstock panel which measures 7" x 7". .
Trim school children image from ABC Primer Happy Go Lucky paper to 5 5/8" x 5 5/8" and attach it to the black cardstock panel which measures 5 3/4" x 5 3/4".
Cut Children's Hour 12x12 Calendar paper (reverse, brown print) to 6" x 4" and attach to the black cardstock panel which measures 6 1/8" x 4 1/8". Trim the apple border from Children's Hour September Collective paper to 4" wide and attach it as a belly band on the card panel.
To create the tag element, use a Graphic 45 black square tag. Trim Children's Hour 6x6 Patterns and Solids green print paper to 4 1/8" x 4 3/8" and round all four corners. Attach the paper to the front of the tag. Trim the Post card tag image from Children's Hour 8x8 September Collective paper and attach the border to the top of the tag, as shown. Use a 1/2" circle punch to punch out a decorative circle for the tag.
Flip all the pieces over to the back. For the large photo mat, cut Time to Flourish September Flourish paper to 6 7/8" x 6 7/8" and attach it to the 7" x 7" cardstock panel.
Trim ABC Primer Happy Go Lucky (reverse) paper to 5 5/8" x 5 5/8" and attach it to the 5 3/4" x 5 3/4" cardstock panel. Trim the September border from Time to Flourish September Cut Apart paper to 5 5/8" wide and attach it to the top of the card panel.
Attach the Time to Flourish September ephemera card (reverse) to the 6 1/8" x 4 1/8" panel. Trim the "Memories" sentiment strip and the postage stamp image from Children's Hour September Collective paper and attach them to the panel as shown.
Trim Place in Time September Cut Apart (reverse) paper to 4 1/8" x 4 3/8" and round all four corners. Attach the paper to the back of the tag.
Place all your items into the pocket.
Close the left-hand flap. Trim Time to Flourish 6x6 Patterns and Solids red gingham paper to 4" x 6" and attach the piece to the flap. Trim The student and kitten image from ABC Primer (DCE) Calico Cut Apart paper and attach it to the center of the flap.
Close the right-hand flap. Trim Place in Time 8x8 September Cut Apart paper (reverse) to 4" x 4" and attach it to the flap. Attach a large, red brad to a Place in Time chipboard tag and glue the tag to the lower right corner of the flap.
Note: I have a lot of the original Place in Time and ABC Primer papers, including the original 8x8 paper pads. Please feel to substitute other papers if you do not have these items.
Close the folio and flip it over so that back is facing up with the fold at the top.
Trim Children's Hour 12x12 Calendar (reverse, brown print) paper to 7 7/8" x 7 7/8" and attach to the back panel. Trim the children sitting border from Children's Hour September Collective paper to 7 7/8" long and attach it to the top of the panel.
And, you are FINISHED with the September folios!
If you are just joining me...
If you missed the January Folios Tutorial, click HERE.
For the February Folios Tutorial, click HERE.
For the March Folios Tutorial, click HERE.
For the April Folios Tutorial, click HERE.
For the May Folios Tutorial, click HERE.
The June, July, and August Folios will be coming in January.
If you wish to make the 9" x 9" x 9" storage box to hold all your monthly folios, click HERE to see that tutorial. UPDATE: If you make your folios lumpy and dimensional like mine, all 24 folios will NOT fit into this box. You will either have to make two boxes, or adjust the dimensions to make the box a rectangle size.
Come back after October 15th to view the OCTOBER FOLIOS!
Cardstock: WorldWin Papers Midnight; Bazzill Cajun
Designer paper: Graphic 45 Children's Hour, Place in Time, ABC Primer, Time to Flourish; Simple Stories Smarty Pants Head of the Class
Chipboard: Graphic 45 Children's Hour, Place in Time, ABC Primer
Banners: G45 Time to Flourish
Tags: Graphic 45 Square Black
Flowers: Wild Orchid Crafts
Metal clock: Tim Holtz
Scrabble tiles: from my stash
Large brad: from my stash
Dies: Spellbinders Standard Circles Small and Large
Tools: hot glue gun, scoring board and bone folder, corner rounder, Fiskars border punch
Adhesive: Scotch 3M ATG tape runner, Scrapbook Adhesives by 3L 3D foam squares, hot glue, Scor-tape, Ranger Multi Medium


