Wednesday, August 31, 2022

Vintage Style Mini Slimline Card

Hello, again everyone! It is my turn on the Really Reasonable Ribbon Blog, so head over there to see all the inspiration! 

I think that I would classify this card as one last summer fling! It is going to be over 100 degrees for the next week (or longer), so I figured let's pull out the hot, summer colors again! 

What could be more summery than hot pink and green?! I created a mini slimline card today. The card measures 3 1/4" x 6 1/4" and the card base is black cardstock. I am not sure what the "standard" measurements are for this style of card, but it does fit into an envelope made for photo-cards. 

Fun fact: Every time I order some sort of photo card, they come with umpteen envelopes! I, naturally, save them! So, the best way to get rid of them is to make cards that fit! 
I used some vintage style paper from Heartfelt Creations (Moments in Time) and let the design of the paper do most of the work! I lined the inside of the card with off-white cardstock.
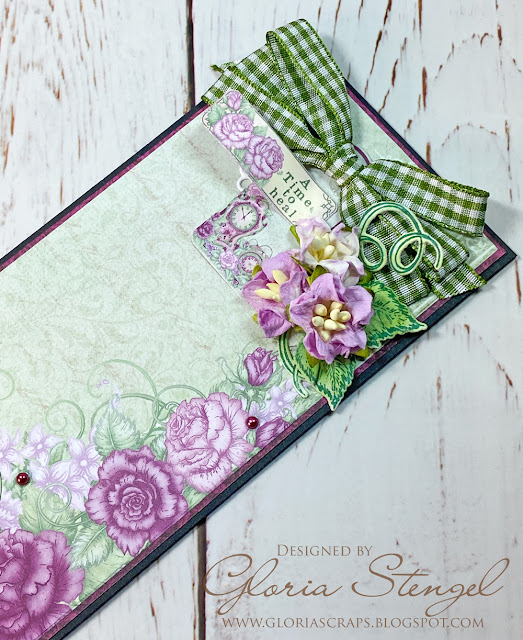
I don't often make the top of a card the focal point, but the printed paper was so pretty, I did not want to cover it up, so I added my flower and ribbon cluster to the top!

I created a bow from 3/8" Moss Green Gingham ribbon. I cannot resist gingham and plaid ribbon, no matter what the season! I used a few leaves that I stamped, then die cut. I added Miniature Gardenias - Mixed Purple flowers. The little sentiment and other decoration are cut from the paper collection.

A few tiny pearls finish off the card. Such a sweet mini size!  

Thank you so much for stopping by!


Really Reasonable Ribbon Supplies Used:

Other Supplies Used: 
Cardstock: Worldwin Black, natural
Flower Shaping Mold: Heartfelt Creations 3D Rose
Ink: Ranger Archival Library Green, Ranger Distress Rustic Wilderness, Crushed Olive
Mini pearls: Want2Scrap
Adhesive: Art Glitter glue, hot glue

Friday, August 26, 2022

Heartfelt Creations August 2022 Alumni Blog Hop

Hello, and good-morning my friends! Welcome to the August 2022 Heartfelt Creations Alumni Blog Hop!


Each month, on the last Friday of the month, the Heartfelt Creations Alumni Team participates in a Blog Hop! 
The August Hop starts at 8am ET on Friday, August 26th.  Be sure to visit each blog on the hop, and leave a comment, because a randomly chosen comment from a mystery blog will receive a $25 gift certificate to shop at Heartfelt Creations! The hop closes Monday August 29th at 11:55pm ET. 

To double the fun, Heartfelt Creations will offer a second $25 gift card for a randomly selected comment on their blog post! The winner will be announced on the Heartfelt Creations Blog and Facebook page on Wednesday, August 31st.  If you are the happy winner, you can claim your prize by emailing socialmedia@heartfeltcreations.us. Please write “Winner of the August 2022 Alumni Hop in the subject line.  You will have 72 hours to claim your prize.

Now, let's get started with the fun! You should be coming to my blog from Lynn Stanborough's Blog: What the Heart WantsAfter visiting me, head on to Candy Slabaugh's Blog: Candy’s Creations. If you are lost, see the blog link list at the end of this post. 

I was able to order some new paper pads from Heartfelt Creations, so I have new toys, but not a lot of new time this month! So, I did a pretty simple card this time around...no handmade flowers! {GASP!}
But, I did do a little fussy cutting! I created a 4 1/2" x 6" card from ivory cardstock. It is an odd size, but I like odd sizes. It will fit in an envelope made for a 5" x 7" card without issue. 

The paper collection I chose is the Floral Shoppe Collection. This collection came out a few years ago (December 2020), and the stamps and dies were not my style, so I skipped getting it. I am not a shaped card maker, which is what this collection is all about. But, I recently had a nice look at the paper collection and decided...I needed to have it! 
I really like the collage pages within the paper collection! I trimmed the letters image to fit my card front, and also trimmed a piece of the red paper for another layer before attaching the main panel to the card. I cut another design into a small triangle for the upper fight corner of the card.

I used the Cut Mat Create 1A and Cut Mat Create1B dies to trim out a sentiment and mat from the paper. I attached the sentiment panel to the card front with foam dots. 

I then fussy cut one of the flowers with leaves from the paper, and shaped it a bit with the stylus tool. I used foam dots to attach it to the corner of the sentiment panel.

Tip: Use sharp scissors with a fine tip for fussy cutting images from the paper. I cannot always buy the full collection, so I will sometimes cut images and flowers directly from the paper with scissors for layering purposes. 
I added a few enamel dots to the card, and it is finished! This card is simple to make and fairly flat to mail. One of the reasons I love Heartfelt Creations products is how versatile they are, and that you can get as creative as you wish. If you wish to create a bouquet of handmade flowers, you can! However, if you wish to have something pretty with little effort, you can do that, too! 

Thanks for hopping by! Hop on over to Candy Slabaugh's Blog: Candy’s Creations next. DON'T FORGET...POST A COMMENT FOR YOUR CHANCE TO WIN A $25 GIFT CARD TO HEARTFELT CREATIONS!

July Heartfelt Creations Alumni Blog Hop List:

Kathy Clement Vicki Dutcher Bozena Bodynek Amarilys Doria Alissa Wells Monica Edwards Lynn Stanborough Gloria Stengel - YOU ARE HERE Candy Slabaugh Heartfelt Creations Blog


Heartfelt Creations Products:

HCDP1-2122 Floral Shoppe Paper Collection
HCD2-749 Cut Mat Create 1A Die
HCD2-750 Cut Mat Create 1B Die
Designer Dries Clear Adhesive (Art Glitter Glue)
Double Dots 3D Foam Circles
Deluxe Flower Shaping Kit
Scor-Pal Measuring and Scoring Board

Other Products:

Cardstock: WorldWin Smooth Natural
Enamel dots: Simple Stories Say Cheese III, DIY Christmas
Tools: Big Shot Plus, Paper trimmer, Craft knife, WRMK Layers, Fine tip scissors 
Adhesive: ATG tape

Friday, August 19, 2022

I Love Fall!

Hello, again everyone! It is so hot where I live, over (or near) 100 degrees every day. I am so thankful for air conditioning and a swimming pool! But, I am so ready for cooler weather! I also know that we will still get lots of days in the 90's into October and November! I think I will go crank the A/C and drink something with pumpkin spice....

To celebrate the eventual coming of fall, I have a fall themed card for you, using more of the beautiful Really Reasonable Ribbon August Ribbon Club ribbons! This is another 6" x 6" card, which is one of my favorite sizes to make. I don't care if they cost more to mail, I love making them! 

To back up a second....I had a great idea for a mini album for today, but things went so sideways, that all I could save was this one chipboard panel with the orange gingham paper! The panel is part of a die cut book that just was not working out how I wanted, then it tore in two places, and then....I was over it! So, I salvaged this piece because I liked how the scored chipboard looks like wood grain! (I am still going to make a mini book, hopefully for the end of the month!)

The pumpkin paper and the main sticker are from Echo Park, The Story of Fall collection (from a few years ago), and the orange gingham paper is from The Girls' Paperie, Toil and Trouble collection (which is who knows how old!).

The piece of scored chipboard is all inked up with three colors of distress ink. I love it! I had die cut chipboard using the Sizzix (Eileen Hull) Wrapped Journal die, which scores the chipboard so that the spines will bend. But, not sure what went wrong, and mine ripped in several places, despite using thick chipboard. I salvaged a few pieces and this one was perfect for a card front! Lose-Win!

Now, for the ribbons! I wrapped a length of the 5/8" Russet Orange Taffeta and a length of the  3/8" Cappuccino Satin with Gold Metallic Edge around the top part of the card. I secured the ribbon inside the card, then covered with white cardstock to hide the ribbon tails. 

I created two bows, one from each ribbon style and glued them to the center of the card as shown. Super easy! Big impact! I think I need to get MORE of that sparkly cappuccino ribbon! So pretty! 

I even put a little sneaky surprise on the inside of the card. {smile} 

Thank you so much for stopping by! Make sure to check out all the inspiration on the Really Reasonable  Ribbon Blog!


Really Reasonable Ribbon Supplies Used:

Other Supplies Used: 
Cardstock: WorldWin Smooth and Silky Brown, Natural
Chipboard: Graffix
Printed paper: Echo Park The Story of Fall, The Girls' Paperie Toil and Trouble
Stickers: Echo Park The Story of Fall
Die: Sizzix Wrapped Journal (just a section of the die cut piece)
Ink: Ranger Distress Vintage Photo, Brushed Corduroy, Carved Pumpkin
Adhesive: Art Glitter Glue, hot glue
Tools: Zutter Round-it-All, glue gun, trimmer, score board, Sizzix Big Shot Plus

Monday, August 15, 2022

Power Poppy Blossom Challenge - August 2022 - Sentimental

Hello and welcome to the Blog! The Power Poppy Bloom Brigade is bringing you a monthly challenge the third Monday of every month! The lovely and super talented Christine Okken is your hostess each month! The challenge is called The Blossom Challenge and will be a different theme or type of challenge each month! 

This month the theme is: Going Sentimental. So grab a Power Poppy sentiment and create a project featuring it! Let's make sentiments the star of the show! 

Our challenge WINNER will receive a $20 gift card to use at the Power Poppy Store!! The challenge is open until September 19th! Link up your project to the Power Poppy Blog for a chance to win! Winners will be posted next month on the Power Poppy Blog. 

To sweeten the deal Power Poppy has discounted a number of the Fall themed Sentiment sets (and a few extras) for you HERE.  Did you know there are also two sets in the sentimental family that are FREE?!  I Can Do All Things and Let It Be.  Were making it easy for you to play along!  

The July winner is posted today on the Power Poppy Blog...hop over to see if it is you!

Now here is a look at my inspiration project for the challenge, Going Sentimental!

I may have cheated just a tiny bit this time, because seriously, how can anything be a star when you have such beautiful blooms to color!?? But, I did my very best to make the sentiment stand out! {smile}

There are many beautiful sentiments "hiding" within other sets. It is often a treasure hunt looking for sentiments. I keep meaning to put all the sentiments into one folder, but that is so much work! {smile}

Here is how I created this card.

This is a Copic project, so get your markers ready. Yes, I pulled out my poor, neglected  Copics this month! 

For this project I used (listed dark to light): 

Dahlia: RV99, R59, R39, R52, R21
Primroses: R88, R83, R81, Y38, Y35, Y02
Leaves: G07, G17, YG09, YG11 
Berries: B39, B28, B23 (plus an Arteza Inkonic fine liner A146 Olive Green for the berry stems)

Using the Dazzling Display Digital Stamp Set, which has two clusters of flowers, I positioned both flower clusters to make a frame that was slightly smaller than 5" x 7". I used the "no-line" versions of the stamps and printed onto white cardstock. 

I did a quick color, letting the Copics sort of "self blend" to give a more loose and vintage look to the images. I am not using my Copics as much these days and the urge to over-blend is strong in me!
Once I had the images colored, I used a decorative rectangle die to cut out the card front. I let the images sort of bleed off the edges.

Note: See, I am using up all that silly washi tape I have collected over the years. I am not sure WHY I have so much because I don't care for washi tape one little bit! 
I love this stitched die set and think it makes the images look very nicely framed! I wish I had nudged it a bit left, but....alas...what's done is done!
Now, for the Sentimental part. I used the sentiment from the Peonies Digital Stamp Set. I printed the sentiment at approximately 2 3/4" tall onto a slightly textured white cardstock using black ink. 
I die cut the sentiment with a circle die, and then cut a circle mat out of dark crabapple cardstock. Using foam tape, I attached the sentiment to the card front. The card base is 5 7/8" x 4 5/8" and is also made from the dark crabapple cardstock. 
I added a few enamel dots and lined the inside of the card with white cardstock. 

hope you have fun with the Going Sentimentalchallenge this month, and please tell your friends! It will be great to have a lot of participants in our monthly Blossom Challenge at Power Poppy!

Make sure you visit the Shop, to see what is on offer!

To see all the inspiration, and to read the challenge details, visit the Power Poppy Blog HERE. Also, to link up your project, do so on the Power Poppy Blog.

Inspiration List

Power Poppy Blog
Gloria - YOU ARE HERE
Christine
Esther
Barbara C.
Lisa


Power Poppy Digital Stamps: 
Dazzling Display Digital Stamp SetPeonies Digital Stamp Set
Cardstock: Hammermill White, Springhill White, Bazzill Crabapple Dark
Alcohol markers: Copic (listed above)
Fine line pen: Arteza Inkonic A146 Olive Green
Enamel Dots: My Mind's Eye Splendor
Die cuts: Heartfelt Creations Circle Basics Large, Eyelet Circle and Basics Small, Elizabeth Crafts Design Stitched Rectangles
Adhesive: ATG tape, 3M foam tape, Score-tape, Art Glitter Glue
Tools: Sizzix Big Shot Plus, WRMK Layers, score board, paper trimmer, glass mat

Saturday, August 13, 2022

Really Reasonable Ribbon August Blog Hop


Welcome to the Really Reasonable Ribbon August Blog Hop! Wow, only six more weeks of summer! Or for folks like me who live in an oven....all the weeks. {giggle} I am getting a jump start on my fall projects in hopes of encouraging autumn to actually arrive sometime before Christmas!

You should be coming to my blog from Ginny's Blog After visiting me hop on to Kathy's Blog next! (The full blog list is at the end of the post.)

At the end of the hop, comment on the RRR Blog post, answering the question listed, for a chance to win the August Ribbon Club Assortment shown below. The Design Team appreciates your comments, too! 
The August Ribbon Club is called Autumn Collection. For over a week I had planned to pull out my Halloween papers....but once I took a good look at the ribbon I decided to pull out fall papers instead!
All that gorgeous ribbon...brown, green, orange...deserved some fall paper to go with it! I pulled out Graphic 45 Time to Flourish, which I have had for ages. I have used this paper collection for classes and tutorials and blog posts, but I still have gobs of it in my stash! (You can get your hands on the re-released Deluxe Collector's Edition HERE.) 
I ended up scrap-lifting one of my old cards for this one, I just flipped it left to right and chose all new papers. The beauty of being a prolific card makers is that I have built in scrap-lift opportunities!

The card is 6" x 6" and will require a special envelope or box to mail The fabby bow is not going to fit in a regular envelope! 

I wrapped some of the 5/8" Cappuccino Taffeta around the card base before adding the focal image and the bow stack. To hide the ribbon ends on the inside of the card, I lined the card with off-white cardstock. 
I created large, loopy bows from the 5/8" Cappuccino Taffeta, 3/8" Cappuccino Satin with Gold Metallic Edge, and 5/8" Kiwi Double-faced Satin. Once I had all the bows created, I hot glued them to the card to make a puffy ribbon embellishment.

I used one of the Graphic 45 Metal Keyholes to cover all the ribbon knots. There is a little wood circle, covered with paper under the keyhole, just to give it something to cling to.

I added a sentiment cut from the paper and some chipboard buttons also from the paper collection. 
Is that not a fantastic looking bow embellishment?! So shimmery and luscious! I love ribbon, can you tell?!

Now, hop over to Kathy's Blog to see what she has for you!

Thanks for joining me for the monthly ribbon hop. Make sure to visit the other team members. And b
e sure to answer Bonnie’s Question of the Month to be entered into a drawing for a FREE Ribbon Club Assortment. If you’re not a member of the Monthly Ribbon Club yet, now is a great time to join. 

Here is the RRR Blog Hop Order in case you get lost!

Really Reasonable Ribbon's Ramblings
Ginny
Gloria - YOU ARE HERE!
Kathy
Cheryl
Bonnie
Karen

Really Reasonable Ribbon's Ramblings


Really Reasonable Ribbon Supplies Used:
Trims: Really Reasonable Ribbon August 2022 Ribbon Club (5/8" Cappuccino Taffeta, 3/8" Cappuccino Satin with Gold Metallic Edge5/8" Kiwi Double-faced Satin)
Adhesive: 1/4" ATG tape
Bow making tools: Zutter Bow-it-All

Other Supplies Used:
Cardstock: WorldWin Papers Smooth Natural, Dark Brown
Printed paper: Graphic 45 Time to Flourish (original collection 8x8 and 12x12, chiboard)
Metal brads: from my stash
Adhesive:Hot glue, Art Glitter Dries Clear Glue
Tools: Provocraft deco scissors, paper trimmer, craft knife, hot glue gun, WRMK Layer Guide, scissors, bone folder

Monday, August 01, 2022

Inspire Me Monday: Good Ol' Summertime!

Hello, Power Poppy Pals! I hope this finds you well and enjoying your summer! It is hot where I live, which is normal. We are approaching our one year anniversary in our new location and I realize that HOT is the way it is here in summer..and spring...and fall!   

Today is my turn to share the weekly Power Poppy inspiration. I decided to take inspiration from the summer, and my days visiting the beach when we lived only 8 miles from the ocean! We lived there for 16 years, and I confess I did not appreciate it the way I should have...especially now that I live adjacent to the desert...same sand...no water! 
I printed the main image from the Seaside Sweetness Digital Stamp Set onto tan cardstock to make a 5 1/2" x 5 1/2" card, with a white card base.
This image can be printed with and without the glass dome cover, as shown above. I decided to color the one without glass. I chose colored pencils again this month. I have such love of colored pencils...I cannot deny it! 
I chose the Arteza Expert brand of pencils, which were so-so on this smooth cardstock. They are fine for a small, quick image, but I would not use them on such smooth paper (Neenah Desert Storm) for a larger project as the wax builds up pretty fast! I would recommend a harder pencil such as Faber-Castell  Polychromos on this particular paper.
I colored the image and the sand and surf with the pencils, but I used a light layer of chalk pastel for the background. I decided to use a fun circle format, sort of like a fancy paper plate, for the main image. I chose a check paper to mimic a napkin, and my beach picnic card is finished! 

I adore this little vignette, plus it is so summery! I think coloring up a bunch of small images for cards or tags is just the ticket for a hot summer day! 

If you are needing a quick card, I highly recommend some of the small images such as this one from the Seaside Sweetness Digital Stamp Set, or from the companion digital sets Nest is BestCuppa CupcakeSingle Orchid, or Tiny Treasures. 

I added a sentiment from the Sweet Simple Things Digital Stamp Set. The images from this set are also perfect for summer time!
Thanks for joining us for Inspire Me Monday! Make sure to come back every Monday to see new inspiration!
If you have yet to play in the Blossom Challenge: Christmas in July, you still have a few more weeks to join! 

Here is my project, which you can read all about HERE.
It makes me excited for our Christmas events at church, and for putting up decorations, wrapping presents, eating baking cookies, and singing carols! 


Power Poppy Products Used:

Seaside Sweetness Digital Stamp Set
Sweet Simple Things Digital Stamp Set

Other Products Used: 

Cardstock: Hammermill white, WorldWin Smooth Blueberry, and Neenah Desert Storm
Printed paper: My Favorite Things Trail Mix 6x6
Colored pencils: Arteza Expert 120
Chalk pastels: Smi
Gel pen: Gelly Roll white
Dies: Spellbinders Grand Circles and Grand Big Scalloped Circles
Adhesive: ATG, Art Glitter Glue