Friday, August 30, 2013

Chalkboard Bookmarks

Today is my day on the WorldWin Blog! I have created a pile of bookmarks, perfect to give as little back-to-school gifts. The chalkboard stamping technique is so popular right now, that I decided to incorporate it into my little bookmark making party!

I went through my stash of stamps looking for interesting text combinations that also would work well for bookmark sentiments. Then I sorted through my die cut templates to find shapes that would work for bookmarks. I actually had a few bookmark templates, but I also pulled out other shapes that seemed to work well for this project.

I cut all of the shapes from ColorMates Heritage Black cardstock. The smooth finish on the Heritage Black is perfect for my "mini chalkboards." I stamped all the sentiments with white ink, and I embossed each sentiment with white embossing powder. I was a little "messy" with my powder to give that chalkboard look.

I used some white pigment ink to rub the edges of each die cut shape. I also smudged the paper a bit, all for that realistic chalkboard look.


I die cut some background shapes from Treasures Pitch Black and Textured Red Denim cardstock, and used a tiny bit of printed cardstock. This a good way to use up scraps of cardstock!  I traced some lines around the edges of the shape with a white pen.


 I created this flag-shaped bookmark so that it would slip over the top of the page. The paper button and twine don't add much bulk, making the bookmark the perfect thickness.


These three bookmarks are super simple. I used just a bit of ribbon and some paper scraps to finish them. To make the bookmarks a bit more sturdy, I die cut some of the shapes a second time and glued the two together.

This is one of those projects you can do in bulk in an evening.

Thanks for looking!


WorldWin Papers:
Treasures Pitch Black
ColorMates Heritage Black
Textured Denim Red

Die templates: My Favorite Things, Taylored Expressions, Papertrey Ink
Stamps: My Favorite Things, Hampton Art, Our Daily Bread Designs, Taylored Expressions, Stampin' Up!
Designer paper: Graphic 45 An ABC Primer, Place in Time
Ink: Stampin' Up! Whisper White; Clearsnap Colorbox Pigment Frost White
Embossing powder: white
Pen: Sakura Gelly Roll white
Ribbon and twine: Really Reasonable Ribbon 
Buttons: unknown
Adhesive: Double-sided tape , adhesive dots

Thursday, August 29, 2013

Scrap Fest 2013

Graphic 45 will be attending this year's Scrap Fest 2013 at the Mall of America in Minnesota, September 20-22.


I was a lucky bug and designed these three make-n-take projects! If you attended Summer CHA in Las Vegas, you may have had a chance to make one of these tag projects. 


I also created this Steampunk Spells tag set that is one of the Graphic 45 workshops being taught at the event!


I hope some of my readers have a chance to attend the event and to make one of these projects!

Wednesday, August 28, 2013

Is it Fall Yet?

Today is my day to post on the CSW Distributors Blog.

I used the Endless folder from the Couture Creations All Occasions set for my card today. I know it is only August, but I love fall, so I am getting a jump start!


I used the "debossed" side of the kraft cardstock for this card. First, I rubbed the folder with ink, on the side of the folder WITHOUT the Couture Creations logo. Then, I embossed the kraft cardstock. I think the leaves look like "fossils." 


I used the Couture Creations Nested Victorian Rectangle to cut out my sentiment. I stamped the sentiment on Light Totally Tan cardstock using several ink colors. I just tapped the stamp into different colors if ink and stamped. Easy! I used the same technique for the fall leaves that I fussy cut. 

The pretty Deep Terra-Cotta cardstock is perfect for my card base. I goes well with the ink colors I chose.


Couture Creations products:
Embossing folder: Endless
Die templates: Nesting Dies Victorian Rectangles
Adhesive: Foam Mounting Tape, Double-sided tape
Tools: Scissors, Craft mat, Handheld Essentials Scoring Tool 

Other:
Cardstock: WorldWin Papers Kraft, Light Totally Tan, Deep Terra-Cotta
Ink: Tsukineko Kaleidacolor Autumn Leaves, Cappuccino Delight; Clearsnap Colorbox Chalk Creamy Brown
Ribbon: Really Reasonable Ribbon
Stamps: Close to My Heart (leaves); Taylored Expressions (sentiment)

Tuesday, August 27, 2013

CropStop Guest Post

CropStop is featuring this card on their blog today as part of Tutorial Tuesday. Check it out HERE.


Enter this code (SKGS-01) for 10% off your total CropStop order. No minimum order. Good on ANYTHING in the store, including pre-orders and sale items! Check out this DEAL OF THE DAY!

Monday, August 26, 2013

Merry Monday #72


Good morning! This is my last week as guest designer for the Merry Monday Challenge Blog! I have had fun creating Christmas cards during August! I want to thank Lesley for asking me to join in! I always love to be asked to come out and play! (And special thanks to my friend Rose Miller for introducing me to Lesley through the Seize the Birthday Challenge Blog!)

Here is the sketch for this week:


Another great sketch! I stayed with "simple and easy to mail" this week!


I love plaid. This paper reminds me of a plaid skirt I had when I was about 7 years old. It was a "Scottish kilt" and even had a huge, gold pin for decoration. I loved that skirt! I don't wear plaid these days...no one wants to see a size 14/16 plaid skirt! But I do love me a plaid paper!


I did NOT use any of my own stamp designs this week. I pulled out a few from my bin of Christmas stamps and gave them some love instead! I love this Santa from Graphic 45! 

Thanks for joining me at Merry Monday today. Make sure  you visit the rest of the team, and go link up your project!

The Merry Monday Team:


Cardstock: WorldWin Papers Original ColorMates Medium Berry Red, Light Totally Tan
Designer paper: Echo Park Season's Greetings
Stamp: Hampton Art/Graphic 45 Christmas Emporium; Technique Tuesdays
Ink: Tsukineko Memento Tuxedo Black; Clearsnap Colorbox Chalk Warm Red
Die cuts: Spellbinders Standard Circles Large, Small; Sizzix Tim Holtz Alterations Tattered Banners
Lace and Twine: Really Reasonable Ribbon
Adhesive: Scotch 3M ATG tape; Scrapbook Adhesives by 3L 3D Foam Squares

Friday, August 23, 2013

Graphic 45 August Place in Time Project Sheets!

It is time to share the Graphic 45 August Place in Time Project Sheets! To get these delivered to your email, sign up for the Graphic 45 Newsletter. The local stores already have the September set, and I submitted the October cards a few weeks ago...so I only have two more months of cards to create! I am not sure what the next Retailer Education Program will be, or if I will be involved....but I will let you know as soon as I find out!

Here are the three August project sheets. I created three summer/harvest themed cards using the Place in Time collection and the Graphic 45 Regular Tag Album Staples. To download each project sheet, click on the card titles below.

Sunshine and Smiles Project Sheet


I created a card by using one of the Regular Tag Album pages in a landscape format. The images from the August Cut-Apart sheet remind me of the images from Domestic Goddess, which is an older G45 collection, and one of my favorites. I am still hoarding some of that paper! I grew up in farm country and still have fond memories of harvest time. 


Here is a peeky at the inside of the card. You could add a gift card to the inside, rather than the Sunshine tag. This card is about 4x6 inches.


This card is a 5x5 inch size, my "normal" size to create. I was inspired by the Graphic 45 team, who made "upside down" tags for the G45 CHA booth. I loved their work, so I decided to try rotating the tag for this card.


I always forget that G45 has sticker letters for each collection. I pulled them out this time and spelled out my sentiment.


This card is a pocket card! I used a lot of cardstock this time. I wish I had used more of the printed paper, but, I think you can swap out the green cardstock for one of the G45 prints in your stash. {wink}


Here is what the tag looks like when you pull it out of the pocket.

I also want to share another peeky at some tags I made for Graphic 45 to teach at Scrapfest 2013. I also created some tags that I think are going to be the make-n-takes at Scrapfest. 


These tags are part of a larger project that is being taught at the Scraptastic Event in Belgium!

Here are a few more peekies that the Scraptastic folks shared on their blog.


Sadly, I am NOT the instructor for any of these classes. They will be taught by other G45 peeps, probably Charee or Aimee. If you are one of the lucky bugs who has a chance to take these classes or workshops, please drop me a note and tell me who you liked them!

Wednesday, August 21, 2013

WorldWin Papers Make-n-Take Tutorial

Good morning, Blogger Peeps! I have a little Summer CHA project to share with you today. I was asked by WorldWin Papers to create a little make-n-take for their booth and for an event they were attending after CHA. 

I created this flower tag with die cut shapes and WorldWin cardstock. To print the tutorial for this project, click HERE. All of the supplies are listed on the tutorial sheet.


I also wanted to show how you could "step up" this design, so I created a few more tags!


This one is the same size, but I made a rolled rose rather than a "flat" flower. I simply cut the cardstock with Spellbinders Rose Creations and Bitty Blossoms dies.


This one is a larger tag with more roses. 


I love the layering of ink and paper. The embossing is fantastic.


Here are a few photos of the booth. 


To see more photos of the booth, with all the fantastic papers and more items made by the DT, click HERE. Make sure you visit the WorldWin Blog to see what the rest of the team is up to!

Tuesday, August 20, 2013

There is a Season (plus a WINNER WINNER WINNER!)

Hello everyone! It is my turn on the Couture Creations Blog today. But before we get started I have to announce the winner of my prize pack!


I have 2 Couture Creations embossing folders, 1 Couture Creations die set, a ki memories sentiment stamp set, 2 ki memories 6x6 paper pads, 1 ki memories glitter pack, 1 Hampton Art stamp, and a scented embossing powder up for grabs....

Using Random.org.....The winner is......

LeAnne said...
First, let me congratulate you on being our GD! Second, when I peeked at this card in our MM gallery, I couldn't WAIT to find out the maker of that sentiment. Now, I find it you're the designer!! How cool is THAT?! I hope I can find it at ACMoore! I love your sweet, simple design....the whole card reminds me of a piece of candy!

So, LeAnne, please contact me and I will get your prize in the mail. (My email is to the left, in the sidebar.)

Now, let's get busy! I have a fall-themed card to share this time.

I created a faux patina effect for this card. It is a fun way to get more use out of your folders! I used the Endless folder from the All Occasions set.


I used a brayer to add ink to the embossing folder. I used a selection of fall colors of dye ink. Make sure you add ink to the inside of the folder, on the section containing the black Couture Creations logo. 

Place cream cardstock into the folder and emboss. Wash your folder to prevent staining. Use a heat tool to make sure the ink on the cardstock is totally dry.


Create a "patina" by using a foam or sponge ink applicator to ink over the raised areas of the embossed paper with green, blue, and dark brown ink, in that order. Allow to dry. You may use a heat tool to dry the ink if you wish. 


Ink some of the raised areas with Watermark or clear embossing ink. You only want to heat emboss a few areas to create a "rusted" look on your card. Emboss with metallic embossing powder. I created my own "rust" powder by combining several powders together. 

Trim the paper to size and use it to create a card.


I cut out the sentiment with the Rectangle and Scallop Rectangle Nesting Dies and attached it to the card with foam tape.

Thanks for joining me today! 


Couture Creations Supplies Used:
Rectangle Nesting Dies
Scallop Rectangle Nesting Dies
Endless Embossing Folder

Couture Creations Tools Used:
Foam Mounting Tape
Craft Mat

Other Supplies:
Cardstock: WorldWin Papers ColorMates Light Totally Tan, Deep Terra-Cotta, Deep Spring Green
Rubber stamps: Our Daily Bread Designs
Stamping ink: Tsukineko Memento Rich Cocoa, Kaleidacolor Cappuccino Delight; Clearsnap Colorbox Graphic 45 Decades Antique Moss, Bon Voyage, Dark Cashmere; Clearsnap Top Boss Watermark
Embossing powder: malachite, gold (Hampton Art), vintage photo (Ranger), copper metallic (Cosmic Shimmer)
Ribbon: Really Reasonable Ribbon

Monday, August 19, 2013

Merry Monday #71


Good morning! I am guest designing for the Merry Monday Challenge Blog this month! Which means you get to see a Christmas card each Monday in August...using a fantastic sketch! 

Here is the sketch for this week:


I had some fun with the card this week. I mean, really, who doesn't like Christmas in the summer?! In fact, I like Christmas all year long! (I think it should be always Christmas and never winter....)


I used the new Graphic 45 The Twelve Days of Christmas paper. I love this collection! I loved the older collection called Christmas Emporium, and this new paper is similar in style. Very vintage and classic!


I created a make-n-take project for Graphic 45, for Summer CHA, and used a "paper bauble" on it. I thought it was sort of fun, so I created one for the center of my card. These are so easy to make! I die cut various circles to make the "circle strip" across the card. Then, I made a bauble for the larger, center circle.


Cut out 5-6 circles, all the same size. I used a 1 3/8-inches circle for my bauble. Use a circle punch or a die template. I used the Spellbinders Standard Circles die template. Fold each circle in half, making sure that the desired pattern is folded to the INSIDE. Crease each fold.

Glue the "wrong sides" of the circles together to form a bauble.  Make sure to line up the straight edges. Line up the folded circles to form a "globe." Do not glue the last two circle flaps together. Attach the "flat side" of the bauble to the card with foam squares.


I used one of my stamps to stamp the sentiment. I can see I still have some work to do with learning Adobe Illustrator! But, I am still pleased to see my designs become actual rubber stamps!

Thanks for joining me at Merry Monday today. Make sure  you visit the rest of the team, and go link up your project!

The Merry Monday Team:


Cardstock: WorldWin Papers Original ColorMates Medium Berry Red, Light Totally Tan
Designer paper: Graphic 45 The Twelve Days of Christmas
Stamp: Hampton Art/Gloria Stengel Designs (available at A.C. Moore PS0793A)
Ink: Tsukineko Memento Rich Cocoa
Die cuts: Spellbinders Standard Circles Large, Small; My Favorite Things Fishtail Flag Stax and Layers
Ribbon: Really Reasonable Ribbon
Adhesive: Scotch 3M ATG tape; Scrapbook Adhesives by 3L 3D Foam Squares

Friday, August 16, 2013

Hampton Art Steampunk Altered Canvas

I have a Hampton Art "masterpiece" to share today!

Altered art and mixed media is all the rage right now and I decided to create a canvas art piece this month, using some mixed media techniques. I have some local friends who are MASTERS at this art form. We recently had a gathering and one of the gals shared a small canvas that just took my breath away. (She does not have a blog, unfortunately.) The colors on her canvas just spoke to me! I decided to make my own canvas, and try to duplicate the dark blue she used. I hope I did her proud.

My friend's canvas was not steampunk, but, I just HAD to make mine in that style! I wanted to alter something small and this 4x6 canvas board was perfect. I have had some of these canvas boards in my stash for ages. It was fun to finally use one!

I learned that the key to a successful mixed media project is to allow everything to dry between layers! While I waited for my canvas layers to dry, I created my other embellishments, such as the clock and the wings. I also altered the flowers and the metal items. {Waiting is NOT something I am good at!}

Here is a quick run-down of the order of steps for creating the layers:

1. Prep the canvas board by painting with white gesso
2. Add tissue paper using gel medium
3. Add second layer of tissue paper and gel medium
4. Create tissue paper "lumps" using gel medium
5. Cover all tissue paper with a layer of white gesso
6. Add two coats of blue paint (custom color)
7. Use modeling paste and stencil, then "color" with Smooch Spritz
8. Add modeling paste "smear," then stamp and rub with mica powder
9. Glue on micro beads, add mica powder, Smooch, and Smooch Spritz to areas of the canvas
10. Add sticker letters
11. Add wings and clock
12. Add other elements

You can see, this takes a long time, with lots of drying time between each step!


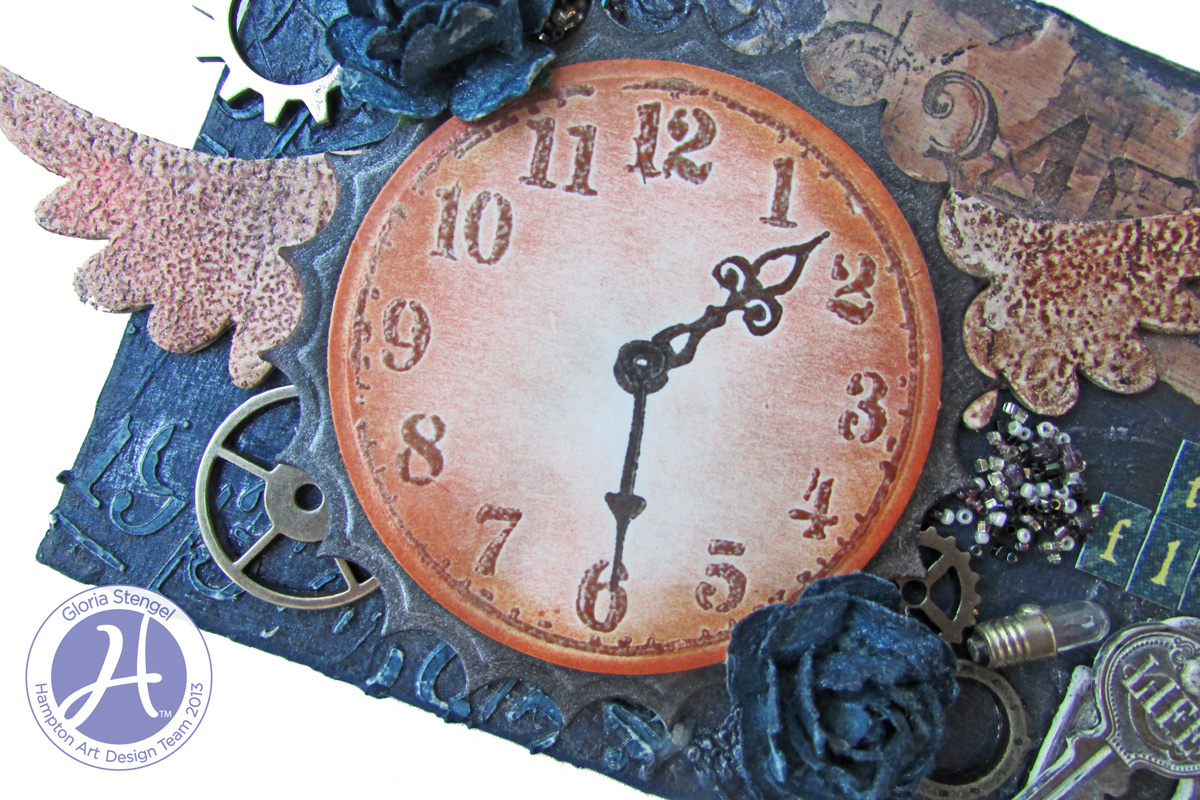
One of my layers is a strip of modeling paste, which I added with a putty knife. I stamped the Numbers image with black ink onto the DRY paste. Once the ink was dry, I rubbed the paste with mica powder. I love that it looks like old plaster.

The wings are chipboard, painted with white gesso and then embossed with several layers of white embossing powder. I then added a layer of Watermark ink and buffed the wings with mica powder. I stamped the Art Warehouse Grunge image onto each wing for added texture.


I stamped the clock image (Art Warehouse Clock) onto cardstock with Watermark ink. I then embossed the numbers with silver and gold embossing powder. I embossed the clock hands with black pigment ink and clear embossing powder.

I rubbed chalk ink onto the paper to "grunge" it up, then I buffed the ink off the embossed numbers. I then rubbed the edges of the clock with Watermark ink and brushed mica powder onto the ink. I buffed the image one last time before attaching it to the project. I used the same technique to add mica powder to the die cut "cog" behind the clock. I brushed the black cardstock with silver mica powder.


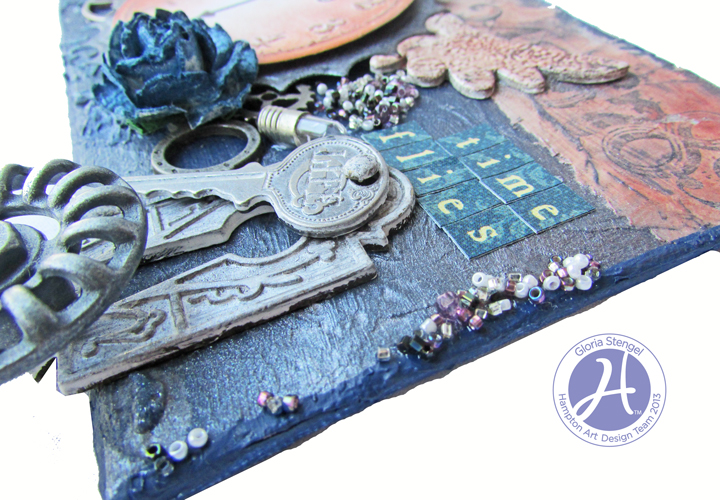
I added one of my signature embellishment groups: flowers, gears, and a tiny light bulb. I also added some tiny micro beads. I sprayed the flowers with Smooch Spritz BEFORE I added them to the canvas. The blue flowers were white, but I sprayed them with Sea Breeze Smooch Spritz and the black flowers I sprayed with Vanilla Shimmer Smooch Spritz.


I created a "lumpy" canvas by painting over tissue paper. Most of my lumps are hidden under the other items that I glued to the top, but you can see a bit of it here. I added some metal items, which I "antiqued" with white paint. My favorite part is the fact that the "spigot" knob fit perfectly into the hole at the bottom of my Graphic 45 metal keyhole. So Steampunk-y!


I used some glue to add micro beads to the very edge of the canvas. I added some sticker letters to spell out my title.


Here is a close-up of how I used the modeling paste and a stencil to add some raised numbers. You can see just a bit peeking through. I "colored" them with Smooch Spritz once the paste was dry.

I hope you had fun looking at my little altered Steampunk canvas! I had a ton of fun making it!


Hampton Art stamps:
Numbers (PS0531)
Art Warehouse: background (PS0713), Clock (SC0218)

Hampton Art supplies:
Embossing powder: gold, silver, clear, white

Clearsnap ink/paint:
Smooch Spritz: Sea Breeze, Vanilla Shimmer
Smooch: Silver Fox, Illuminate
Colorbox Chalk: Blackbird, Toffee, Gray Whale
Colorbox Pigment: Black, Silver, Bronze
Top Boss: Watermark

Other supplies:
Canvas: Dick Blick
Flowers: Wild Orchid Crafts
Gears, key, knob: Tim Holtz
Light bulbs: Sky Blue Pink
Keyhole: Graphic 45
Micro beads: unknown
Other ink: Staz-On Jet Black; Viva Inka-gold Copper
Paint: Apple Barrel Cobalt Blue; Making Memories Dusk, Grapevine; Martha Stewart Beetle Black; Folkart Whicker White
Mixed Media: : Liquitex Modeling Paste, Gel Medium, Gesso
Mica powder: Pearl Ex Antique Silver, Copper; Cosmic Shimmer Silver
Chipboard wings: Maya Road
Stickers: Graphic 45 French Country
Die templates: Spellbinders Large Classic Inverted Scallop Circles, Standard Circles Small
Stencil: Crafters Workshop Mini Bingo
Tissue paper: craft supply
Cardstock: black, white
Adhesive: Scrapbook Adhesives by 3L 3D foam squares; Ranger Glossy Accents